I’ll help you set up a woodworking shop in a corner of your apartment without sacrificing your living room or annoying your neighbors. The trick isn’t having a massive workshop; it’s choosing the right spot and using smart storage solutions. Before you buy a single tool, you’ll want to figure out where dust goes, how to manage noise, and what gear actually fits in tight quarters.
Let me walk you through the essentials that’ll get you building.
Choose Your Apartment’s Best Woodworking Spot

Finding the right spot for your woodworking setup can affect your apartment workshop’s success. The best location won’t interfere with your daily life. Look for a corner in your living area, a closet workspace, or a balcony, somewhere you can actually work without constant interruptions.
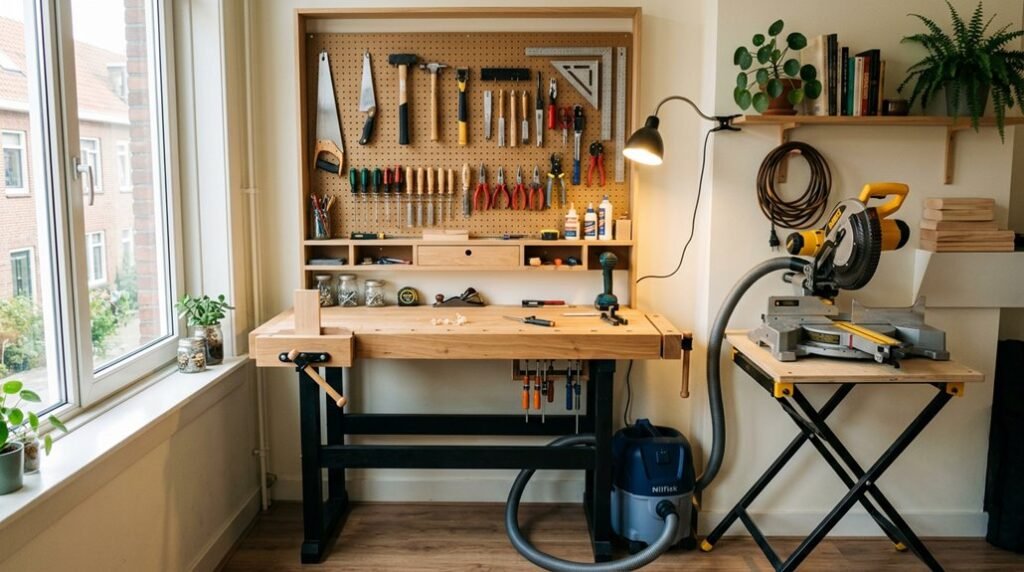
The ideal small space needs easy wall access for a fold-down bench or pegboard. This keeps your most-used tools, like a cordless drill, handheld sander, and compact circular saw, within arm’s reach. Your apartment workshop setup should stay separate from living areas when you’re not using it.
Climate matters too. Choose a dry, climate-controlled spot to protect stored lumber from warping. A balcony works great if you add weather protection. This thoughtful placement lets you pursue your woodworking passion while respecting your shared living space.
Measure Space and Map Your Workflow

How much room do you actually have to work with? Grab a measuring tape and map out your space precisely in square feet. Note where walls, doors, and windows sit—this shapes everything.
Measure your space precisely in square feet, noting wall, door, and window placement—it shapes everything.
Start your space planning by creating three distinct zones:
- Tool Storage Zone – Place this near your entrance for easy access and to keep clutter contained
- Cutting and Assembly Area – Position this centrally to minimize walking between tasks
- Finishing Zone – Locate this near ventilation or a window for airflow
Your workflow mapping should flow linearly from storage to milling, then cutting, assembly, and finishing. Arrange compact tools like cordless drills and track saws within arm’s reach.
Test configurations using rolling carts before committing to permanent placement. This flexible approach lets you reconfigure as projects change, maximizing your apartment’s potential without feeling cramped.
Control Dust and Noise Before Setup

Why does sawdust seem to travel everywhere in an apartment, coating surfaces you didn’t even know existed? It’s time to tackle dust containment before you buy your first tool.
I recommend investing in a shop vac with a dust separator, which will extend your filter’s life substantially. Install an air filtration unit to continuously clean your space during and after work. For finishing tasks, I’ll move those outdoors or use a window fan for exhaust. This keeps solvent fumes and particles outside where they belong.
Store finishes in fireproof, ventilated cabinets to prevent dangerous buildup. Use drop cloths and mats to contain sawdust in controlled areas, reducing cleanup and indoor tracking. These steps create a healthier, cleaner apartment workshop that your neighbors will appreciate too.
Pick Portable Tools for Small Apartments

When you’re working in tight quarters, choosing the right tools is important, and that means picking equipment that won’t eat up your floor space or require a dedicated workshop. I’d recommend focusing on portable essentials like a cordless drill, compact circular saw, and a 7 1/4-inch miter saw that you can store away when you’re done.
Consider adding a rolling tool cart so you can move your setup to wherever you need it. The key is matching your tools to your space: think vertical storage in labeled bins and wall-mounted work surfaces rather than permanent installations that’d lock up your apartment.
Space-Saving Tool Selection
What makes a woodworking shop work in an apartment? Space-saving tool selection. I’ve found that choosing the right equipment creates a functional workspace in cramped quarters.
Here’s my approach to staying smart about tools:
- Bench-top tools over full-size machines – A portable table saw handles most cuts without consuming floor space like stationary equipment would.
- Cordless tools for flexibility – My drill, circular saw, and sander eliminate cord clutter and let me move freely around tight areas.
- Modular storage solutions – Rolling carts and fold-down surfaces keep essentials accessible while disappearing when I’m done working.
I’ve learned that prioritizing portable, cordless options means I’m not sacrificing capability for square footage. You’re building a genuine workshop, not just storing tools in your living space.
Mobility and Flexible Storage
Once you’ve got your tool collection sorted, the next move is making sure everything actually fits and works in your space, and that’s where mobility becomes your best friend.
A fold-down workbench mounted on your wall becomes your workshop when you need it, then disappears when you don’t. Rolling tool carts let you move your supplies around easily, adapting to whatever project you’re tackling.
For vertical storage, pegboards and magnetic strips keep your portable power tools within arm’s reach while freeing up valuable floor space. Store lumber vertically too; it takes up less room than laying it flat.
This approach means your 100–200 sq ft apartment works harder for you. Everything stays accessible, nothing gets permanently anchored, and you’re building something meaningful in a space that’s truly yours.
Install a Fold-Down Workbench

How much floor space would you reclaim if your workbench disappeared into the wall?
Reclaim precious floor space with a wall-mounted fold-down workbench that vanishes when not in use.
A fold-down bench is a useful solution for a compact workshop. Here’s what makes it work:
- Right dimensions matter – Around 40 inches long by 18 inches deep gives you genuine workspace without hogging your living area.
- Wall-mounted stability – A sturdy hinge system attached to your wall or cabinet keeps everything secure during actual work.
- Smart dual purpose – When folded up, it becomes furniture or blends into your décor, hiding your woodworking life completely.
Pair your fold-down bench with a front vise and planing stops. You’ll handle hand-tool projects and clamping tasks easily. Then fold it away.
Your apartment stays livable while you keep your passion alive.
Maximize Wall Space for Tool Organization
With your fold-down workbench taking care of horizontal space, you’ll want to turn your walls into a tool-storage powerhouse that keeps everything visible and within arm’s reach. I’ve found that combining pegboard systems, magnetic strips, and French cleats gives you the flexibility to organize tools exactly how you work and change that setup whenever your projects demand something different.
Let’s explore each of these wall-mounting strategies so you can use bare apartment walls to create an efficient storage system that actually makes woodworking easier.
Wall-Mounted Pegboard Systems
Because apartment space comes at a premium, pegboards are one of your best allies for keeping tools organized and accessible. I’ve found that standard pegboards with 1/4-inch holes and 1-inch spacing work perfectly for hanging hooks, bins, and custom holders.
Here’s how I set up my system:
- Install at work-height – Position your pegboard at arm’s reach to improve workflow and keep frequently used tools within grabbing distance.
- Add labeled storage – Use transparent bins and labeled hooks so you’ll instantly know where each tool belongs, reducing clutter and search time.
- Combine with French cleats – Mount magnetic strips or French cleats above your pegboard for heavier metal tools that don’t hang well.
Avoid placing pegboards in far corners. This wall storage organization approach makes your apartment workshop into an efficient, functional space where everything has its place.
Magnetic Strips For Metal Tools
Pegboards work great for organizing lots of tools, but they have limits, especially when you need quick access to your metal tools without hunting through hooks and bins. That’s where magnetic strips shine. I’ve found they’re highly effective for space-saving storage in tight apartment workshops.
Strong neodymium magnet strips mounted at eye level give you instant visibility and access to chisels, screwdrivers, and other metal hand tools. Install them along your tool wall in staggered heights to accommodate different tool sizes. This magnetic strips approach frees up precious pegboard and drawer space for non-metallic items.
| Strip Type | Pull Strength | Best For |
|---|---|---|
| Standard | 5-10 lbs | Light chisels |
| Neodymium | 20-50 lbs | Heavier tools |
| Heavy-duty | 50+ lbs | Large metal tools |
Label each bay and reorganize periodically to maintain an orderly, clutter-free metal-tool zone.
French Cleats For Flexibility
How can you reorganize your apartment workshop whenever your tool collection changes without constantly drilling new holes and patching drywall?
French cleats solve this problem. These horizontal wall-mounted rails use 1-inch-thick wood cut at 45 degrees to create a secure, adjustable system for hanging brackets and bins.
Here’s why French cleats work brilliantly for space optimization:
- Flexible repositioning – Move heavy items without re-drilling or wall damage
- Modular storage – Swap tool holders as your needs evolve
- Weight distribution – Multiple cleats safely support handheld and lighter power tools
Position frequently used items at eye level for quick access. Reserve higher cleats for lighter or occasional tools. This strategic arrangement maximizes your vertical wall space while keeping everything within arm’s reach, making cramped apartments into functional woodworking studios.
Use Mobile Storage to Free Floor Area
When you’re working in a tight apartment space, where do you put all your tools and materials? Mobile storage is your answer. Rolling tool cabinets and workbenches let you move everything to your work zone, then tuck them away when you’re finished.
I’ve found that rolling lumber carts consolidate raw materials beautifully, while mobile storage bins keep accessories organized without eating up floor space. The real trick is to label and color-code your mobile units. I use different colors for different tool categories, making space optimization automatic; I grab what I need instantly.
Combine these rolling solutions with wall-mounted pegboards for frequently used hand tools. This hybrid approach makes your apartment a functional woodworking space that doesn’t feel cramped.
Set Up Task Lighting and Safe Outlets
Why does your apartment woodshop feel like a cave when you’re trying to cut dovetails? Poor lighting and unsafe electrical setups sabotage your work quality and safety. Here’s how I’ve improved my space:
- Install LED shop lighting – I mounted linkable LED fixtures overhead for consistent, flicker-free illumination that stays bright even in cold apartments. They run multiple units from a single outlet, saving space.
- Position task lighting strategically – I added focused lights directly above my workbench to eliminate shadows during detailed joinery. This prevents mistakes on precision cuts.
- Create safe outlets – I installed surge-protected outlets along walls near work zones. I also added a weatherproof outlet box near my sanding area to protect connections from dust and debris.
These upgrades made my apartment woodshop into a functional, safe workspace where I can actually see what I’m doing.
Start With Small Projects That Fit Your Space
When you’re working in a small apartment, you’ll want to match your projects to your actual space, think bookshelves, spice racks, or small toolboxes rather than full furniture pieces. Starting with beginner-friendly designs that you can finish in a weekend keeps your apartment from turning into a permanent workshop and gives you quick wins that build your confidence.
As you tackle these smaller projects and master basic skills like measuring, cutting, and finishing, you’re naturally preparing yourself for more complex builds down the road.
Scale Projects To Space
How do you start building skills and confidence when you’re working in tight quarters? You scale your projects to match your space. I’ve learned that apartment woodworking thrives when you think strategically about what you build.
Consider these manageable starting points:
- Compact projects like shelves or toolboxes that fit through doorways and don’t dominate your workspace
- Simple designs using minimal parts, reducing hardware clutter and organization headaches
- Portable finished pieces you can move or store easily once complete
Choose materials like pine or plywood that don’t require extensive space for handling. Keep your compact tools and organization systems efficient.
Plan each project’s footprint before starting. Measure your workspace and the final piece’s dimensions. This approach lets you complete projects without overwhelming your apartment while building real momentum toward bigger challenges ahead.
Choose Beginner-Friendly Designs
The smartest move I’ve made in apartment woodworking is picking projects that don’t fight against my space, and you can too. When I started my small shop, I realized that beginner-friendly projects aren’t just easier; they’re smarter for apartments. I focus on self-contained pieces that fit my closet and finish within a weekend.
| Project | Size | Time | Skill Level |
|---|---|---|---|
| Bookshelf | 24″×36″ | Weekend | Beginner |
| Spice Rack | 12″×18″ | 6 hours | Beginner |
| Toolbox | 18″×12″ | 8 hours | Beginner |
| Crate | 16″×16″ | 4 hours | Beginner |
Starting with pine or plywood keeps apartment woodworking manageable indoors. These materials cut cleanly and finish quickly without specialized equipment.
You’ll build momentum completing projects fast, which keeps you motivated in tight quarters.
Build Skills Progressively
Why rush into complex joinery when you can master the fundamentals with projects perfectly sized for your apartment?
Your small workshop thrives when you build strategically. Here’s how I’d approach progressive practice:
- Start with bookshelves or spice racks: these teach measurement, cutting, and assembly without demanding advanced skills or excessive space.
- Use beginner-friendly materials like pine or plywood, which are forgiving and affordable as you learn.
- Complete projects within weekends to maintain momentum while your apartment stays organized.
As your confidence grows, I gradually increase complexity. Compact tools like cordless drills and hand saws keep my workspace uncluttered. Each finished project builds muscle memory and understanding.
You’ll discover what techniques work for your setup, making your next challenge feel manageable rather than overwhelming.
Keep Your Apartment Safe and Dust-Free
When you’re working with wood in a small space, dust and fumes aren’t just annoying, they’re legitimate concerns for you and your neighbors.
Start with proper ventilation. A window fan or exhaust setup vents fumes away from living areas. Position your finishing work in a dedicated, well-ventilated zone away from bedrooms.
For dust collection, invest in a shop vac with a dust separator. It’ll keep your vacuum working longer. A portable dust collection system captures sawdust right at the source, minimizing spread.
Smart space organization matters too. Create a clean zone near your entrance with a mess-resistant rug to contain debris. Store finishes and solvents in a fireproof cabinet to prevent fume buildup. Hand tools create less dust than power tools, keeping your apartment cleaner overall.
Upgrade Your Tools as You Get Better
Your tool collection should evolve with your skills—upgrade strategically, not impulsively, as your projects grow more ambitious.
As your skills improve and projects get more ambitious, your tool collection needs to evolve with you. You don’t need everything at once, that’s the beauty of starting small in your apartment.
Here’s how to upgrade strategically:
- Assess your actual needs – Before buying, ask yourself what your next three projects require. This prevents dust-collecting impulse purchases.
- Invest in compact versions first – Upgrade to a better cordless drill or a track saw before considering larger equipment. These space-saving tools deliver serious capability.
- Plan for off-site access – As you advance, rent time at a shared workshop for bigger machines like planers or bandsaws rather than storing them.
Upgrading thoughtfully means you’re always ready for your next challenge without sacrificing your living space.


