When you’re staring at a warped board that’s cupped, bowed, or twisted, the jointer becomes an essential tool. I’ll show you how this machine flattens rough lumber into perfectly squared stock with parallel faces, which is the foundation every woodworker needs.
But here’s the point: most people use it wrong, and that’s where tear-out happens. Want to know the correct sequence?
Do You Actually Need a Jointer?

Whether you need a jointer really depends on what kind of woodworking you’re doing and where your lumber comes from. If you’re buying pre-milled S3S or S4S stock from the store, you can probably skip it. But if you’re working with rough-sawn lumber, a jointer becomes necessary for stock preparation.
Here’s why: a jointer handles flattening and edge jointing, two tasks that create two-sided flatness and square edges. This matters because you can’t get parallel faces or proper face planing without starting with a flat surface. Think of it as building a foundation before constructing a house.
For beginners, consider your project load. Occasional projects? You might manage without one. Working regularly with rough lumber? A jointer significantly improves both your workflow and results.
Jointer vs. Planer: What’s the Difference?

Many woodworkers mix up these two machines, but they’re actually teammates with different jobs. I’ll break down what each does so you can understand why you need both.
Many woodworkers confuse the jointer and planer, but these teammate machines actually have distinct and different jobs.
The jointer flattens and squares your boards, while the planer brings uniform thickness. Here’s the key distinction:
- Jointer removes warp, crook, and cup from one face
- Jointer squares edges to your flattened face
- Planer makes both faces parallel and consistent
- Planer requires a flat reference surface first
Together, they prepare rough boards into perfectly milled stock. Think of it this way: the jointer’s your setup tool, preparing surfaces. The planer finishes the job, creating that uniform thickness you need.
You really can’t skip the jointer, it’s your foundation for everything that follows.
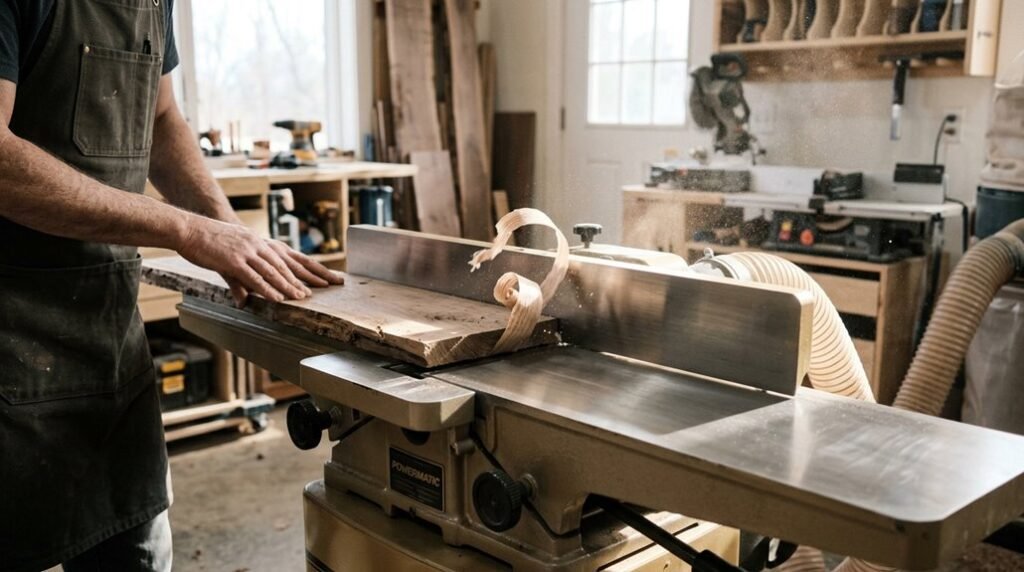
Four Essential Jointer Components

Since a jointer’s job is to flatten and square your boards, it needs four main parts working together in perfect harmony.
First, the infeed table feeds your stock into the machine. I adjust its height to control how much material I’m removing. Next, the outfeed table catches your board after the cut and must stay perfectly coplanar, meaning it aligns flush with the cutter head. The cutter head spins rapidly, actually doing the stock dressing work.
Finally, the fence runs perpendicular along both tables, guiding your board straight. When these components work together, I get flat, square results every time. Getting them properly aligned is necessary for successful jointing.
How Grain Direction Prevents Tear-Out

Now that you’ve got your jointer dialed in and ready, there’s one more thing standing between you and a perfectly flat board: grain direction.
I can’t stress this enough—grain direction makes or breaks your results. Here’s what I focus on:
- Orient your board so the knife rotation cuts with the grain slope, not against it
- Joint downhill along the grain to reduce tear-out and achieve smoother face and edge flattening
- Feed the stock in the direction that aligns with the cutter head’s rotation
- Maintain consistent stock-crossing pressure on each pass
- When grain reverses, prioritize the dominant slope that cuts with the grain
Think of it like petting a cat: stroke downhill, and you’ll get smooth results. Go against the grain, and you’ll ruffle everything up.
Face-Jointing First, Then Edge: The Right Order

I face-joint first because it gives you a flat reference surface; think of it like creating a stable foundation before building a house. Once you’ve got that flat face, you rotate your board 90 degrees and edge-joint against the fence, which makes the edge come out perfectly square to the face you just created.
This order matters because you can’t get a truly square edge if your starting face is already cupped or twisted.
Why Face Comes First
When you’re working with rough lumber, getting the sequence right is important, and that is why we always flatten the face first. Face jointing establishes your reference face, which becomes the foundation for everything else. Here’s what makes this order important:
- Removes warp, cup, and bow before edge jointing
- Prevents the board from rocking against the fence
- Creates a stable surface for planer support
- Ensures edge squareness relative to the flattened face
- Sets up proper workflow order for consistent results
Squaring The Edge After
What’s the next logical step once your face is flat and true? You’re ready to square the edge. Rotate your board 90 degrees and position it against the fence. This step uses your newly jointed face as a reference for flatness, the solid foundation you’ve established.
Run the straight edge along the jointer, maintaining consistent pressure throughout. The fence alignment keeps your edge perpendicular to that flat face you created. This produces a 90-degree angle between surfaces.
Here’s what prevents problems during edge jointing:
- Feed the board smoothly to avoid tear-out
- Keep steady pressure against both the fence and table
- Watch for twist or crook issues beforehand
When you nail this sequence, you have two square, parallel surfaces ready for the next milling steps.
Jointer Depth of Cut: Settings by Stock Type
The depth you set on your jointer isn’t one-size-fits-all; it depends on what kind of wood you’re working with and what shape it’s in. I’ll walk you through the general guidelines for different situations, from straightforward stock to tricky warped boards, plus how grain direction affects your cut depth.
Understanding these settings helps you get flat surfaces without chewing up your wood or creating tear-out that ruins your work.
General Use Guidelines
Getting your depth of cut right is key to smooth, safe jointing, and it’s simpler than you might think. I’ll walk you through the essentials so you’re confident every time you approach the jointer.
The infeed table height controls your depth of cut, while the outfeed table stays flush with the cutter head. Here’s what I recommend for different situations:
- General use: 1/32 inch per pass
- Rough stock: Slightly deeper cuts acceptable
- Badly warped boards: Up to 1/8 inch maximum
- Test passes: Always start shallow first
- Consistent pressure: Maintain steady feed rate throughout
Start with a shallow test pass to check how your stock responds. Feed slowly and steadily, applying consistent pressure from infeed to outfeed. This prevents scalloping and tear-out, giving you that flat board you’re after.
Heavy Stock Milling
Milling thicker or heavier boards demands a different strategy than jointing thin stock. You can’t just crank the infeed table down and push through in one go. Instead, take multiple shallow passes to maintain flatness and reduce tear-out.
For warped or cupped stock, adjust your feeder direction to remove the most material while minimizing deflection. Longer boards need slower feed rates and extra support to stay firmly against the fence.
| Stock Type | Depth of Cut | Passes | Notes |
|---|---|---|---|
| General Use | 1/32 inch | 2-3 | Standard edge jointing |
| Heavy Stock | 1/16 inch | 4-5 | Reduces deflection |
| Rough/Warped | 1/8 inch max | 6+ | Control tear-out |
| Longer Boards | 1/32 inch | Multiple | Extra fence support |
Lower the infeed table progressively as the board becomes truer, making each pass easier to manage and safer to execute.
Grain And Defect Orientation
Why does grain direction matter so much when you’re working at the jointer? Because cutting against the grain causes tear-out, those ugly fiber splinters that ruin your board’s surface. I always cut downhill with the grain slope to get clean results.
Here’s what I focus on for successful jointing passes:
- Grain direction: Cut with the slope, not against it
- Defect orientation: Position cupped boards with higher grain toward the cutter
- Stock alignment: Use a featherboard to maintain consistent pressure
- Board flatness: Take lighter cuts (1/32 inch) on end grain to prevent binding
- Jointing passes: Multiple shallow passes beat one heavy cut
For twisted or warped stock, I apply steady pressure on one side to prevent rocking. This keeps my board stable and flat. With proper defect orientation and careful stock alignment, I flatten boards efficiently while maintaining beautiful surfaces.
Feeding Technique for Straight, Square Results
How you feed a board through your jointer matters just as much as the machine itself; it’s really the difference between getting a clean, square edge and fighting with tearout and uneven surfaces.
Start by maintaining steady feed pressure from infeed to outfeed, pressing the board firmly against the fence. This keeps your cut straight and consistent. Next, align your feeding direction with the grain slope. Always move downhill to minimize tearout and get smooth results.
For depth of cut, begin shallow at around 1/32 inch and test it. You can gradually increase to 1/8 inch for heavily warped boards. When edge jointing, keep your previously jointed face against the fence. This preserves perpendicularity and keeps your edge square.
Avoid rocking by applying steady pressure on one side throughout each pass.
Safety Essentials: Guards, Push Blocks, and Minimum Sizes
Perfect feeding technique means nothing if your hands end up near the spinning cutter head; that’s where safety gear steps in. I can’t stress enough how critical proper equipment is when operating a jointer.
Here’s what I rely on for safe jointing:
- Guard protection over the cutter head
- Push blocks to keep hands clear during cuts
- Minimum workpiece size of at least 12 inches
- Eye and ear protection as standard practice
- Fence square at 90° for stable cuts
I always keep my fence square and my blades sharp. Dull blades cause tear-out and accidents. Push blocks maintain consistent pressure from infeed to outfeed without risking contact with rotating blades.
Never work pieces shorter than 12 inches; they’re unstable and dangerous. Cutter head protection combined with proper safety practice keeps you jointing confidently.
How to Flatten a Warped Board
Before you can flatten a warped board, you’ll need to spot what’s wrong with it: whether it’s cupped (curved across the width), bowed (curved along the length), twisted, or some combination. I’ll walk you through the jointer setup and technique that’ll help you tackle these defects systematically, starting with light passes of about 1/32 inch to gradually bring that uneven surface back to flat.
The key is understanding how to position your board and adjust the infeed table so the cutter head removes just enough material each pass without causing tear-out or safety problems.
Identifying Board Defects
Why do some boards look twisted or bent even when they’re lying flat on your workbench? Wood moves and warps over time, and spotting these defects is your first step toward using a jointer effectively.
I’ve learned to identify the main defects:
- Warp: The entire board twists like a spiral
- Cup: The face curves across the width (like a bowl)
- Bow: The board bends lengthwise
- Crook: The edge curves along its length
- Twist: Opposite corners don’t touch a flat surface
Once you recognize what you’re dealing with, face jointing becomes essential to your process. You’ll take several shallow passes, gradually removing material until that flat reference surface appears. This approach prevents tear-out and keeps your board stable against the fence throughout the process.
Jointer Setup And Technique
Getting your jointer dialed in correctly keeps you efficient and prevents frustration with your machine.
Start by setting your infeed table to a shallow depth of cut, about 1/32 inch works great for beginners. Feed your warped board steadily against the fence, orienting the grain to minimize tear-out. You’ll feel the planing improve as you move from infeed to outfeed table with consistent pressure.
For face-jointing, keep your previously jointed face touching the fence. This prevents tipping and provides a true edge. Work gradually, increasing depth only if material removal seems insufficient.
Always use push blocks and avoid boards shorter than 12 inches. These practices keep you safe while you flatten your stock smoothly.
Beyond Flattening: Chamfers, Bevels, and Tapers
Once you’ve mastered flattening stock on your jointer, you’re ready to explore its hidden talents. Beyond basic face jointing, your jointer creates professional details that improve your projects.
Master basic jointing, then unlock your jointer’s full potential for creating professional details that elevate every project.
I’ll guide you through three essential techniques:
- Chamfers: Tilt your fence to 45 degrees, then run edges across the cutter head for decorative beveled corners
- Bevels: Angle your fence between 0-90 degrees to cut sloped surfaces along boards
- Tapers: Vary feed direction and edge orientation for gradual thickness reduction
- Rabbet joints: Make partial-depth cuts using incremental passes along edges
- Clean transitions: Keep blades sharp to prevent tear-out on angled cuts
Each technique requires controlled angle and fence guidance. Sharp blades prevent tear-out, guaranteeing clean results. Start with shallow passes, then adjust your setup incrementally.
Your jointer becomes a versatile shaper beyond its basic flattening function.


