I’ve learned that woodworking isn’t some mysterious craft reserved for experts. It’s a skill you can truly master with patience and the right approach.
When I started, I made costly mistakes: buying expensive power tools too soon, skipping safety gear, and rushing through projects. The truth is you’ll build better pieces faster by starting with hand tools, planning ruthlessly, and learning from a community that actually wants you to succeed.
But here’s where most beginners stumble…
What Is Woodworking and Why Start Now?

How many times have you walked past a handmade wooden table or shelf and wondered who created it? That could be you. Woodworking is the craft of creating useful and decorative objects from wood, think cabinets, bowls, and instruments, using hand tools, carving, and joinery techniques.
I’ll be honest: you don’t need years of experience to start. What you do need is understanding the fundamentals and prioritizing safety. Begin with basic techniques, then build skills gradually as projects progress.
You’ll learn proper hand tool handling, wood selection, and finishing methods. Each project teaches something new. You’re joining a community of makers with ancient roots; woodworking has shaped human civilization for thousands of years. It’s accessible, rewarding, and absolutely achievable for beginners ready to learn.
Five Beginner-Friendly Projects to Build Your Skills

I’m going to show you how simple projects like a basic nightstand build your confidence while teaching you real construction skills. Think of each project as a stepping stone that prepares you for the next challenge.
You’ll start with fundamental techniques (stock preparation, dry-fitting, clamping) and gradually add complexity through projects that introduce shaping, joining, and finishing. This progressive path means you’re not just making stuff; you’re developing the precision and problem-solving abilities that separate casual builders from skilled woodworkers.
Simple Projects Build Confidence
The foundation of fine woodworking isn’t built on complex joints or fancy finishes; it’s built on completing real projects that teach you how to measure, cut, and assemble wood accurately. When you build a wooden box or small nightstand, you’re not just making furniture; you’re developing skills that’ll carry through every project ahead.
Start with stock preparation by flattening and trueing your lumber on inexpensive wood. You’ll practice measuring precisely with try squares and marking knives, cutting straight edges using basic hand tools, and planning your glue-up with clamps positioned strategically.
Each completed project builds your confidence. You’ll see how marking tools prevent mistakes and how a controlled glue-up creates strong joints. These fundamentals aren’t shortcuts; they’re the real foundation of craftsmanship you’re building.
Progressive Skill Development Path
Once you’ve mastered the basics with your first box or nightstand, what’s next? I’ll guide you through a structured path that builds real competence.
Start with Carving Techniques, tackling a Tudor Rose project. You’ll develop hand-tool control and learn to visualize three dimensions, which are essential skills for detailed work.
Next, explore Marquetry and Veneering. Here, you’ll handle thin wood pieces in different colors, assembling decorative patterns. This skill development strengthens your precision and design thinking.
Then try Wood + Metal projects. Combining materials, such as a wooden tabletop with a metal base, teaches you how different mediums work together.
Finally, attempt Kitchen Turning: bottle stoppers or pepper mills. These project-based learning experiences establish foundational turning knowledge alongside core proficiency.
This progression respects your growing capabilities while keeping you challenged and engaged.
Hand Tools vs. Power Tools: What to Buy First?

Should you start by filling your workshop with loud, spinning machines, or would hand tools serve you better?
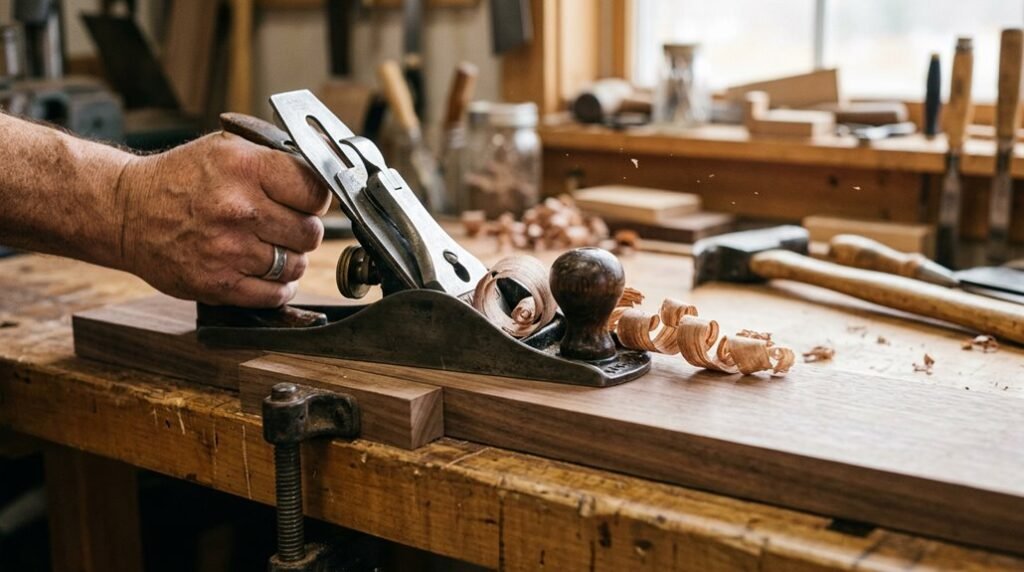
I’d recommend starting with hand tools. They’re your foundation for learning accuracy and control, the skills that make you a real woodworker.
Your starter tools should include:
Your starter tools should include a marking knife, try square, hand planes, chisels, and sharpening stones for precision work.
- A marking knife and try square for precise measurements
- Hand planes and chisels for controlled cuts
- Sharpening stones to keep edges razor-sharp
These hand tools teach you fundamentals that power tools can’t. You’ll develop feel and understanding before investing in expensive equipment.
Once you’ve mastered basic joints and jigs with hand tools, gradually add power tools. A table saw, drill/driver, and router table accelerate your work when you’re ready. This progression builds confidence and prevents costly mistakes. You’re joining a community of woodworkers who understand that patience with hand tools pays dividends later.
Safety Gear and Workshop Practices That Protect You

Now that you’re building foundational skills with hand tools, it’s time to talk about protecting yourself while you work. Start with safety glasses—they’re your first defense against dust, chips, and splinters flying toward your eyes. Wear them every single time you’re in the shop.
Your workspace matters too. Keep it clean to prevent slip hazards that can cause accidents.
For finishing work, establish fire-safe disposal methods immediately. Store rags and finish containers in a fire-rated metal container with a lid, or burn them outside safely. This prevents spontaneous combustion, a real risk with oil-based products.
Finally, prioritize dust control through proper ventilation and collection systems. Your lungs deserve protection as much as your eyes do.
Setting Up Your Home Woodworking Workshop

You don’t need a massive garage to start woodworking. I’ve built quality pieces in spaces as small as 100 square feet using handheld tools and a compact workbench.
In this section, I’ll walk you through smart space planning, the essential hand tools you’ll actually use, and the safety setup, including dust collection and ventilation, that keeps you healthy while you work.
Space Planning And Layout
Where do I start when I’m carving out a woodworking space in my home? You’ll want to claim at least a 10-by-12-foot area where you can work safely and comfortably. This space planning sets the foundation for everything ahead.
I recommend organizing your workspace strategically:
- Position your workbench near a window or bright light source for accurate visibility
- Keep dust collection systems centrally located to manage sawdust effectively
- Arrange tools within arm’s reach to minimize unnecessary movement
Your workspace organization prevents accidents and improves efficiency. Dedicate specific zones: one for cutting, one for assembly, one for finishing. This separation keeps materials organized and reduces safety precautions violations.
Start small with benchtop tools, and you’ll find that even a garage corner becomes a functional workshop when thoughtfully planned.
Essential Tools For Beginners
What separates a frustrating first project from a satisfying one? Having the right tools.
You don’t need everything at once. Start with hand tools that build accuracy: a marking knife, try square, fine hand planes, and chisels. These fundamentals matter more than you’d think.
Next, invest in a sharpening setup. Dull tools frustrate everyone.
For stock preparation, getting your wood flat and uniform, you’ll want a table saw with a cross-cut sled, plus a jointer and thickness planer. These machines handle the heavy lifting.
Safety comes first. Grab safety glasses and a respirator immediately. Your lungs will thank you.
Finally, master joinery basics before tackling complex projects. Practice on small builds. Dry-fit everything before gluing. This approach prevents costly mistakes and builds confidence.
Safety And Ventilation Requirements
Having the right tools sets you up for success, but a safe workshop is what keeps you working safely and enjoyably for years to come.
Ventilation and safety equipment are critically important when you’re woodworking. You’ll create a ton of dust when sanding, so you need a solid dust collection system that actually works. Here’s what I focus on:
- Wear a certified respirator or dust mask rated for particulates, plus safety glasses to protect your eyes and lungs
- Install proper ventilation using an open window or exhaust vent to remove fumes from finishes
- Keep your workspace organized with regular emptying of dust collection bags to prevent dangerous buildup
Store all finishes and solvents in fire-rated metal containers with tight lids. This simple setup allows you to focus on creating quality pieces without worry.
The Vocabulary You’ll Actually Use
Why do woodworkers use such specific terms for what seem like simple tasks? Because precision matters. When you’re learning woodworking terminology, you’re joining a community that speaks the same language.
Essential Terms You’ll Hear
- Joinery: How pieces connect using joints like mortise-and-tenon
- Hand planes: Tools that smooth surfaces and shape edges by shaving wood thin
- Stock preparation: Readying your wood before cutting
Understanding these basics eliminates confusion during projects. When someone mentions “jointing an edge,” they’re preparing it for glue. “Planing” smooths rough surfaces. “Routing” shapes grooves and edges with rotating bits.
You don’t need to memorize everything immediately. Pick up terminology naturally as you work. Soon you’ll confidently discuss grain direction, mortises, and wood movement like experienced craftspeople. The vocabulary becomes second nature.
Choosing the Right Wood for Your First Project
Once you’ve got your terminology down and understand how woodworkers talk, here’s the truth: not all wood behaves the same way. I’ll guide you toward woods that won’t frustrate you.
Select maple and cherry are your friends. They machine cleanly, finish beautifully, and won’t warp unexpectedly, exactly what you need when learning.
For stock selection, prioritize straight pieces with minimal defects. This reduces planing time and improves your yield significantly.
When examining potential stock, look for grain patterns that run consistently without wild swirls, edges and faces already fairly flat, and wood free from cracks, knots, or stains.
Keep your wood finish simple too. Skip heavy stains that hide the wood’s natural beauty. Let the grain shine through. Combined with quality hand tools and proper technique, honest finishes showcase your craftsmanship.
Wood Grain, Moisture, and Movement Explained
Now that you’ve selected your wood, here’s what happens next: your beautiful maple or cherry is going to move.
Wood grain direction affects how light bounces off surfaces, creating visual texture. But more importantly, moisture content drives real physical changes. Green wood, freshly cut, contains lots of water. As it dries, it shrinks unevenly. Wood contracts across its width far more than lengthwise, like a swelling that reverses.
Here’s the key: acclimate your lumber to your workshop’s humidity before machining. This simple step minimizes future movement and prevents joints from gapping seasonally.
Different species dry at different rates. Your red oak won’t behave like your walnut. High moisture content risks warping and poor finish adhesion. Lower moisture means stability and better results.
Understanding these forces prevents frustration later.
How to Read and Use Woodworking Plans Confidently
Reading a woodworking plan is like having a map before you drive somewhere; it keeps you from getting lost halfway through. I’ll walk you through understanding plans so you tackle projects confidently.
Reading a woodworking plan is like having a map before you drive somewhere; it keeps you from getting lost halfway through.
Start by studying your layout carefully:
- Create a clear cutlist showing each component’s dimensions
- Use a cross-cut sled for accurate measurements during stock preparation
- Plan your joinery before cutting anything
Next, I examine how pieces connect. Understanding joinery methods, like mortise and tenon or dovetail joints, prevents costly mistakes. Then I dry-fit everything together without glue to catch fit issues early.
Finally, develop your clamping strategy before glue-up happens. This preparation means you’re not scrambling when glue starts setting. Spending time upfront reading and planning makes chaotic projects into smooth, satisfying builds.
Four Essential Joints and How to Cut Them
Because strong joints separate a project that’ll last decades from one that falls apart in a year, mastering a few key techniques is worth your time.
Dovetail joints create interlocking pockets that look impressive and hold without nails. You’ll see them in quality drawers; the angled fingers interlock like puzzle pieces.
Mortise-and-tenon joints form the backbone of fine furniture. You cut a rectangular tenon (the protruding part) to fit snugly into a mortise (the hole). Glue alone makes them very strong.
Box joints use rectangular fingers cut into edges, offering lots of gluing surface. They’re perfect for carcass construction and honestly easier to cut than dovetails once you get the spacing right.
Each joint demands practice, but you’ll join our community of craftspeople making heirloom-quality pieces.
Five Budget-Draining Mistakes (and How to Skip Them)
I’ve made plenty of costly mistakes that could’ve been avoided: chasing the newest gadgets, skipping the tedious prep work, and jumping into projects without a solid plan. I want to help you sidestep them. You don’t need a shop full of fancy equipment or the trendiest tools to build quality pieces; instead, mastering the basics like hand planing and proper joinery will save you money and frustration.
In this section, I’ll walk you through the five budget-draining pitfalls beginners hit hardest and show you exactly how to skip them.
Chasing Trendy Equipment
How many times have you scrolled through a woodworking catalog or video and felt the urge to buy the latest tool that promises to make everything easier?
I get it. The shiniest gadgets seem like shortcuts to better results. But here’s the truth: trendy equipment drains your budget fast, especially when you’re still building skills.
Instead, invest in foundational tools first:
- Hand planes for smoothing grain and understanding wood movement
- Tools for joinery like chisels and marking gauges for precise cuts
- Stock preparation equipment like a jointer to flatten boards
These proven basics teach you genuine technique. Once you master accurate marking and safe operation, you’ll recognize which tools actually serve your projects, not your wishlist.
Skip the hype. Buy what your next project needs.
Neglecting Stock Preparation
When you skip the tedious work of trueing and flattening your wood before building, you’re inviting expensive problems down the road. Here’s why stock preparation matters: misaligned joints create gaps and twists that sabotage your assembly. Warped or uneven boards amplify errors through every step—glue-ups, veneering, finishing. You’ll waste material and time fixing mistakes.
I’ve learned that investing upfront in basic tools pays off. A straight edge, marking knife, and jointer access help you achieve the flatness your project deserves. Trueing faces and edges before planning joinery takes patience but prevents costly rework.
Skip this step, and you’re gambling with your materials and effort. Take the time. Your finished piece will thank you.
Skipping Project Planning
Why do so many woodworkers dive straight into cutting wood before sketching out their piece? I’ve learned the hard way that skipping project planning costs time and money.
A solid plan prevents expensive mistakes. Before you touch your stock preparation or even think about joinery planning, you need clarity. Here’s what I do:
- Create a detailed cutlist with exact measurements (down to 1/16 inch)
- Draw a scale drawing showing how pieces fit together
- Plan your joinery in advance; fewer joints mean fewer problems
I sketch everything at half-scale on graph paper. This simple step reveals conflicts before they happen.
When you’re deliberate about planning, your actual building goes smoother. You’ll use less material, waste less wood, and join pieces correctly the first time. That’s how you become a confident woodworker.
Keeping Your Tools Sharp: Simple Maintenance You’ll Actually Do
Ever notice how a dull chisel makes you work twice as hard?
I’ve learned that sharp tools aren’t luxuries, they’re necessities. Here’s what actually works:
Stay consistent. I do small touch-ups frequently rather than waiting until my plane’s completely dull. This keeps my edges performing well throughout projects.
Prepare properly first. Before honing, I check that my stock trueing is accurate. True surfaces mean my sharpening stone contacts the blade evenly, giving me better results.
Keep it simple. I use a proper sharpening stone or ceramic honing rod regularly. For hand planes, I finish with light stropping to eliminate the burr, that tiny wire edge.
Practice as you go. I pair sharpening with test cuts on scrap wood. This verifies my edge quality before tackling real work.
Sharp tools control better and reduce frustration. You’ll notice the difference immediately.
How to Finish Your Wood Like a Pro
A great finish can make or break your woodworking project. I’ve seen beautiful grain disappear under the wrong coating, and I’ve watched simple wood become something special with the right approach.
The secret? Proper sanding and smart finish selection. I progress through sanding grits without skipping steps, moving from coarse to fine, then use 320 grit between coats. This removes marks and creates an even surface where your wood grain truly shines.
Progress through sanding grits without skipping steps, then use 320 grit between coats to reveal your wood’s true grain.
Here’s what separates pros from beginners:
- Choose finishes that preserve natural color instead of heavy stains
- Build a reference library of finishes and their properties
- Balance glossy film coatings with oils based on durability needs
Match your finish to the wood’s characteristics, not against them. That’s when excellent results happen.
Joining the Woodworking Community and Next Steps
Once you’ve mastered the fundamentals, from selecting wood to applying that perfect finish, you’ll want to connect with other woodworkers who share your passion.
Joining a woodworking community opens doors to growth. You’ll find discussion forums and newsletters packed with recent posts, editor tips, and member notices about limited-time sales. These spaces help you feel like part of something bigger.
Take advantage of hands-on learning opportunities. The Woodworking CREATE Lab and specialized courses like Spoon Carving By Hand let you learn directly from experienced instructors. Progressive tracks guide your journey from Woodworking I Foundations through advanced specialties like Turning for the Kitchen.
Don’t overlook safety resources either. Access planning tips, stock preparation advice, and clamping strategies that structure your projects safely.
The Crucible offers classes on everything from Wooden Boxes to Woodturning I. You’re ready to step forward.


