Did you know that wood burning has been a cherished craft for centuries, yet most beginners abandon it within their first week? I’m here to change that.
You don’t need expensive equipment or natural talent to create impressive, personalized pieces. You just need the right approach. Whether you’re drawn to intricate designs or bold patterns, these five straightforward steps will help you move from nervous beginner to confident artist. Let me show you how.
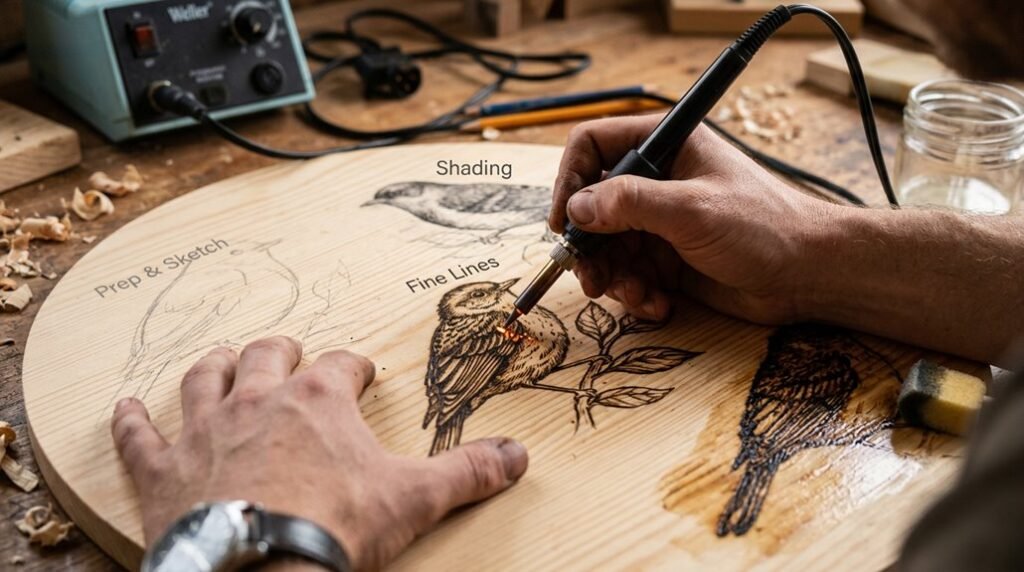
Step 1: Choose the Right Burner and Tip for Your Skill Level

What’s the first thing you’ll need to start wood burning? The right burner and nib types. I’d recommend picking a wire nib burner because it gives you access to different nib shapes as you’re learning, plus better control over your lines.
Wire nib burners offer access to different nib shapes and better line control, making them ideal for beginners learning wood burning.
Here’s what I suggest starting with:
- Writer nib: creates consistent, detailed lines
- Shader nib: covers larger areas quickly
These two nib types keep your setup simple while you build skills. Check your burner’s compatibility guide. Brands like Colwood and Optima have specific recommendations for optimal performance.
Before you begin, familiarize yourself with safety considerations and transfer methods. Always use pliers when handling hot tips, and turn off your pen before removing them.
Step 2: Select Quality Wood for Wood Burning

Now that you’ve got your burner ready, choosing the right wood is just as important as picking your tool. I’d recommend starting with pale woods like basswood or birch. They show burn visibility clearly, making mistakes obvious and easier to learn from.
Avoid wood with knots. They’re unpredictable and will throw off your control when you’re still developing your technique. Look for smooth grain instead. Even surfaces let you create intentional, controlled burns without rushing or second-guessing yourself.
Consider toxicity too. Some woods release harmful fumes when heated, so stick with beginner-safe options.
Here’s my suggestion: order a wood sampler kit. You’ll compare different woods, discover what works for your style, and join fellow burners who’ve done the same. It’s a smart investment for your wood selection journey.
Step 3: Prepare Your Wood Surface and Transfer Your Design

Before you burn a single line, your wood surface needs to be smooth and your design needs to be exactly where you want it. I start by sanding with 220 grit sandpaper to create that smooth base. Then I mist the board lightly with water to raise the grain, then re-sand for an ultra-smooth finish. This gives you crisper burns.
For design transfer, you have options. I either sketch lightly or use transfer paper to outline my design. This sketch outline becomes your guide for accuracy. When you burn along prepared lines, the work’s already half done. Whether you’re using patterns or direct sketching, map your design carefully onto the wood surface preparation. This foundation step separates beginners from sloppy work.
Step 4: Start Your First Burn With Light Pressure and Steady Movement

Your design’s now mapped out and waiting, so it’s time to pick up that pyrography pen and actually start burning. Here’s what I’ve learned: begin with light pressure on your wood burning tool. This prevents your nib from sinking and creates smoother, uniform lines.
Start along outlines or simple lines rather than jumping into shading. This builds your nib control and confidence naturally.
I recommend practicing on scrap wood like pine or cedar first. You’ll develop a feel for the right pressure without worrying about mistakes.
Move deliberately and slowly, like you’re writing, not pushing. Avoid heavy, cranking shading early on. Use one preferred tip initially to master your beginner’s burn technique with steady movement before exploring others.
This foundation makes everything easier ahead.
Step 5: Seal Your Finished Piece to Prevent Fading and Cracking

The final step separates a pyrography piece that’ll last for years from one that’ll fade and crack like old paint. I always seal my finished work to lock in those beautiful burnt lines and protect against damage.
| Finish Type | Best For | Protection Level |
|---|---|---|
| Matte Sealant | Natural look | Moisture barrier |
| Gloss Finish | High durability | Maximum shine |
| Satin Protection | Balanced appeal | Medium protection |
After cooling completely, I apply my chosen sealant. This prevention step guards against moisture, humidity, and UV fading that’ll wear down your design over time.
The right finish preserves contrast and extends your piece’s life significantly. I recommend following the guide’s specific recommendations for your project type, whether it’s a decorative box or functional coaster. Proper sealing turns temporary artwork into lasting craftsmanship you’ll treasure.


