Did you know that wood filler actually shrinks as it dries? This is why pros deliberately overfill holes. I’ve learned that applying filler correctly makes the difference between a patch that’s obviously there and one that completely disappears.
The process isn’t complicated, but it does require the right technique and materials. I’m here to walk you through each step so you can tackle your wood projects with confidence and get results that actually look professional.
Prepare Your Surface for Wood Filler

Why does wood filler sometimes fail to stick properly or cure unevenly? The answer lies in your prep work. I’ve learned that a clean surface is important.
Here’s what I do: First, I remove dust, dirt, and loose wood particles with a brush. Then I wipe the area with a damp cloth and let it dry completely. This step is crucial for proper adhesion.
For dirty or oily surfaces, I use mild detergent and water. After cleaning, I grab a tack cloth or lint-free rag to catch any remaining dust.
For larger repairs, I slightly dampen the surface beforehand. This helps the filler blend and set properly. The key is to keep everything completely dry before applying filler.
Select the Right Filler for Your Project

Now that your surface is prepped and ready, it’s time to pick the right filler. This choice matters more than you might think.
First, consider your environment. Outdoor vs indoor fillers differ significantly; moisture-resistant fillers handle wet conditions, while indoor options won’t survive outside exposure.
Outdoor vs indoor fillers differ significantly; moisture-resistant options handle wet conditions while indoor varieties won’t survive outside exposure.
Next, think about finishing. Stainable vs paintable matters because some fillers won’t accept stain after drying. Check the label—Durham’s Water Putty, for example, resists staining.
For larger repairs, you’ll want backing material supporting deeper holes, preventing shrinkage and cracking. Select a wood filler type formulated for structural strength when needed.
Finally, check drying time. Some fillers cure quickly; others require patience. Read manufacturer instructions carefully, as layering thin applications prevents problems better than one thick coat.
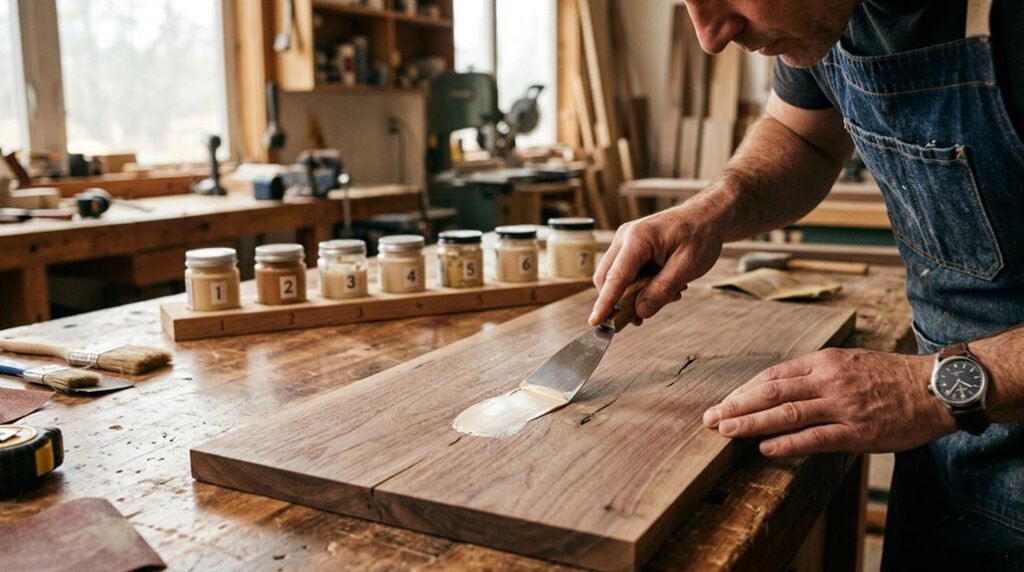
Apply Wood Filler With a Putty Knife

Now I’ll show you how to actually apply the filler using the right technique and pressure, which is important for the difference between a sloppy job and a professional-looking repair. You’ll need to think about two main things: the angle you hold your putty knife and how much force you apply as you work the filler into those holes and cracks.
Getting these basics down means your filler sits flush with the surrounding wood, giving you way less sanding work later.
Technique And Angle
The angle you hold your putty knife at affects how smoothly you can work the filler into damaged wood. I recommend holding it at a 45-degree angle, halfway between flat and straight up. This angle gives you perfect control.
I spread the filler in the direction of wood grain first. This follows the wood’s natural lines. Then I make cross-grain passes to push filler into pores and dents you might’ve missed.
For larger holes, I fill in layers. Let each layer partially dry before adding the next one. This prevents sinking and creates better shaping.
While the filler’s still soft, I scrape off excess with the flat edge and smooth everything as much as possible before it dries completely.
Pressure And Coverage
Once you’ve got your putty knife at that perfect 45-degree angle, the real work comes down to how hard you press and how completely you cover the damage. You’ll want to apply steady, firm wood filler application pressure; think of it like spreading peanut butter, but with more purpose. Press firmly into the hole using a back-and-forth motion across the grain, which helps your fill technique grip the wood’s pores.
Here’s the coverage evenness part that separates amateurs from professionals: overfill slightly beyond the surface. You’re aiming about 10-15% higher than surrounding wood. This accounts for shrinkage as the filler dries.
Use your putty knife pressure strategically; firmer strokes push filler deep, and lighter strokes smooth surfaces. For grain-directed filling, finish with single-direction strokes along the grain, then let it set before sanding.
Sculpt the Filler to Match Wood Contours

Once you’ve pressed the filler into the damage, you’ve got a narrow window to shape it before it hardens. Work quickly while the material’s still soft and malleable. I use my putty knife to carve the filler to match the wood grain’s peaks and valleys, which means less sanding work later and a repair that looks deliberate rather than patched.
Getting the texture and contour right during sculpting rather than trying to sand it into shape afterward saves you time and helps the repair blend seamlessly with the surrounding wood.
Matching Surrounding Wood Texture
Before your wood filler hardens completely, you have a narrow window to shape it into something that will blend smoothly with the surrounding wood. I use my putty knife to work along the grain alignment first, pushing the filler deep into wood pores. Then I carve across the grain to create that authentic fill texture you’re after.
Here’s my technique: work in small sections so the material stays workable. I make light fingertip checks to verify the surface matches adjacent wood perfectly. For tricky spots with visible grain patterns, I’ll use a damp cloth to soften edges and blend transitions.
Once it’s set, light sandpaper smoothing completes the job. You’ll create repairs that look natural and well-done, not like patches.
Timing Your Sculpting Efforts
The real magic happens in those first few minutes after you’ve applied the filler. You’ve got a narrow window where the wood filler stays workable, so don’t waste time scrolling your phone.
While it’s still soft, grab a putty knife and shape it to match the surrounding wood contour. Press gently along the grain direction; this alignment makes your final sanding job much easier. For larger repairs, I recommend layering: apply, let it dry completely, then add another coat.
This approach gives you better control and maintains accurate shaping throughout. Here’s the key: overfill slightly. Once your dry time finishes, you’ll sand everything flush with fine-grit sandpaper. Working within these timing constraints results in a repair that looks professional.
Reducing Post-Application Sanding Work
How much time you spend sanding later depends entirely on how well you shape the filler now.
I always overfill slightly when applying wood filler. This gives me material to work with. Using a putty knife at a 45-degree angle, I sculpt the filler to match the surrounding wood contours before it dries. I follow the grain alignment carefully, so the repair blends naturally with the original design.
Here’s my approach: work quickly on detailed areas to keep the surface workable. Once dry, I sand gradually using medium-grit sandpaper first, then move to fine-grit for a flush finish.
This technique significantly reduces sanding effort compared to starting with uneven filler. You’ll notice the difference immediately with less dust, faster results, and a polished appearance that shows you know what you’re doing.
Allow Your Wood Filler to Cure Completely

Ever wonder why rushing through a project backfires? Filler curing is where patience truly matters. Here’s what I’ve learned: drying time varies significantly; expect 2–3 hours minimum, longer for thick applications or outdoor work.
Your curing conditions matter tremendously. I keep temperatures above 50°F and maintain controlled humidity to prevent uneven hardening. For layered fills, I wait between coats to avoid trapping moisture that ruins results.
Before sanding, I always perform a hardness test. I lightly press my fingernail into the surface; it should feel solid, never tacky. This simple check prevents smudging or pulling out partially cured filler.
Skipping this step means redoing work. I’ve learned that waiting for complete curing saves frustration and delivers professional-looking results every time.
Sand the Filler Flush With Surrounding Wood
Once your filler has fully hardened, it’s time to sand it smooth and flush with the surrounding wood. I always start with medium-grit sandpaper to knock down the high spots, then switch to fine-grit for that polished finish.
Sanding technique matters. I sand in the direction of the wood grain to minimize scratches and help everything blend seamlessly. For larger patches, I use an orbit sander to get a uniform, flat surface without the arm workout.
Check your progress. I run my hand across the repair; it should feel completely even with adjacent wood. If raised areas remain, I keep sanding.
Clean between steps. I wipe away dust with a tack cloth or lint-free rag. This prevents grit from embedding in the filler and ruining your finish.
Finish With Paint or Stain for Seamless Results
Now that your filler is sanded smooth and level with the surrounding wood, applying paint or stain will hide all traces of the repair.
I always apply primer first. It helps paint stick better and gives you a uniform finish across the repaired area. Think of primer as the glue that makes everything stick around.
For staining, I use a stainable filler or pick a stain that matches my existing wood. After priming, I apply the stain carefully over the repaired spot.
Whether painting or staining, I use multiple finish coats for seamless results. Each coat needs to dry completely before I apply the next one. This patience pays off, your repair becomes invisible, blending perfectly with the surrounding wood.


