I’ve discovered that woodworking at home doesn’t require a fancy shop or a trust fund. You just need the right setup, a handful of essential tools, and honest expectations about what you’ll actually create.
The truth is, most beginners make the same mistakes I did, and they’re all preventable. Before you make your first cut, there’s one critical decision that’ll determine whether you enjoy this or get frustrated.
Before You Start: Space, Budget, and Expectations

Where will you actually work? You don’t need a fancy workshop. I’ve started projects using sawhorses and plywood on a patio or garage floor. A dedicated space beats constant setup and teardown, though.
Good ventilation and dust collection matter for your safety and air quality.
Budget Planning
Start small with hand tools and bench-top equipment before investing in larger machines. This approach saves money and space.
Material Choices
I recommend softwoods like pine for beginner projects. They’re affordable, forgiving, and easier to cut than hardwoods.
Your Workspace
Whether it’s a garage, shed, or apartment patio, make sure you’ve got room to move safely and tools within reach. This foundation sets you up for success.
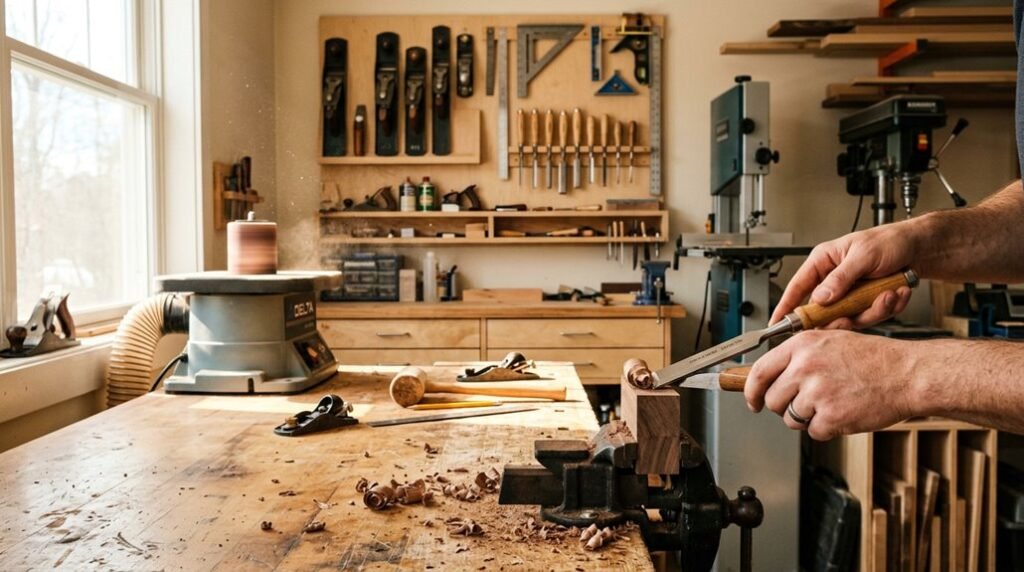
Set Up Your Home Workshop on Any Budget

Now that you’ve thought through your space and budget, it’s time to actually build your workshop. You don’t need much to start; I’ve built plenty using sawhorses with plywood on top as my workspace. Start with basic hand tools like chisels, saws, and sanders before investing in expensive equipment.
As you gain experience and confidence, gradually add larger tools.
| Budget Level | Setup Strategy |
|---|---|
| Low | Sawhorses + plywood tables |
| Medium | Add bench-top tools |
| Higher | Dedicated garage space |
| Advanced | Large stationary equipment |
Prioritize safety gear and dust collection early; your lungs will thank you. Organize your workspace setup flexibly so projects fit comfortably.
This budget-friendly approach to project planning lets you grow at your own pace while joining the woodworking community.
Starter Tools: Five Essentials Explained

When I started woodworking at home, I realized that you don’t need a garage full of expensive equipment to create quality projects; just the right five tools will handle most beginner tasks. I’ll walk you through each essential tool and explain why it’s worth the investment, plus I’ll show you how to find budget-friendly options that won’t strain your finances.
Whether you’re building picture frames or your first cabinet, these tools form the foundation that will make your work faster, stronger, and far more enjoyable.
Essential Tools for Beginners
How do you know which tools actually matter when you’re just starting out? I’d recommend focusing on five essentials that’ll set you up for success without breaking your budget.
Here’s what I’ve found works best:
- Miter saw – cuts precise angles for clean joints
- Cordless power drill – handles drilling and fastening tasks quickly
- Random orbital sander – smooths surfaces efficiently for beginner projects
I’d also grab a Kreg Jig for pocket-hole connections and a brad nailer for finishing touches. Start with bench-top equipment that fits small spaces.
These tools handle foundational projects while keeping costs down. Don’t overlook tool safety; watch YouTube tutorials and practice hands-on before diving into builds. You’ll master techniques faster through real experience than reading alone.
Budget-Friendly Equipment Options
The good news is that you don’t need to spend thousands of dollars to get started with woodworking. I’ve built plenty of quality projects using budget-friendly versions of the five essential tools.
| Tool | Budget-Friendly Pick |
|---|---|
| Miter Saw | Entry-level compound saw ($150-200) |
| Cordless Power Drill | Basic 18V drill-driver ($80-120) |
| Random Orbital Sander | Lightweight orbital model ($60-100) |
You’ll find budget-friendly options across price ranges that balance cost with durability. A Kreg Jig handles pocket-hole joinery without breaking your wallet, and it’s my go-to for strong joints.
Skip expensive belt sanders; an orbital sander tackles most beginner projects efficiently. A basic brad nailer completes your starter kit affordably.
The real investment is in online tutorials and digital courses. These teach proper tool use and workflows, maximizing your money’s value before you ever pick up a saw.
Choosing Beginner-Friendly Wood and Understanding Lumber
When you’re starting out in woodworking, choosing the right wood matters just as much as picking your tools, and I’m here to help you navigate those choices. You’ll want to understand the difference between softwoods (like pine and cedar, which are beginner-friendly) and hardwoods (which require more skill). You should also learn how to spot a straight board that won’t warp on you after your first project.
Let’s break down what makes certain woods easier to work with and how to select quality lumber that will set you up for success.
Softwoods vs. Hardwoods
Why do some woodworkers grab pine for their first project while others reach for oak? The answer lies in understanding softwoods versus hardwoods.
I’d recommend starting with softwoods like pine because they’re:
- Easier to cut – Your tools won’t strain, and mistakes are forgiving
- Lighter on your wallet – You’ll spend less money learning
- Faster to machine – Projects move quickly, keeping momentum high
Hardwoods such as oak and walnut offer superior durability and beautiful finishes, but they’re denser and trickier to work. As a beginner, you’ll want pine or whitewood.
When reading plans, note whether they call for softwoods or hardwoods. This detail shapes your finishing steps and tool requirements. Also check lumber grades and select straight boards; this reduces warping and improves your results significantly. Starting smart means better projects ahead.
Pine: The Beginner’s Choice
Now that you know softwoods beat hardwoods for beginners, let’s focus on the best starter wood: pine. I recommend pine because it’s affordable, readily available, and forgiving as you learn.
| Feature | Pine | Why It Matters |
|---|---|---|
| Cost | Low | Affordable for beginner projects |
| Workability | Easy | Machines and glues smoothly |
| Availability | High | Found at any lumber supplier |
Pine won’t punish you for mistakes. You’ll machine it easily with basic woodworking tools, and it glues without fuss.
Start with pine beginner projects like cutting boards or simple boxes to master fundamentals before investing in expensive hardwoods. Pine’s finish can look beautiful when you use proper technique. Don’t underestimate this softwood; it’s your perfect training ground.
Selecting Straight Board Stock
The most important step in choosing your pine is picking boards that are actually straight. Warped stock will cause you serious headaches during beginner woodworking and mess up your final project.
Here’s how I select quality boards:
- Hold boards at one end and lift the other to check for bowing or twisting
- Inspect from multiple angles by rotating the board and looking down its length
- Visit local lumber yards instead of big-box stores for more consistent straight boards since their stock varies daily
When you’re starting out with softwoods like pine, straightness matters more than anything else. Warped boards don’t fit together properly, making assembly frustrating.
Taking five extra minutes to inspect boards for straightness saves hours of frustration later. Your beginner woodworking projects deserve quality material from the start.
Your First Project: Build Confidence With Simple Pieces

Before you jump into building a fancy cabinet or intricate shelf, you’ll want to start with something simpler that teaches you the basics without frustrating you halfway through. A small wooden box or basic shelf is perfect for your beginners guide to woodworking at home.
These simple projects let you practice essential techniques: cutting, planing, and gluing. You’ll master joinery, which is how pieces connect together, without overwhelming complexity. Start with softwoods like pine, which are forgiving and affordable.
Your basic hand tools matter most here: a saw, drill, and sander handle most tasks. As you build confidence, you’ll gradually add equipment like routers or clamps.
Core Woodworking Techniques: Sawing, Drilling, Sanding, Finishing
How do you turn rough wood into a polished, protected piece you’ll actually want to keep? Master these four core techniques, and you’re halfway there.
Sawing means making clean cuts with handsaws or power tools. Drilling creates holes and drives fasteners precisely. Sanding smooths surfaces using progressively finer grits. Finishing seals and protects your work.
Here’s your action plan:
- Cut wood using square, plumb cuts to avoid crooked joints
- Use power tools at consistent feed rates; don’t force them
- Progress through sanding grits (coarse to fine) and remove dust between steps
Proper technique prevents grain tearing and helps finishes adhere perfectly. You’ll notice the difference immediately when staining or painting reveals a genuinely professional surface.
These skills turn rough lumber into something you’re genuinely proud to display or give away.
Establish Safety Practices Before Your First Cut
Why would you skip safety when it’s the one thing standing between you and a trip to the emergency room? I wear safety gear every single time I step into my workshop: eye protection, hearing protection, and a dust mask are non-negotiable.
Before making your first cut, read tool manuals completely so you understand how each tool works and where its guards go. Set up your workspace with good lighting and organize clamps, scraps, and tools in designated spots to prevent tripping hazards.
Install dust collection or ventilation systems to keep sawdust from filling the air and creating fire risks. Always secure your workpiece with clamps before cutting or sanding. These protective gear habits and practices aren’t boring, they’re what let you keep woodworking safely for years.
When and How to Upgrade Your Tools and Skills
Once you’ve built those safety habits into your routine, you’re ready to think about growing your workshop and sharpening your abilities.
Start with basic handheld tools like a cordless drill and random orbital sander. These handle most beginner courses and starter projects. Here’s your growth path:
- Match upgrades to project needs: don’t buy equipment you won’t use yet
- Take structured classes: beginner courses build confidence in safe tool use
- Practice with simple projects: wooden boxes or small nightstands teach fundamentals
Invest gradually in quality essentials like a miter saw or Kreg Jig as you tackle more complex work. Read manuals, watch tutorials, and apply what you learn immediately.
This approach keeps costs manageable while building real skills. You’re not just collecting tools; you’re joining a community of makers who started exactly where you are.


