You might think building a wooden box sounds complicated, but I’m here to show you it’s totally doable. With the right plan, proper cuts, and some assembly know-how, you’ll create something sturdy and useful.
The key is understanding three straightforward steps: from sketching your design to installing the final hinges. Want to know the specific wood thickness that will keep your box from warping? Let’s get started.
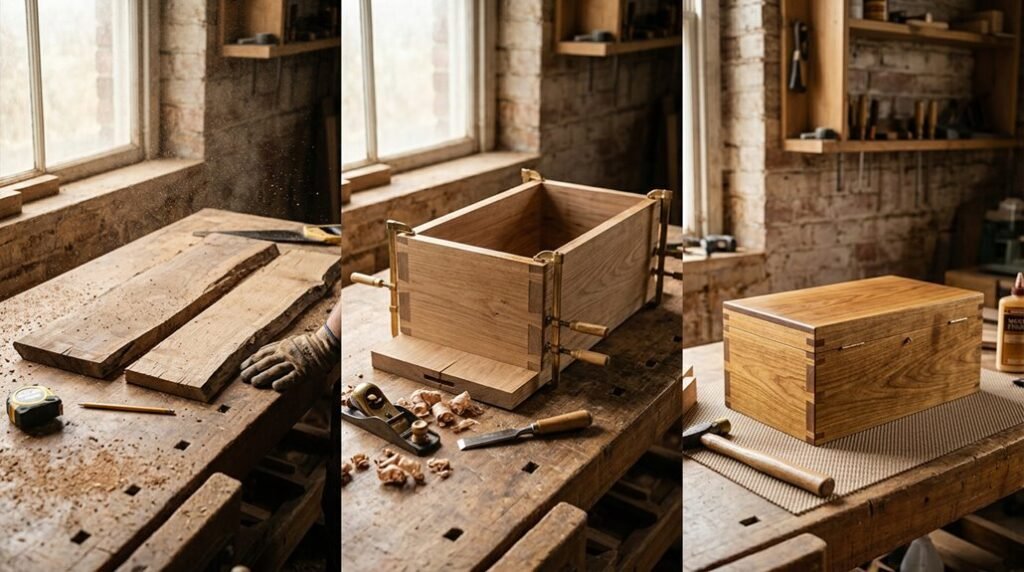
Step 1: Plan Your Box (Choose Size, Wood, and Joinery)

Before you pick up a saw or hammer, you’ll want to sketch out what your box should look like and what it’ll be made from. Start by deciding your box size—aim for practical proportions like 5×8 or 6×9 inches with a height around 3 inches. Next, choose your wood species based on appearance and durability.
Plan your material thickness carefully. I’d recommend 5/16″ to 3/8″ for sides and 5/16″ for the bottom. Think about your joinery early: butt joints work great for beginners, while box joints offer more strength.
Consider hardware needs like hinges, which require thicker sides (roughly 3/8″ to 1/2″). Finally, create a cut list using a single board when possible to minimize waste and maximize efficiency.
Step 2: Cut and Assemble Your Box Frame

Now that you’ve got your plan locked in, it’s time to turn those measurements into actual wood pieces.
Start by cutting your four sides with 45-degree miter joints. These angled cuts create clean corners. Make sure opposite sides match perfectly for true squareness. I dry-fit everything around a fresh board first, checking that corners align properly before committing to glue.
Cut your four sides with 45-degree miter joints, then dry-fit everything to ensure corners align perfectly before gluing.
Here’s my process for the box frame:
- Cut dados (grooves) 1/4″ high along maple edges
- Adjust your fence so walnut panels fit snugly into these dados
- Mark front, back, and sides with corner references to maintain grain continuity
- Glue the four sides together
- Add a 1/2″ makeup strip for proper alignment
This careful assembly helps your glue-up succeed and keeps your box square.
Step 3: Sand, Finish, and Assemble Hardware

What’s the difference between a rough wooden box and one that looks professionally made? The finishing details. I start by sanding all surfaces with 220 grit sandpaper, smoothing both exterior and interior while removing bandsaw marks. This prep work matters.
| Step | Action |
|---|---|
| Sanding | Use 220 grit on all surfaces |
| Finish Coat 1 | Apply shellac base layer |
| Finish Coat 2 | Second shellac application |
| Finish Coat 3 | Final shellac coat |
| Hardware | Install hinges with mortises |
Next, I apply three coats of shellac to highlight the wood’s figure and character.
For hinges, I mark mortises with a marking knife, mill them with a trim router to half hinge height, then use a self-centering bit for precise alignment. Finally, I test-fit the flush lid, making sure it operates smoothly before declaring my box complete and ready to impress.


