I’ve watched plenty of beginners grab every tool in sight, only to feel overwhelmed.
Here’s the truth: you don’t need much to start.
A sharp plane, a decent saw, chisels, and proper marking tools form your foundation.
But there’s an important point: having the right tools matters far less than knowing how to use them correctly.
Let me show you what actually works.
Hand Tool Mastery: Why Beginners Benefit

Why start with hand tools when power tools exist? Hand planes, chisels, and saws teach you what wood actually wants. You’ll feel grain direction through your hands, understand how wood moves, and develop real control; skills that matter with any tool later.
Hand tools teach what wood actually wants—you’ll feel grain direction and develop real control that matters with any tool later.
When you work with hand planes and chisels, you’re getting immediate feedback. The wood tells you when you’re cutting wrong. You learn to adjust your angle, pressure, and technique instantly. This builds muscle memory and confidence.
Plus, sharpening these tools matters. Keeping your chisels and planes sharp isn’t busywork. It’s where technique and results directly connect. A sharp edge cuts cleanly; a dull one fights you. You’ll see the difference immediately.
Hand tools won’t break your budget either. You’re joining a community that values skill over equipment hype.
Marking and Measuring: Where Accuracy Starts

How’d you like to cut a joint that actually fits the first time? That’s what happens when you master marking and measuring. I’ll show you why these basics matter so much.
A marking gauge creates consistent scribe lines across your board, acting as your repetition machine. A marking knife beats pencils hands down for crisp, precise lines that guide your saw exactly where it needs to go. Pair these with a quality try square, and you’ve got the foundation for accurate layouts.
Here’s what you’re building toward: joints that fit perfectly without forcing, assemblies that sit flat, and the confidence that comes from knowing your measurements are correct. You’re not just following steps—you’re developing the skills that separate amateur work from craftsmanship.
Planes: The Foundation of Surface Preparation

I’ll start you off with the truth: planes are where surface prep really happens, and you’ve got to understand the different types and how to set them up properly if you want results. You’ll work with a jack plane (No. 5/5½) first to flatten and joint your wood, then graduate to a smoothing plane (No. 4) once you’ve got flat surfaces. It’s like going from roughing out a sketch to creating a polished final drawing.
Getting these tools ready means checking that the sole is dead flat, adjusting your blade for paper-thin shavings, and learning how each plane plays a specific role in turning rough lumber into something glass-smooth.
Plane Types And Functions
Precision and patience: that’s what planes bring to your woodworking bench. You’ll find that planes work by removing controlled shavings through a flat sole and sharp blade, creating smooth surfaces from rough wood.
Core Bench Planes You’ll Need
A jack plane (sizes No. 5, 5½, or 62) handles initial flattening work, tackling material quickly. Once you’ve roughed out your surface, you’ll switch to a smoother for that final polish.
Your smoother demands precision. It needs a dead-flat sole and tight mouth to produce paper-thin shavings. This creates the smooth finish that separates amateur work from professional results.
Pro Consideration
Bevel-up smoothers like Veritas offer adjustable blade geometry, making them versatile for figured or straight-grained wood. Proper maintenance, including sharpening blades, adjusting depth, and keeping soles true, produces consistent, beautiful results on every project.
Setting Up For Success
Why do your joints fit poorly even when you measure carefully? The answer often lies in surface preparation. I’ve found that flattening your wood properly makes everything else easier.
Start with sharpening. A dull blade tears wood fibers, creating rough surfaces that won’t mate cleanly. I keep my plane irons sharp, and it’s non-negotiable.
Next, match your tools to the task. Use a jack plane for initial flattening on larger surfaces. Follow with a smoother for that glass-like finish. A block plane handles edges and tight spots.
Finally, dial in your setup. A dead-flat sole and properly set blade mouth determine success. These adjustments seem small, but they’re what separates frustrating projects from satisfying ones.
Master these fundamentals, and you’ll join experienced woodworkers who produce truly accurate joinery.
Saws: Choosing the Right Blade for Every Cut

The blade you choose affects how smoothly a saw cuts through wood versus how much resistance you encounter. Understanding saw blades and teeth-per-inch (TPI), the number of teeth along each inch, helps you pick the right tool for different cut types.
- Rip saws use 26 TPI teeth for fast cuts along the grain
- Crosscut saws feature 26 TPI for cleaner cuts across the grain
- Tenon saws offer 18 TPI with shallow depth, perfect for joinery work
- Japanese pull saws like dozuki models cut on the pull stroke for precision with less effort
Start with a carbide-tipped combination blade for versatility. As you tackle specific projects, add specialized blades: finishing or dovetail versions that match your growing skills.
Chisels: Precision Tools for Joint Work and Detail

I’ll show you how to pick the right chisels for your projects, keep them sharp enough to shave with, and use them with the control that separates sloppy cuts from clean joints. You’ll discover that chisels come in different types: bevel-edge varieties in sizes like 6, 13, 19, and 25 mm for general work, and mortise chisels for hollowing out joints, each with its own job to do.
Understanding how to grip, angle, and maintain these tools changes them from frustrating instruments into extensions of your hands that make precise detail work feel almost effortless.
Chisel Types and Sizes
How do you pick the right chisel for the job? I’ll walk you through the main types you’ll need as you’re building your toolkit.
- Bench chisels (1/8, 1/4, 3/8, 1/2 inch) handle your everyday paring and waste removal; they’re your workhorses
- Paring chisels (1.5 to 2 inches wide) define joint edges and tackle precise hand work without mallet force
- Bevel-edge chisels cut dadoes and reach slim spaces thanks to their angled sides and superior edge retention
- Mortise chisels (6 mm and 13 mm) absorb heavy mallet strikes for aggressive square-edged mortise work
You’ll pair most chisels with a round-cabinet mallet that delivers controlled impact. Starting with bench and paring chisels gives you solid foundations before exploring specialized types.
Sharpening and Maintenance Techniques
Keeping your chisels sharp is where precision work actually happens. You’ll notice the difference immediately: sharp chisels glide through wood instead of crushing fibers, which means cleaner joints and fewer mistakes.
I recommend investing in a dedicated sharpening stones set with 1000 and 6000 grit options. The coarser stone flattens and resharpens; the finer one polishes your edge to perfection. Maintain a consistent 30-degree bevel angle across the entire blade during sharpening.
Regular honing between sharpenings keeps edges true and prevents tear-out. Wipe away metal particles after each session, as they’ll embed into your stones otherwise and create burrs on your blade.
Flatten your stone periodically. This simple maintenance extends both tool and stone life, keeping your work precise and satisfying.
Proper Grip and Control Methods
Once your chisels are razor-sharp, you’re ready to actually use them, and that’s where grip and control are important for the difference between smooth cuts and messy mistakes.
Here’s what separates clean joints from torn wood:
- Wrap your hand around the handle naturally, keeping the chisel at a 15–20 degree angle for optimal cutting direction
- Keep the butt square to your workpiece when paring waste from joints; this prevents wandering cuts
- Use light, controlled strokes rather than heavy pressure, which minimizes tear-out and gives you precision
- Employ a soft-faced mallet for heavy paring, protecting both your handle and blade from damage
These grip-control techniques work because they let you guide your tool confidently. You’ll feel the wood respond beneath the chisel, developing intuition about pressure and angle.
That’s when woodworking shifts from intimidating to deeply satisfying.
Drilling and Boring: Holes and Mortises Done Right
Why does a sharp drill bit matter so much in woodworking? Because dull bits wander, creating messy holes that’ll frustrate you. I’ve learned that keeping your braced bits sharp improves your mortising work; it’s the difference between clean joints and sloppy ones.
For most tasks, you’ll want a 10 swing brace with bits ranging from 1/4″ to 2″. That covers about 90% of what beginners need.
| Bit Size | Best Use | Why It Matters |
|---|---|---|
| 1/4″ | Peg holes, dowels | Most common joinery task |
| 3/8″ | Medium mortises | Handles larger recesses |
| 1/2″–2″ | Heavy mortising | Specialized projects |
Keep your drill bits aligned and sharp. Pair boring with chisels to clean waste. You’ll join our community of woodworkers who understand that proper drilling makes everything else easier.
Common Beginner Mistakes and How to Avoid Them
When you’re starting out, I see three major pitfalls that can derail your progress: buying expensive tools before you’ve mastered the basics, ignoring blade sharpness and maintenance, and skipping the fundamental techniques that make everything else work. You don’t need a $200 chisel set or power tools yet.
Instead, invest in a reliable marking knife, a quality square, and a few sharp hand planes to learn how wood actually behaves. Dull blades and sloppy measuring habits create weak joints and frustration, so I’d recommend spending your early time getting comfortable with proper marking, maintaining sharp edges, and practicing basic cuts before attempting complex joinery.
Overbuying Tools Too Early
Many beginners fall into the trap of buying far more tools than they actually need, and I’ve seen it happen countless times. You get excited about starting beginner projects and suddenly you’re accumulating hand tools without a clear plan.
Here’s what typically happens:
- You buy specialized tools for projects you haven’t started yet
- Duplicate items end up in your collection because you forgot what you already own
- Premium-priced tools sit unused while basic versions would’ve worked fine
- Storage space fills up with overbuying products you rarely touch
Instead, start with essential hand tools aligned to actual projects you’re doing right now. Build your collection gradually as your skills grow and real needs emerge.
This approach saves money and keeps your workspace focused.
Neglecting Sharpness And Maintenance
How sharp is your chisel right now? I’m guessing it’s duller than you think. Dull edges waste your time and can wreck your joints, so you’ll want to sharpen your chisels and planes regularly. Think of it like this: a sharp tool does the work; a dull one just frustrates you.
Here’s what I’ve learned: skipping maintenance shortcuts your tool’s life. Rust creeps in. Moving parts get stiff. That’s preventable.
What you should do:
- Clean rust off after each project
- Oil moving parts to prevent binding
- Check edges for nicks or chips before starting work
- Re-hone after each project
Set up a stable sharpening station with proper angle guidance. Uneven edges lead to sloppy work. You’ll notice better control and fewer tear-outs immediately. Your joints’ll thank you.
Skipping Proper Technique Foundation
You’ve got your tools sharp and your workbench clean—that’s great. Now it’s time to build solid fundamentals that’ll stick with you forever.
Proper technique separates confident woodworkers from frustrated beginners. Here’s what I’ve learned matters most:
- Mark carefully with a sharp knife and square – rushed layouts cause misaligned joints that won’t fit right
- Dry-fit everything before glue-up – test your components together to catch problems early
- Secure workholding properly with clamps – loose stock drifts during cuts, ruining your work
- Match your tool to the task – using a smoothing plane on rough stock creates tear-out and clogs your blade
I’ve watched beginners skip these steps hoping to save time. They don’t. You’ll spend more time fixing mistakes than doing it right the first time.
Take your time marking, sharpening between sessions, and testing fits. That’s when woodworking becomes rewarding.
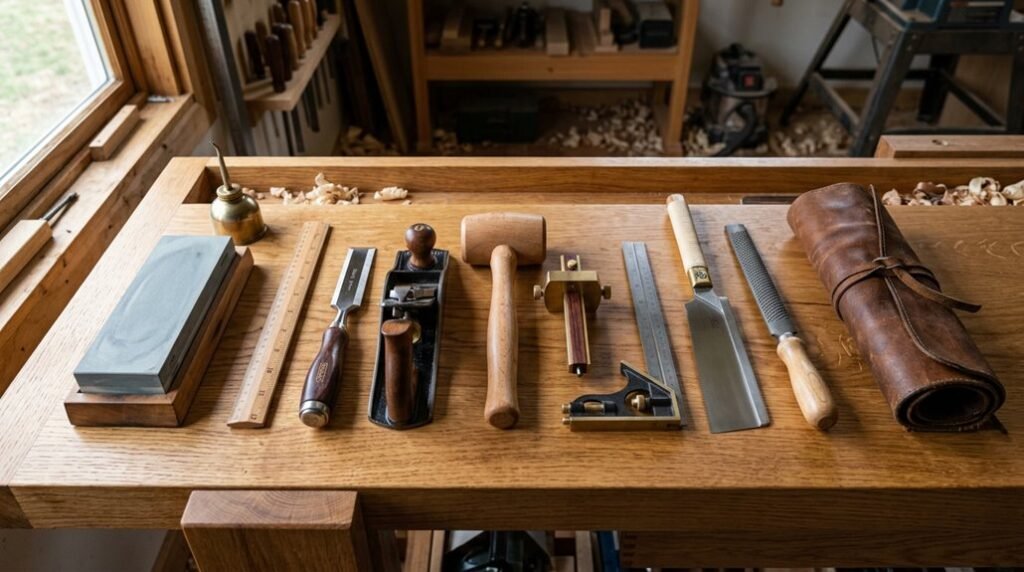
Assembling a Minimal Starter Kit That Works
| Tool Type | Recommended Size | Purpose |
|---|---|---|
| Jack Plane | 5–1/2″ | Rough shaping and flattening |
| Block Plane | 6–0″ | Edge work and grain direction |
| Chisels | 6, 13, 19, 25 mm | Joinery and fine detail |
| Marking Knife | Standard | Precise layout lines |
| Marking Gauge | Wheel type | Consistent spacing |
Focus on quality over quantity. A 5–1/2″ jack plane, three to four bevel-edge chisels, a rip saw, and basic marking tools get you started.
Add a sharpening stone set (1000 and 4000 grit) so your blades stay razor-sharp. This minimal collection builds competence before you consider power tools.
Sharpening and Maintenance: Keeping Edges Ready
Once you’ve assembled your starter kit, you’ll quickly discover that a dull blade ruins everything, tearing grain, slipping off layout lines, and turning simple cuts into frustrating struggles.
- Invest in sharpening stones – Start with a 1000/6000 grit waterstone combo for chisels and planes
- Use honing guides – These maintain consistent bevel angles (30 degrees for chisels) so you’re not fighting your technique
- Establish routine tool maintenance – Clean metal surfaces after each use and inspect edges for nicks before starting
- Flatten stones periodically – Glazed stones won’t sharpen anything, so keep them true
You’ll form a burr during honing, then remove it on final passes. Store tools with protective covers to prevent rust.
Sharp edges aren’t optional. They’re what separate satisfying work from frustration.
Essential Techniques: Using Tools Effectively
You’ll master three core techniques. First, marking tools like wheel gauges and knives transfer your layout onto wood; precision here prevents mistakes later. Second, your handsaw follows these marks, with rip saws cutting along grain and crosscut saws across it. Third, planes flatten and thickness your stock, removing thin, controlled shavings.
| Tool | Purpose | Key Skill |
|---|---|---|
| Marking knife | Layout transfer | Light scoring |
| Handsaw | Stock division | Straight cuts |
| Jack plane | Flattening | Even pressure |
Practice these fundamentals repeatedly. You’re building muscle memory that separates beginners from craftspeople.
Each technique builds confidence and belongs in your growing skillset.
Beyond the Basics: Advanced Tools Worth Considering Later
Why does a beginner’s toolkit need to expand? As your projects become more ambitious, you’ll discover that basic hand tools have limits. Strategic additions help you work faster and achieve precision that’s harder to accomplish manually.
As projects grow more ambitious, basic hand tools reach their limits—strategic upgrades enable faster work and precision that’s difficult to achieve manually.
Consider these upgrades:
- Router plane – Creates consistent dados and grooves without tedious chiseling
- Mortiser – Drills precise through and blind mortises for strong joinery joints
- Joinery jig – Improves accuracy for dovetails and box joints beyond hand-cutting
- Disc or belt sander – Speeds up material removal on larger projects
You’ll also want parallel jaw clamps and magnetic clamps for handling bigger assemblies. A small jointer or planer becomes valuable when working with rough stock, keeping flat, square faces before beginning joinery work.
These tools make challenging tasks into manageable ones, letting you tackle increasingly complex builds.


