Is your wood exterior door looking weathered and worn? Don’t rush to replace it! With some patience and the right techniques, we can help you transform that tired entryway into a stunning focal point for your home’s exterior.
Refinishing a wood door isn’t just about aesthetics—it’s also about protection. Over time, sun, rain, and temperature fluctuations take their toll on exterior doors, causing the finish to crack, peel, and fade. By following our step-by-step refinishing process, you’ll not only restore your door’s beauty but also extend its lifespan and improve your home’s curb appeal without the expense of a replacement.
Why Refinishing Your Wood Exterior Door Is Important
Refinishing your wood exterior door protects it from harsh environmental elements that cause deterioration over time. Sun exposure, rain, snow, and temperature fluctuations gradually break down the protective finish, leaving the wood vulnerable to water damage, warping, and rot. A properly refinished door creates a barrier against moisture infiltration, preventing these common issues that can lead to costly replacements.
Curb appeal significantly increases with a freshly refinished wood door, improving your home’s overall aesthetic value. The rich, natural wood grain becomes more prominent after refinishing, creating a warm, inviting entrance that makes a positive first impression. Real estate professionals estimate that an attractive front entrance can add 3-5% to your home’s perceived value, making refinishing a worthwhile investment.
Energy efficiency improves through the refinishing process as you seal small cracks and gaps that develop in weathered doors. These openings allow air exchange between your home’s interior and the outside environment, forcing your HVAC system to work harder and increasing energy bills. Refinishing helps maintain a proper seal around the door frame, reducing drafts and improving your home’s thermal performance.
Maintenance costs decrease substantially when you carry out a regular refinishing schedule for your wood exterior door. Preventative care through refinishing every 2-3 years costs significantly less than replacing a severely damaged door, which can run $500-$2,000 depending on the door quality and installation requirements. This proactive approach saves money while preserving the character of your home’s entryway.
Tools and Materials You’ll Need for Refinishing

Gathering the right tools and materials before starting your door refinishing project ensures a smooth, efficient process. These items will help you achieve professional-quality results while protecting your investment in your home’s exterior.
Essential Tools for the Job
The refinishing process requires exact tools to properly prepare and finish your wood exterior door. An orbital sander serves as your primary tool for removing old finish and smoothing the door’s surface. Hand sanders in various grits (80, 100, 150, and 220) allow you to work on details and edges where the orbital sander can’t reach. Quality paintbrushes or foam brushes apply the finish evenly, with foam brushes offering less streaking for many finishes.
Padded sawhorses provide a stable, elevated work surface that protects your door during the refinishing process. A tack cloth removes fine dust particles before applying new finish, while microfiber towels help with cleanup and application of certain products. Safety equipment including goggles and work gloves protects you from dust, chemicals, and splinters throughout the project.
Additional helpful tools include sanding blocks for manual sanding of detailed areas and a utility knife for removing old finish from edges and corners. These tools combine to give you everything needed to strip, repair, and refinish your door properly.
Choosing the Right Refinishing Products
Selecting appropriate products dramatically impacts your door’s appearance and longevity. Wood finish remover or paint stripper becomes necessary when dealing with thick layers of old finish that sanding alone can’t remove effectively. Wood filler repairs any damage, cracks, or holes in the door, creating a smooth surface for the new finish.
For the actual finish, exterior-grade wood sealant or varnish provides essential protection against UV rays and moisture. These products come in various sheens from matte to high gloss, allowing you to customize your door’s appearance. Select sealants specifically formulated for exterior use, as they contain additives that protect against sun damage and water infiltration.
A quality primer improves adhesion and coverage if you’re changing the door’s color significantly. Clear coats add an extra layer of protection and enhance the durability of your finish, particularly in harsh weather environments. When selecting these products, consider your local climate conditions—doors in rainy, humid, or intense sun exposure areas need more robust protection than those in milder climates.
Preparing Your Door for Refinishing

Proper preparation is the foundation of a successful door refinishing project. The initial steps you take will significantly impact the quality and durability of your finished door.
Whether to Remove the Door or Refinish in Place
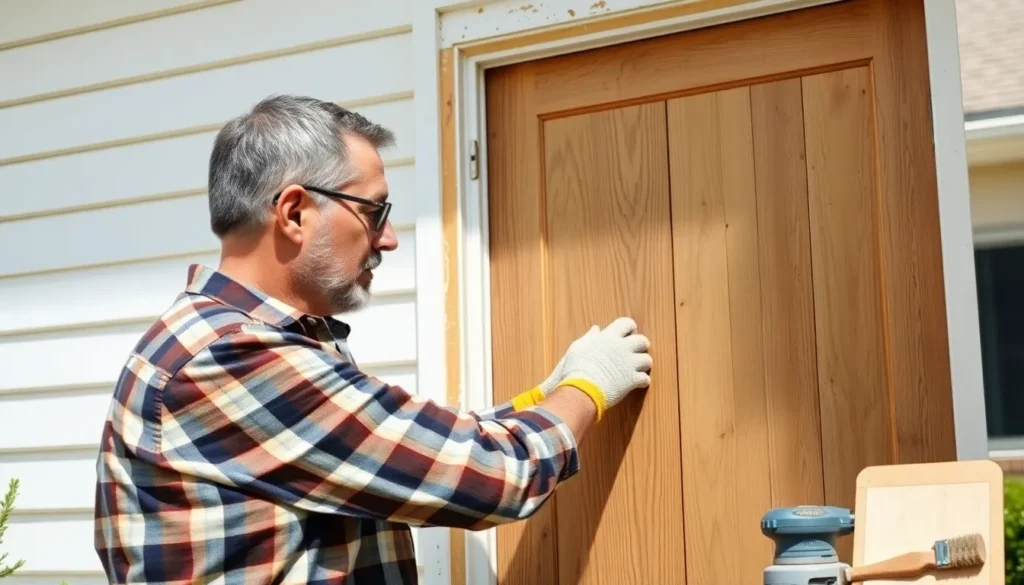
You’ve got two options when refinishing your exterior door: remove it completely or work on it while still hanging. Removing the door provides better access to all surfaces and contains mess more effectively. Working on a detached door also lets you position it horizontally, which prevents drips and runs in your finish. Refinishing in place saves time and eliminates the need to reset door alignment, but requires creating a protective plastic booth around the door to contain dust and debris. For heavier exterior doors, leaving them on hinges often proves more practical than wrestling with their substantial weight.
Removing Old Finish and Paint
Thorough removal of the existing finish creates the clean surface necessary for new finishes to adhere properly. Follow these essential steps:
- Remove All Hardware: Take off handles, knobs, locks, and hinges (if the door is being removed). Store these pieces in labeled bags to keep track of all components.
- Protect Surrounding Areas: Cover adjacent surfaces with plastic sheeting or drop cloths. Create a plastic booth around the door if refinishing in place to contain dust and prevent it from settling throughout your home.
- Sand Away Old Finish:
- Begin with 80-grit sandpaper to break through the existing finish without damaging the wood underneath
- Progress to finer 100-grit sandpaper to smooth the surface
- Finish with 120-grit or 150-grit sandpaper for the final smoothing
- Hand sand detailed areas and carvings to maintain their definition and prevent damage
- Clean Thoroughly: Vacuum all sanding dust from the door surface and surrounding area. Wipe the entire door with a tack cloth or microfiber cloth to remove any remaining particles that could mar your new finish.
Always sand with the grain of the wood to avoid creating visible scratches in your finished product. Wear appropriate safety gear including gloves, eye protection, and a dust mask throughout the preparation process to protect yourself from dust and chemical exposure.
The Sanding Process for Wood Exterior Doors

Proper sanding creates the foundation for a beautifully refinished exterior door. This crucial step removes old finishes and prepares the wood surface to accept new stain or varnish effectively.
- Removing Hardware: Take off all door hardware, including hinges, knobs, and decorative elements to prevent damage and ensure thorough refinishing.
- Starting with Coarse Sandpaper: Apply 80-grit sandpaper to break up the old finish. This coarse grit effectively removes thick varnishes while requiring careful attention to avoid damaging the wood.
- Progressing to Finer Sandpaper: Move to 100-grit, then 120-grit or 150-grit sandpaper for a smoother surface. Progressive sanding eliminates remaining imperfections and prepares the wood for staining.
- Final Sanding: Complete the process with 220-grit sandpaper to achieve a perfectly smooth surface ready for staining or finishing.
Different Grits and When to Use Them
Sandpaper grit selection impacts the quality of your refinishing project dramatically. Each grit serves a exact purpose in the refinishing process:
- 80-grit: Perfect for aggressive removal of old finishes, paint, and varnish from your exterior door. This coarse grit quickly breaks down weathered surfaces but requires a gentle touch to prevent gouging the wood.
- 100-grit: Smooths out rough surfaces after removing the old finish. This medium grit helps eliminate deeper scratches left by coarser paper while preparing the door for finer sanding.
- 120-grit or 150-grit: Creates a higher level of smoothness and removes any marks left by previous sanding. These grits prepare the wood for the final sanding stage while ensuring an even surface texture.
- 220-grit: Used for final sanding before applying stain or finish. This fine grit creates the silky-smooth surface necessary for professional-looking results and optimal finish adhesion.
Dealing with Detailed Areas and Carvings
Intricate door details require special attention during the sanding process. Hand sanding works best for detailed areas and carvings since power sanders can damage these delicate features.
For decorative elements, fold sandpaper into small sections to reach crevices and grooves. Sanding sponges offer flexibility when working around curved details and moldings on the door. Small wooden dowels wrapped with sandpaper effectively reach tight spaces between carved elements.
Vacuum the entire door thoroughly after sanding to remove all dust particles. Lingering dust can compromise the quality of your finish application and create an uneven appearance. A tack cloth works wonderfully for removing the finest dust particles that vacuuming might miss.
Always maintain the integrity of carved details by sanding with the grain and using a lighter touch than on flat surfaces. This careful approach preserves the door’s character while preparing it for a fresh, protective finish.
Repairing Damage Before Refinishing

Before applying a new finish to your wood exterior door, repairing existing damage is crucial for achieving professional results. A properly repaired door ensures the new finish adheres correctly and lasts longer.
Fixing Holes, Cracks and Dents
Wood fillers are essential for repairing visible imperfections in your exterior door. Apply the filler directly into holes, cracks, and dents using a putty knife, pressing firmly to eliminate air pockets. Allow the wood filler to dry completely according to the manufacturer’s instructions, typically 2-4 hours for most products. Sand the filled areas with 120-grit sandpaper to create a smooth, even surface that blends seamlessly with the surrounding wood. For deeper damage, you might need multiple applications of filler, sanding between each layer to ensure proper adhesion and a level finish.
Addressing Moisture Damage
Moisture damage requires immediate attention before refinishing can begin. Thoroughly dry affected areas using fans or heaters to remove all trapped moisture, which could take 24-48 hours depending on severity. Wood conditioners help restore moisture-damaged sections that show discoloration or warping, improving the wood’s ability to accept stain evenly. Replace severely rotted sections with new wood if the damage is beyond repair, ensuring the replacement piece matches the original door’s wood type and grain pattern. Focus on treating the underlying cause of moisture damage by sealing gaps and ensuring proper door installation to prevent future issues.
Applying Stain to Your Exterior Door

Staining your exterior door enhances its natural beauty while providing essential protection against the elements. The staining process requires careful preparation and application techniques to achieve professional-looking results that will last for years.
Selecting the Right Stain Color
Choosing the perfect stain color is crucial for complementing your home’s exterior aesthetic. Consider colors that harmonize with your home’s siding, trim, and overall architectural style for a cohesive look. Test the stain on an inconspicuous area of your door or on a scrap piece of similar wood first to verify the actual color appearance.
Many homeowners find that medium to dark stains offer better UV protection and show less dirt over time compared to lighter options. Each wood species accepts stain differently, with oak and mahogany typically taking stain evenly, while pine and cedar might require pre-treatment with wood conditioner to prevent blotchiness. Apply a small test patch and let it fully dry to ensure it doesn’t bleed or darken unevenly before committing to the entire door.
Application Techniques for Best Results
Working in sections following the wood grain direction creates a streak-free finish with professional results. Start by applying stain to the detailed areas and panels first, then move to the larger flat surfaces of the door. Use a foam brush for controlled application and a clean cloth to wipe away excess stain, preventing buildup that can lead to an uneven appearance.
Maintaining a wet edge as you work prevents lap marks and ensures uniform color absorption throughout the door. Allow the stain to penetrate according to the manufacturer’s recommended time—typically 5-15 minutes—before wiping away any excess with a clean, lint-free cloth. Apply a second coat if a deeper color is desired, but avoid excessive buildup which can create a tacky surface.
After the stain has completely dried (usually 24-48 hours), apply a clear protective finish such as exterior-grade varnish or polyurethane. This protective layer shields your door from weather elements and extends the life of your refinishing work. Use a soft-bristled brush for smooth application, working with the grain and avoiding crossing grain lines until ready for the final smoothing strokes.
For optimal durability in varying weather conditions, apply 2-3 coats of protective finish, lightly sanding with 220-grit sandpaper between coats to ensure proper adhesion. This multi-coat approach creates a deep, rich finish that highlights the wood’s natural beauty while providing maximum protection against moisture, UV rays, and daily wear.
Sealing and Protecting Your Refinished Door

After staining your exterior wood door, proper sealing is essential for long-term protection against the elements. The final protective layer creates a barrier that shields your door from moisture, UV damage, and general wear.
Applying Clear Protective Finishes
Multiple thin coats of high-quality varnish provide superior protection compared to a single thick application. Apply each coat with a soft-bristled brush, moving in the direction of the wood grain to prevent unsightly brush marks. Marine-grade varnish offers exceptional durability for exterior doors exposed to harsh weather conditions. Allow each coat to dry completely before lightly sanding with 220-grit sandpaper and applying the next layer. This technique creates a smoother finish and enhances the bond between coats. Three to four thin coats typically deliver optimal protection and a professional-looking result.
Weather Protection Considerations
Exterior doors face constant exposure to rain, sun, and temperature fluctuations that can cause premature deterioration. UV-resistant finishes prevent color fading and wood degradation from sun exposure. Apply specialized edge sealers to the top and bottom of the door where moisture often penetrates. These areas remain particularly vulnerable to water damage when not properly sealed. Complete drying of all finish coats before reinstallation prevents sticking and ensures proper functionality. Scheduling your refinishing project during dry weather with temperatures between 60-80°F creates ideal conditions for proper curing. Regular maintenance inspections every 6-12 months help identify wear spots in the finish before they lead to wood damage.
Maintaining Your Refinished Wood Exterior Door

Regular Cleaning
Regular cleaning extends your door’s finish and appearance. Wipe the door with mild soap and water at least once annually to remove dirt, pollen, and environmental contaminants. Microfiber cloths work effectively without scratching the finish. Avoid harsh chemical cleaners or abrasive scrubbing tools that can damage the protective topcoat.
Inspection Routine
Thorough inspections every six months help catch issues before they become serious problems. Look for cracks in the finish, peeling areas, or signs of moisture damage along the bottom and edges of the door. Check weather stripping for wear that might allow water intrusion. Address small imperfections immediately with touch-up stain and sealant to prevent moisture from penetrating the wood.
Protective Recoating
The topcoat on your exterior door needs refreshing every 2-3 years to maintain protection against UV damage and weathering. Signs that indicate recoating is needed include a dull appearance, rough texture when running your hand across the surface, or water no longer beading on the finish. Apply a thin coat of exterior-grade polyurethane or varnish following the wood grain for optimal results.
Hardware Maintenance
Door hardware requires attention to ensure proper door function. Lubricate hinges annually with silicone-based lubricant to prevent squeaking and ensure smooth operation. Tighten all screws on handles, knockers, and hinges to prevent the door from sagging or becoming misaligned. Clean metal hardware with appropriate cleaners to prevent corrosion that can transfer to and damage the wood finish.
Conclusion
Refinishing your wood exterior door is a rewarding project that delivers important returns on your investment. We’ve shown you how this DIY approach can save hundreds compared to replacement while preserving your home’s character and boosting curb appeal.
By following our step-by-step guide with the right tools and materials you’ll create a finish that not only looks beautiful but stands up to environmental challenges. Remember that proper preparation is the foundation of success while quality sealants ensure long-lasting protection.
Your newly refinished door will enhance your home’s first impression while improving energy efficiency. With regular maintenance you’ll keep it looking fresh for years to come making this one of the most practical home improvement projects you can tackle.
Frequently Asked Questions
How often should I refinish my exterior wood door?
Refinish your exterior wood door every 2-3 years for optimal protection. However, doors exposed to harsh weather conditions or direct sunlight may need refinishing more frequently. Regular inspections will help you identify when it’s time – look for signs of fading, cracking, or peeling finish. Maintaining this schedule prevents deeper damage and extends your door’s lifespan significantly.
Can I refinish my door without removing it from the hinges?
Yes, you can refinish an exterior door without removing it, though removal provides better access and typically yields superior results. If refinishing in place, carefully tape off hardware, hinges, and weatherstripping. Use drop cloths to protect surrounding areas. Be mindful that working vertically may cause drips, so apply thinner coats and maintain vigilance during application.
What tools do I need to refinish my exterior door?
Essential tools include an orbital sander with various grit sandpapers (80-220), quality paintbrushes (natural bristle for oil-based products), paint scraper, putty knife, wood filler, clean rags, drop cloths, and painter’s tape. Safety equipment is crucial: wear gloves, safety glasses, and a dust mask. For stripping, you’ll need a chemical stripper and scraper. Have mineral spirits on hand for cleanup.
How do I choose the right stain color for my door?
Select a stain color that complements your home’s exterior color scheme, architectural style, and personal preference. Always test the stain on an inconspicuous area of the door or on a similar wood sample first. Consider your climate – darker stains absorb more heat, which may be problematic in hot regions. Popular choices include rich mahogany, classic walnut, and golden oak tones.
What’s the best finish to protect an exterior wood door?
Marine-grade or exterior-specific polyurethane offers superior protection for wood doors. Look for products with UV inhibitors to prevent sun damage and yellowing. Oil-based finishes typically provide better durability than water-based options, though they take longer to dry. Apply 3-4 thin coats, sanding lightly between each, for maximum protection against moisture, temperature fluctuations, and sun exposure.
How do I repair damaged areas before refinishing?
First, identify all damaged areas including cracks, holes, and rotted sections. For minor damage, use wood filler appropriate for exterior use. For deeper damage or rot, remove the affected wood and apply a wood hardener followed by an epoxy wood filler. Once repairs are dry, sand them flush with the surrounding surface. Severe rot may require partial wood replacement before refinishing.
What weather conditions are best for refinishing a door?
Refinish your door during dry, mild weather with temperatures between 50-85°F (10-29°C) and humidity below 85%. Avoid direct sunlight during application, which causes finishes to dry too quickly. Don’t refinish when rain is expected within 24-48 hours of your final coat. Fall and spring typically offer ideal conditions. Allow extra drying time during cooler or more humid conditions.
How can I maintain my refinished door between refinishing cycles?
Clean your door every 3-6 months using mild soap and water. Apply a refresher coat of protective finish annually, especially on south or west-facing doors. Immediately address any visible damage to the finish. Keep weatherstripping in good condition to prevent moisture infiltration. Lubricate hinges and hardware regularly. Wipe up any standing water after heavy rain to prevent damage.
Is it cost-effective to refinish rather than replace an exterior door?
Absolutely. Refinishing typically costs $100-$250 in materials and tools versus $500-$2,000 for a quality replacement door plus installation. Wood doors, especially solid hardwood or custom doors, are expensive to replace. Regular refinishing extends your door’s life by decades while preserving its character and architectural value. It’s also more environmentally friendly than replacement.
How long does the refinishing process take from start to finish?
The complete refinishing process typically takes 2-4 days. Stripping and sanding require about one day. Repairs and preparation take several hours. Each coat of stain or finish needs 6-24 hours drying time, depending on the product and weather conditions. Plan for at least a weekend project, allowing extra time for unexpected challenges or additional coats of finish.


