Renovating your home but wondering if you can skip the hassle of tile removal? We’ve got great news for you! Yes, you can install wood flooring over existing tile, potentially saving you important time, money, and cleanup during your renovation project.
We understand that ripping out tile can be a messy, expensive, and time-consuming process. That’s why many homeowners are exploring the option of laying new wood floors directly over their existing tile surfaces. This approach has become increasingly popular as manufacturers develop installation systems specifically designed for this purpose.
In this guide, we’ll walk you through everything you need to know about installing wood flooring over tile – from assessing if your tile floor is a good candidate to choosing the right wood flooring options and proper installation techniques to ensure beautiful, long-lasting results.
Can You Install Wood Flooring Over Tile: The Comprehensive Guide
Installing wood flooring over existing tile presents a practical solution for homeowners looking to update their floors without the hassle of tile removal. This approach saves important time and money while creating a beautiful new surface in your home. Let’s explore the key considerations for successfully installing wood over tile.
Assessing Your Existing Tile Floor
Tile floors need to meet certain criteria before becoming suitable substrates for wood flooring. First, check that your tile surface is level, with height variations less than 1/4 inch across 10 feet. Loose, cracked, or damaged tiles must be repaired or replaced before proceeding. The tile must also be securely bonded to the subfloor without any hollow sounds when tapped. Ensure the floor is completely clean and free of wax, grease, or other substances that might interfere with adhesion.
Types of Wood Flooring Compatible with Tile Installation
Not all wood flooring works equally well over tile. Engineered hardwood offers superior stability and resistance to moisture compared to solid hardwood, making it ideal for over-tile installations. Floating floor systems such as click-lock engineered wood eliminate the need for nails or glue directly on the tile. Luxury vinyl plank (LVP) with wood appearance provides another excellent option, offering waterproof properties and thin profiles. Traditional solid hardwood generally isn’t recommended due to its expansion characteristics and installation requirements.
Preparation Steps Before Installation
Proper preparation ensures successful installation of wood over tile. Remove baseboards and door trim to allow for expansion gaps around the perimeter. Thoroughly clean the tile surface to remove all dirt, dust and residue. Fill in any grout lines deeper than 1/16 inch with an appropriate floor leveler to create a smooth surface. Take accurate moisture readings of both the subfloor and the room environment to ensure conditions fall within manufacturer specifications. Acclimate your wood flooring in the installation space for 48-72 hours before beginning the project.
Installation Methods and Best Practices
The installation method depends on your chosen wood flooring type. For floating engineered wood systems, install a moisture barrier or underlayment over the tile first to provide cushioning and sound absorption. With glue-down installations, use modified adhesives specifically designed for non-porous surfaces like tile. Maintain proper expansion gaps (typically 1/4 to 1/2 inch) around all walls and fixed objects. Install the flooring perpendicular to the longest wall for optimal structural stability and visual appeal. Follow exact manufacturer guidelines about acclimation, installation temperature, and humidity requirements.
Height Considerations and Transitions
Adding wood flooring over tile increases floor height, requiring thoughtful planning for transitions. Door clearances may need adjustment—interior doors typically require at least 1/2 inch clearance. Transitions to other flooring materials need special attention; use appropriate reducer strips where the new wood floor meets different surfaces. Baseboards might need replacement or modification to accommodate the higher floor. Appliances in kitchens, particularly dishwashers and refrigerators, should be checked for adequate clearance with the new floor height.
Benefits of Installing Wood Flooring Over Existing Tile

Installing wood flooring directly over existing tile offers homeowners important advantages. This approach provides practical answers for flooring renovations without the hassle of complete tile removal.
Cost and Time Savings
Wood flooring installation over tile eliminates expensive demolition costs associated with removing existing tile. Homeowners save hundreds or even thousands of dollars by avoiding additional labor fees for tile removal, disposal, and subfloor preparation. The installation process becomes significantly faster, often reducing project timelines by 30-50% compared to complete floor replacement. Professional installers can complete the job more efficiently since they don’t need to spend days removing old tiles, scraping adhesive, and preparing the subfloor. This streamlined approach also minimizes disruption to your daily routine, allowing you to enjoy your new floors sooner.
Avoiding Messy Tile Removal
Tile removal creates an extraordinary amount of dust and debris throughout your home. Demolishing ceramic or porcelain tile produces microscopic particles that can infiltrate every room even though containment efforts. By installing wood flooring over existing tile, you’re bypassing this notoriously dusty and disruptive process entirely. The noise factor also decreases dramatically since there’s no need for jackhammers, chisels, or other demolition tools that create excessive sound pollution. This cleaner installation method protects your home’s air quality and prevents potential damage to walls, fixtures, and furniture that often occurs during aggressive tile removal procedures.
Evaluating Your Current Tile Floor

Before installing wood flooring over tile, a thorough evaluation of your existing tile surface is essential for a successful installation. The condition and levelness of your tile floor directly impact how well your new wood flooring will perform and last over time.
Checking for Damage and Loose Tiles
A comprehensive inspection of your tile floor reveals potential issues that could compromise your wood flooring installation. Look for cracked, chipped, or loose tiles by tapping on each tile with a hard object—hollow sounds indicate detachment from the subfloor. Replace or secure any damaged tiles before proceeding with installation to prevent future movement or unevenness. Fill important cracks or chips with epoxy filler, allowing it to cure completely. Remove any severely damaged sections entirely and patch them with new tiles or appropriate floor leveling compound. This preparation creates a solid foundation for your wood flooring and prevents future issues like squeaking or premature wear patterns.
Assessing Floor Height and Transitions
Adding wood flooring over tile increases your floor height by approximately ½ to 1 inch, depending on the exact wood product and underlayment chosen. Measure the new combined height to determine if door adjustments are necessary—interior doors typically require ⅝ inch clearance to swing freely. Check threshold transitions between rooms, as important height differences create tripping hazards and affect the overall aesthetic. Consider installing appropriate transition strips where wood flooring meets different flooring materials. Examine baseboards and trim to determine if they’ll need adjustment or replacement to accommodate the new floor height. Take measurements at various points throughout the installation area to identify any important variations in the existing tile floor height that might require additional leveling.
Types of Wood Flooring Suitable for Tile Overlay

When installing wood flooring over existing tile, choosing the right type of flooring is crucial for long-term durability and performance. Several flooring options work effectively over tile surfaces, with each offering distinct advantages depending on your exact needs and conditions.
Engineered Hardwood Options
Engineered hardwood stands as the premier choice for tile overlay installations due to its dimensional stability. Its layered construction—featuring a real wood veneer bonded to multiple plywood layers—resists warping from moisture or temperature fluctuations that commonly occur in tiled areas. MS Polymer adhesives like Hav:Bond create exceptional bonds with properly prepared tile surfaces, ensuring the engineered planks remain firmly attached. Before installation, grinding the tile surface creates texture that improves adhesive grip, while primers such as Mapei Eco Prim T enhance the bonding between the tile and engineered wood. This flooring type offers authentic wood aesthetics with greater resilience than solid hardwood when installed over non-porous surfaces.
Floating Floor Systems
Floating floor systems provide excellent alternatives for tile overlay projects, particularly for DIY enthusiasts. Laminate flooring utilizes interlocking planks with attached underlayment that create a unified surface without requiring adhesive to the tile beneath. These systems effectively “float” above the existing floor, accommodating minor imperfections in the tile surface. Luxury Vinyl Planks (LVP) offer another outstanding floating option, combining water resistance with remarkable flexibility. LVP mimics authentic wood appearance while adapting to slight irregularities in the underlying tile. Both floating systems require minimal preparation beyond ensuring a clean, level tile base and installing appropriate moisture barriers in potentially wet areas. Their snap-together installation eliminates messy adhesives and creates immediately usable surfaces once installed.
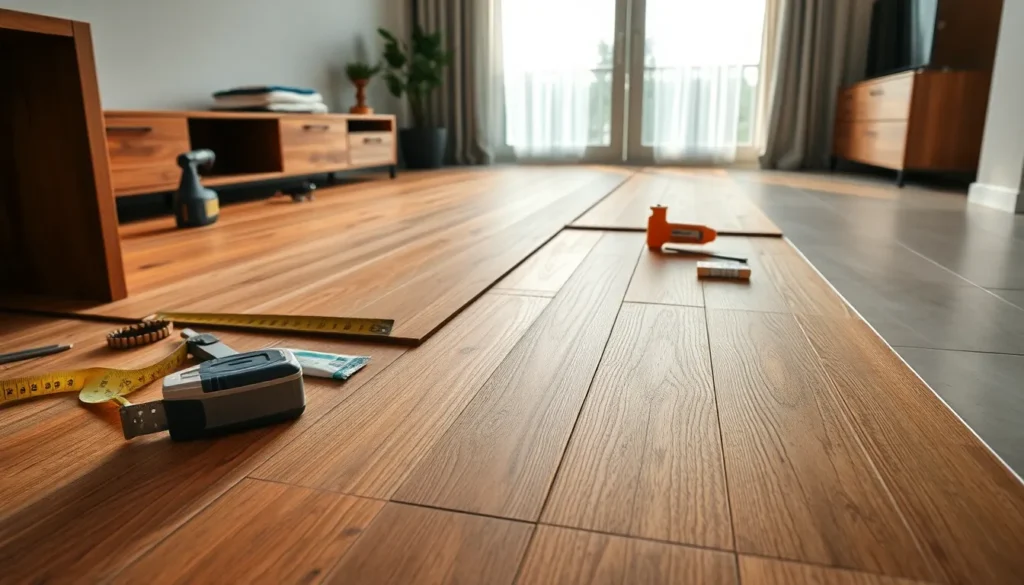
Step-by-Step Installation Process

Installing wood flooring over existing tile requires careful execution to ensure a successful outcome. Following a systematic approach helps achieve professional results while maximizing the longevity of your new floor.
Preparation Phase
Proper preparation creates the foundation for a successful wood-over-tile installation. Start by thoroughly cleaning the tile surface to remove all dirt, grease, and debris that could interfere with adhesion. Lightly grind glossy tiles using a diamond cup wheel or floor buffer with an abrasive pad to create texture for better bonding. Apply a primer specifically designed for non-porous surfaces if you’re using a glue-down method. Fill any deep grout lines with a leveling compound to create a more uniform surface, ensuring it’s completely dry before proceeding. Remove baseboards and door casings to allow for expansion gaps and height adjustments.
Underlayment Application
Underlayment serves as a critical buffer between your tile and new wood flooring. For floating floor installations, roll out a high-quality underlayment perpendicular to the direction you’ll install the wood flooring, overlapping edges by 2-4 inches and securing with tape. Trim excess material along walls using a utility knife, leaving approximately 1/4 inch gap. Specialized underlayments with moisture barriers are essential in bathrooms and other moisture-prone areas. For glue-down installations, verify that your adhesive manufacturer doesn’t require a exact underlayment or primer before proceeding.
Flooring Installation
The installation method varies based on your chosen wood flooring type. For floating engineered wood or laminate, start in a corner and work from left to right, maintaining a 1/4-inch expansion gap along all walls. Connect pieces according to the manufacturer’s instructions, typically using click-lock or tongue-and-groove systems. For glue-down installations, apply MS Polymer adhesive directly to the prepared tile surface using the recommended trowel size. Press wood planks firmly into the adhesive, checking periodically for proper transfer by lifting a recently placed plank. Work in small sections to prevent the adhesive from drying before planks are positioned.
Finishing Touches
Complete your installation with attention to detail for a polished result. Install transition strips where the new wood flooring meets different flooring materials, ensuring they’re properly secured and level. Reinstall baseboards or install new ones to cover the expansion gaps along the walls. Make door adjustments if necessary, removing doors and trimming approximately 1/8 inch more than the height of your new flooring. Clean the surface thoroughly according to the manufacturer’s instructions, avoiding excessive moisture. Allow the floor to settle for 24-48 hours before placing furniture or area rugs on the new surface.
Potential Challenges and Solutions

Installing wood flooring over tile presents several obstacles that require careful planning and proper execution. Understanding these challenges and implementing the right answers ensures a successful installation that lasts for years to come.
Dealing with Uneven Surfaces
Uneven tile surfaces create one of the most important challenges when installing wood flooring. Grout lines between tiles and variations in tile height can transfer through to the wood flooring, causing instability, unevenness, and premature wear. To overcome this issue, apply a self-leveling compound across the entire tile surface before installation. This compound fills in grout lines and creates a smooth, level foundation for the wood flooring. For minor unevenness, a quality underlayment can help bridge small gaps and provide additional support. Grinding down high spots on the tile surface also helps achieve the flatness required for proper wood floor installation.
Managing Moisture Concerns
Moisture poses a serious threat to wood flooring, particularly when installed over tile in areas like bathrooms or basements. Tiles in these locations may trap humidity underneath the new flooring, potentially leading to warping, cupping, or mold growth. Installing a proper moisture barrier becomes essential to protect your investment. Specialized underlayments with built-in moisture protection create an effective barrier between the tile and wood flooring. For engineered wood installations, moisture-resistant adhesives provide additional protection when using glue-down methods. Conducting moisture testing before installation identifies potential problem areas, allowing you to address them before they cause damage. Regular inspections of the perimeter areas after installation help detect moisture issues early, particularly in spaces prone to water exposure.
When Not to Install Wood Over Tile

Even though the many advantages of installing wood flooring over existing tile, certain situations make this approach inadvisable. Recognizing these conditions before beginning your project can save important time, money, and frustration.
Unstable or Damaged Tile
Loose, cracked, or severely damaged tiles create an unsuitable foundation for wood flooring. Any movement in the underlying tile will transfer to your new wood floor, potentially causing squeaking, separation, or premature wear. Tiles that shift or sound hollow when tapped indicate poor adhesion to the subfloor and must be addressed before proceeding with installation. Extensive cracking throughout the tile surface typically signals structural issues that require investigation and repair.
Moisture Issues
Wood flooring and excess moisture don’t mix well, even with engineered products. Bathrooms, laundry rooms, or areas with known water problems present important risks for wood installations over tile. Signs of moisture issues include:
- Discoloration or staining on existing grout lines
- Mold or mildew growth along tile edges
- Efflorescence (white, powdery deposits) on the tile surface
- Musty odors in the room
Moisture testing is essential before installation, as hidden moisture problems can lead to warping, cupping, or complete failure of your new wood flooring.
Inadequate Subfloor Conditions
The subfloor beneath your tile must provide sufficient structural support for an additional flooring layer. Springy or excessively flexible areas indicate potential subfloor weakness that can’t adequately support both tile and wood flooring. Rooms with concrete subfloors that show signs of cracking or heaving should be evaluated by a professional before adding any additional flooring layers.
Excessive Floor Height
Adding wood over tile raises your floor level, which creates potential complications in some homes. Doorways may no longer have adequate clearance, exterior doors might drag, and appliances like dishwashers or refrigerators could become difficult to remove or reinstall. Floor height concerns become particularly problematic in open floor plans where the new wood floor must transition to other flooring types, creating trip hazards or awkward elevation changes between rooms.
Extremely Uneven Tile Surfaces
Tile floors with important lippage (height variation between adjacent tiles) or dramatic slopes create challenges for wood installation. While minor unevenness can be addressed with leveling compounds, floors with variations exceeding 3/16 inch within a 10-foot span typically require more extensive preparation or complete removal of the tile before wood installation becomes viable.
Long-Term Performance Considerations

Installing wood flooring over tile requires careful attention to several factors that impact long-term durability. These considerations ensure your flooring investment maintains its integrity for years to come.
Subfloor and Tile Condition
Existing tile must be fully adhered, level, and free of cracks or movement to support wood flooring properly. Any unstable subfloors or loose tiles create a risk of buckling, gaps, or squeaky floors over time. Thoroughly inspect the entire floor surface before installation, paying special attention to hollow-sounding areas that might indicate adhesion issues. Repair or replace problematic areas to establish a solid foundation for your new wood flooring.
Moisture Management
Moisture barriers are critical components when installing wood over tile, especially in humidity-prone areas. These barriers prevent moisture migration that can lead to warping or cupping of the wood. Always conduct moisture testing on both the tile surface and subfloor before beginning installation to establish baseline conditions. Use appropriate vapor-retardant underlayment or sealants based on the exact moisture levels in your space and the manufacturer’s recommendations for your chosen flooring material.
Height and Transitions
Adding wood flooring over existing tile increases overall floor height, often requiring adjustments throughout the space. Door trimming may be necessary to maintain proper clearance, while transition strips help manage height differences between rooms. Carefully plan these transitions to minimize tripping hazards and maintain visual continuity throughout your home. Professional installers typically measure and account for these height changes during the initial assessment stage.
Installation Method
Floating floor systems offer excellent compatibility with tile underlayment as they accommodate minor imperfections and allow natural wood movement. This installation approach utilizes specialized underlayment that provides both moisture protection and minor cushioning over the rigid tile surface. Glue-down or nail-down methods demand perfectly level surfaces, often requiring additional preparation such as grinding high spots or filling low areas. Each method presents different advantages depending on your exact situation and the type of wood flooring selected.
Material Compatibility
Engineered wood typically outperforms solid hardwood when installed over tile due to its enhanced dimensional stability in fluctuating humidity conditions. The layered construction of engineered wood resists the expansion and contraction that often affects solid hardwood planks. Avoid installations in bathrooms, laundry rooms, or other areas with frequent water exposure unless using specifically designated waterproof materials. Choose products designed for the unique challenges of your installation environment to ensure optimal performance.
Conclusion
Installing wood flooring over tile offers a practical renovation solution that can save time money and hassle. With proper assessment and preparation your existing tile can serve as a solid foundation for beautiful new wood floors.
Remember to thoroughly inspect your tile evaluate floor height implications and select appropriate materials like engineered hardwood or LVP for best results. The right installation method—whether floating or glue-down—will depend on your exact circumstances.
While this approach isn’t suitable for every situation it’s an excellent option for many homeowners looking to transform their spaces without the disruption of tile removal. By following proper techniques and addressing potential challenges you’ll enjoy the warmth and beauty of wood floors without the extensive demolition typically required.
Frequently Asked Questions
Can I install wood flooring directly over tile?
Yes, you can install wood flooring directly over existing tile, provided the tile is in good condition. This method has become increasingly popular due to advancements in installation systems. It saves time and money by eliminating messy and costly tile removal. The best options for this application are engineered hardwood and luxury vinyl plank (LVP) due to their stability and moisture resistance.
What should I check before installing wood over tile?
Ensure your tile floor is level, secure, and clean. Conduct a thorough inspection for damaged or loose tiles and replace or secure them. Fill any cracks with epoxy filler. Check floor height, as adding wood over tile will raise it, potentially requiring door adjustments. Assess moisture conditions, especially in bathrooms or basements. Proper preparation creates a solid foundation for your new wood flooring.
Which wood flooring types work best over tile?
Engineered hardwood is the premier choice due to its dimensional stability and moisture resistance. Floating floor systems like laminate and luxury vinyl plank (LVP) are excellent alternatives, offering easy installation and adaptability to minor imperfections. Traditional solid hardwood is not recommended for over-tile installation because it requires nailing down and is more susceptible to moisture issues.
How do I prepare the tile for wood flooring installation?
Start by thoroughly cleaning the tile surface to remove dirt and grease. Grind glossy tiles to create better adhesion. Fill grout lines if they’re deep or wide. Apply a primer if necessary for bonding. Remove baseboards and ensure adequate door clearance. Use a high-quality underlayment for floating installations. Allow your wood flooring to acclimate to room conditions for at least 48 hours before installation.
What installation methods work for wood over tile?
Two primary methods work well: floating and glue-down installations. Floating systems connect boards together without attaching them to the subfloor, making them ideal for DIYers. Always use a moisture barrier underlayment with floating installations. For glue-down methods, use MS Polymer adhesives specifically designed for tile overlays. Follow manufacturer guidelines regardless of which method you choose.
Will installing wood over tile cause height issues?
Yes, adding wood flooring over tile will increase your floor height by approximately 1/2 to 3/4 inches depending on the product chosen. This may require trimming doors to ensure proper clearance. You’ll also need to install transition strips where the new flooring meets other floor coverings to prevent tripping hazards. Careful planning of these transitions is essential for both safety and aesthetics.
How much money can I save by not removing tile?
Skipping tile removal can save you $3-7 per square foot in demolition costs alone. For an average kitchen of 200 square feet, that’s $600-1,400 in savings. The overall project timeline is typically reduced by 30-50%. Additionally, you’ll avoid the significant cleanup costs associated with tile removal, which can create substantial dust and debris throughout your home.
Is moisture a concern when installing wood over tile?
Absolutely. Moisture control is critical, especially in areas prone to humidity. Install a quality moisture barrier regardless of the flooring type you choose. Conduct moisture testing on the tile surface before installation. Use engineered products designed to withstand moisture fluctuations. Regularly inspect your floor after installation to detect any moisture issues early and prevent potential damage.
When should I NOT install wood flooring over tile?
Avoid this installation method if: your existing tile is unstable or damaged; the area is subject to significant moisture (bathrooms, laundry rooms); the subfloor beneath the tile is inadequate; the added height would create excessive threshold differences; or the tile surface is extremely uneven. In these cases, complete tile removal may be necessary to ensure a successful wood floor installation.
How do I handle transitions between rooms with different floor heights?
Use specialized transition strips designed to accommodate height differences. For doorways, install reducer strips that create a gentle slope between the higher wood floor and lower adjacent flooring. For open transitions, consider a custom threshold or transition piece. Always ensure transitions are securely fastened and create a smooth path to prevent tripping hazards and provide a finished look.


