Sublimating on wood opens up a industry of creative possibilities for crafters and entrepreneurs alike. We’ve discovered that transforming ordinary wooden items into personalized masterpieces isn’t just satisfying—it’s also highly profitable in today’s custom-product marketplace.
Whether you’re looking to create unique gifts, start a small business, or expand your crafting repertoire, wood sublimation delivers stunning results when done correctly. The process allows for vibrant, detailed images that become permanently embedded in specially coated wooden surfaces, creating durable products that won’t fade or peel like traditional methods.
In this comprehensive guide, we’ll walk you through everything you need to know about sublimating on wood—from essential equipment and materials to step-by-step techniques that guarantee professional results every time.
What Is Sublimation on Wood?
Sublimation on wood is a specialized heat transfer process that permanently bonds ink to specially treated wooden surfaces. This technique transforms dye particles from a solid state directly into a gas without passing through the liquid phase, which then penetrates the polymer coating on the wood. Unlike vinyl transfers or decals that sit on top of the surface, sublimated designs become part of the wood’s coating itself.
The science behind wood sublimation relies on three key elements working together: sublimation ink, heat, and pressure. Wood doesn’t naturally accept sublimation dyes, so it must first be coated with a polymer layer that contains polyester receptors. These receptors capture the gaseous ink molecules when heat and pressure are applied, creating a permanent, full-color image that won’t fade, crack, or peel over time.
Popular items for wood sublimation include ornaments, signs, coasters, cutting boards, jewelry, and home décor pieces. Each piece offers unique creative possibilities while maintaining the natural beauty and texture of wood. The versatility of this method allows for vibrant, detailed images with photographic quality that traditional printing methods can’t achieve on wooden surfaces.
Benefits of Sublimation on Wooden Products

Sublimation transforms ordinary wooden items into stunning personalized products with many advantages over traditional decoration methods. The customization potential allows for full-color, intricate designs that perfectly suit personalized home décor, ornaments, and signage. Wooden products featuring sublimated designs showcase remarkable durability since the ink chemically bonds with polymer-coated surfaces, creating permanent images that resist fading, scratching, and everyday wear.
The versatility of wood sublimation stands out as a major benefit, working effectively across diverse wood types including create rounds, plaques, and decorative pieces. Each wooden base brings its unique texture and character to the final product, improving the artistic appeal when properly coated with sublimation-friendly materials. Artists and crafters especially appreciate how the natural wood grain often shows through sublimated designs, creating a distinctive aesthetic that combines digital precision with organic warmth.
Efficiency makes wood sublimation particularly attractive for small businesses and hobbyists alike. The process uses standard sublimation printers and heat presses, streamlining production without requiring specialized industrial equipment. Creators can produce small batches or one-off custom pieces without important setup time, making this technique ideal for on-demand production and personalized gift businesses. This accessibility allows even beginners to achieve professional-looking results after mastering the basic techniques of surface preparation and heat application.
Essential Supplies for Wood Sublimation

Creating stunning sublimated wood projects requires exact equipment and materials to achieve professional results. These essential supplies ensure your designs transfer properly and create lasting impressions on wooden surfaces.
Sublimation Printer and Inks
A dedicated sublimation printer serves as the foundation of any wood sublimation project. These specialized printers use unique sublimation inks that convert from solid to gas when heated, allowing for permanent bonding with polymer-coated surfaces. Standard printers with regular inks won’t work for this process, as only sublimation inks contain the chemical properties necessary for the gaseous transfer. Popular options include Epson EcoTank models converted for sublimation or dedicated Sawgrass sublimation printers that come ready to use out of the box.
Heat Press
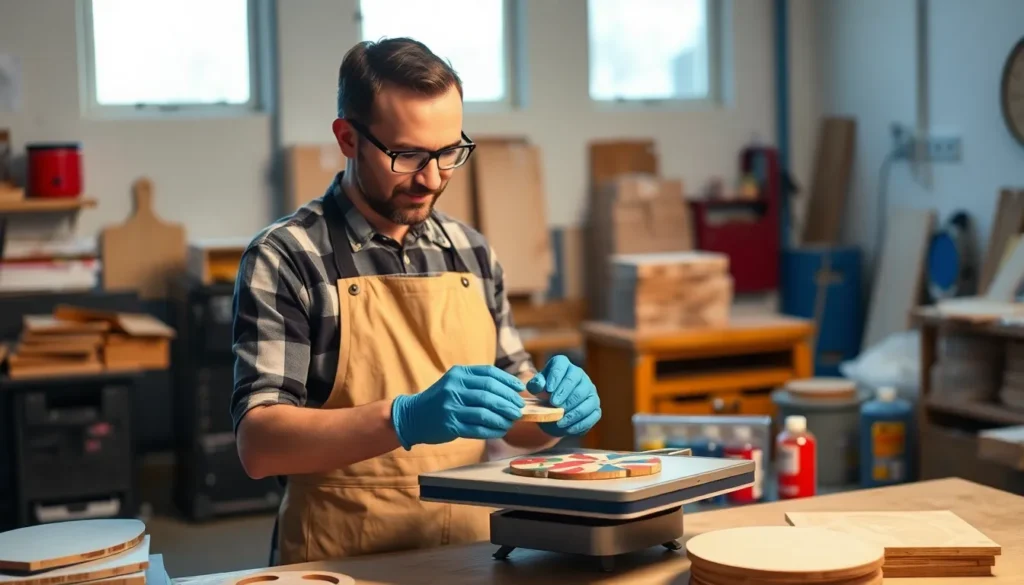
Heat presses provide the consistent temperature and pressure needed to trigger the sublimation process. For wood sublimation, a heat press capable of reaching and maintaining 375°F is essential for the full 90-second duration required for proper ink transfer. Flat heat presses work well for most wooden items like signs, coasters, and plaques. The even distribution of heat and pressure ensures complete transfer of your design without cold spots or inconsistencies. Many crafters opt for a 15×15 inch model as it accommodates a wide variety of wooden blank sizes.
Sublimation Paper
Sublimation paper features a special coating designed to hold sublimation ink on its surface until the heat transfer process. This high-release paper prevents the ink from soaking in, keeping it available for the sublimation process. The paper’s quality directly impacts your final results, with premium papers offering better color vibrancy and image clarity. During the heat press process, this paper gets placed ink-side down against the wood surface, allowing the gaseous ink to transfer completely into the polymer coating.
Poly-Coated Wood Blanks
Poly-coated wood blanks come pre-treated with a polymer layer that’s receptive to sublimation inks. This coating acts as the receptor for the gaseous ink molecules during the heat transfer process. Uncoated wood won’t work for sublimation as the natural wood fibers can’t properly capture the ink particles. These specialized blanks are available in various shapes including ornaments, signs, coasters, and decorative panels. For uncoated wooden items, applying a laminating sheet creates a compatible surface that accepts sublimation, though results may differ from factory-coated blanks. The polymer coating’s quality determines color vibrancy and image longevity in your finished projects.
How to Prepare Wood for Sublimation

Proper preparation of wood surfaces is crucial for successful sublimation results. The sublimation process requires a polymer coating on the wood to create a chemical bond with the ink during heat application. There are two primary approaches to getting wood ready for sublimation: using pre-coated blanks or treating raw wood yourself.
Using Pre-Coated Wood Blanks
Pre-coated wood blanks offer the easiest path to successful sublimation projects. These specialized products come with a polyester layer already applied, eliminating the need for additional treatment. Truflat plywood blanks represent a popular option in this category, featuring an optimal surface for vibrant ink transfer.
The process for using pre-coated blanks follows three straightforward steps:
- Create your design using graphic software and upload it to your sublimation printing program
- Print your artwork in mirror image on sublimation paper using sublimation ink
- Heat press the design face-down on the wood blank at 400°F (204°C) for 45-60 seconds with medium pressure
Pre-coated blanks deliver consistent results and save important preparation time, making them ideal for beginners or high-volume production.
Applying Sublimation Coating to Raw Wood
Raw wood requires additional treatment to accept sublimation ink properly. Four effective coating methods transform ordinary wood into sublimation-ready surfaces:
Laminating sheets create an excellent polymer surface on raw wood. Simply position a laminating pouch over your wood piece, apply heat with your press, then trim away excess material after cooling. This method works particularly well for flat surfaces.
Sublimation HTV (heat transfer vinyl) provides another reliable option. Clear HTV applied to wood creates a polymer layer that bonds perfectly with sublimation inks during the pressing process, resulting in vibrant transfers.
Polycrylic coating transforms raw wood through a manual application process. Apply 2-3 thin coats of water-based polycrylic with a brush, allowing each layer to dry completely before lightly sanding and adding the next coat. This method works effectively on irregular or curved wooden surfaces.
Sublimation spray offers a quick application method for preparing wood. Matte sublimation spray coats evenly and creates a polymer surface after curing. Multiple light coats typically yield better results than a single heavy application.
Regardless of your chosen coating method, several critical steps ensure optimal results:
- Sand unfinished wood thoroughly to remove any surface imperfections
- Maintain consistent temperature throughout the pressing process
- Apply appropriate pressure without excess force that might warp the wood
Raw wood without polymer treatment won’t properly accept sublimation ink, resulting in faded, patchy images that lack durability. The polymer coating captures ink molecules as they transition to gas, creating the permanent bond that makes sublimation so effective.
Step-by-Step Wood Sublimation Process

Sublimating on wood requires a careful process to ensure vibrant, permanent results. Follow these precise steps to transform your wooden blanks into customized masterpieces with professional-quality transfers.
Preparing the Wood Surface
The foundation of successful wood sublimation begins with proper surface preparation. Sand your pre-cut wooden blanks until completely smooth, removing any imperfections that might affect the final image quality. Apply a white polyester-based paint as a polymer coating, creating the necessary surface for ink adherence. Alternatively, use lamination pouches or Clear Sublimatable HTV to create the polymer layer essential for capturing sublimation ink. Allow the coating to dry completely—typically about one hour for paint applications—before proceeding to the next step.
Designing Your Image
Creating the perfect design requires attention to exact technical details for wood sublimation. Mirror or flip your artwork horizontally in your graphic design software, ensuring it’ll appear correctly when transferred to the wood surface. Optimize your design with vibrant, highly saturated colors since sublimation transfers appear most vivid with intense color profiles. Consider the natural wood grain and how it might interact with your design, potentially incorporating this texture as an enhancement rather than fighting against it.
Printing Your Sublimation Transfer
Printing your design correctly forms a critical step in the wood sublimation process. Use only genuine sublimation paper with a printer specifically loaded with sublimation inks—regular inks won’t convert to gas during heating and won’t bond properly. Print at the highest quality settings your printer offers to capture all design details. Check your printed transfer for color accuracy and sharpness before proceeding, as what you see on the paper closely represents your final result after accounting for the sublimation process.
Heat Press Settings for Wood
Precise temperature control ensures optimal ink transfer and permanent bonding with the wood’s polymer coating. For the initial lamination or HTV application phase, set your heat press to 375°F (190°C) and press for 15 seconds to properly adhere the coating to the wood surface. When transferring your sublimation design, maintain the same temperature of 375°F but extend the pressing time to 90 seconds under medium pressure. These exact settings activate the sublimation ink’s transformation from solid to gas while allowing proper penetration into the polymer coating.
Transferring Your Design
The transfer technique directly impacts the quality of your finished wood sublimation project. Position your printed sublimation paper face-down on the prepared wooden surface, ensuring perfect alignment with any reference marks you’ve made at the center point. Secure the paper with heat-resistant tape to prevent shifting during the pressing process. Cover the entire setup with butcher paper to protect your heat press from any excess ink. After pressing, immediately peel away the sublimation paper while still hot to prevent any ghosting or blurring effects. Trim any excess laminate or HTV with a create knife for clean edges on your finished piece.
For best results, ensure proper ventilation with fans or open windows during the process due to potential fumes. Light-colored, smooth hardwoods typically produce the most vibrant results compared to darker or highly textured wood varieties.
Troubleshooting Common Wood Sublimation Problems

Even experts encounter challenges when sublimating on wood. Let’s explore the most common issues you might face during your sublimation projects and provide practical answers to help you achieve professional results consistently.
Faded Images
Faded sublimation images on wood typically result from insufficient heat, time, or pressure during the transfer process. To correct this issue, verify your heat press settings are at 375°F with pressing times between 15-60 seconds under firm, even pressure. Double-check that your wooden substrate has been completely coated with either polycrylic sealant or laminate to create the necessary polymer-rich layer for proper ink bonding. Applying 2-3 coats of sealant often makes a important difference in image vibrancy and clarity compared to a single application.
Ghosting Issues
Ghosting appears as blurred or double images on your sublimated wood products. This frustrating problem occurs when there’s movement during pressing or inadequate adhesion between the transfer paper and wood surface. We recommend securing your sublimation transfer paper firmly with heat-resistant tape on all edges to prevent shifting. Avoid the temptation to reposition the paper after it makes initial contact with the heated surface. For best results, place your transfer in the exact position needed the first time and maintain complete stillness throughout the pressing process.
Uneven Transfer
Uneven transfers manifest as patchy or inconsistent design areas on your wooden items. Warped wood surfaces, trapped debris, or irregular sealant application commonly cause this issue. Sand your wooden blanks thoroughly before beginning the sublimation process to ensure a perfectly smooth surface. Apply multiple thin coats of polycrylic sealant (2-3 layers) rather than one thick coat for consistent coverage. Use a lint roller immediately before pressing to remove any dust particles that might interfere with image transfer. For optimal results, consider using oil-based paints as a base coat instead of water-based alternatives when working with painted wood surfaces, as they provide superior sublimation results.
Best Types of Wood for Sublimation Projects

Choosing the right wood type significantly impacts your sublimation results. Not all woods accept sublimation equally, with some providing vibrant, crisp images while others produce disappointing outcomes. Let’s explore the most effective options for your sublimation projects.
Natural Wood
Natural wood offers a rustic, authentic appearance that many crafters desire. The organic grain patterns create unique, one-of-a-kind results for each project you complete. But, these natural characteristics come with limitations – wood grain and texture often distort print quality, potentially compromising fine details in your designs. Another challenge with natural wood stems from its sap content, which can bleed through during the heat pressing process, affecting color accuracy and image clarity.
Engineered Wood
Engineered wood provides the most reliable surface for sublimation projects. Plywood and MDF (Medium Density Fiberboard) feature flat, uniform surfaces that accept sublimation ink evenly without the inconsistencies of natural grain interference. These materials produce sharper, more consistent results across batches, making them ideal choices for beginners and commercial producers alike. Truflat plywood stands out as a premier option, coming pre-coated with a wood-like finish that eliminates preparation steps while maintaining a natural aesthetic.
Painted Wood
White-painted wood surfaces enhance color vibrancy in sublimation prints, creating eye-catching final products. The paint layer acts as a bright background that allows colors to pop more dramatically than on natural wood tones. This option requires additional preparation though – you’ll need to apply heat transfer vinyl (HTV) or a specialized coating to prevent resin or sap from bleeding through during the heating process. Painted surfaces work particularly well for detailed designs where color accuracy matters most.
For reliable results, engineered woods like plywood and MDF consistently outperform other options due to their uniform surfaces and stability under heat. Pre-coated substrates like Truflat eliminate guesswork and provide professional-quality outcomes even for first-time sublimators. Natural wood works best for projects where a rustic look takes priority over perfect image reproduction.
Creative Wood Sublimation Project Ideas

Wood sublimation opens up endless possibilities for creating beautiful, personalized items. Let’s explore some of the most popular and profitable project ideas that showcase the versatility of this technique.
Decorative Signs
Decorative signs represent one of the most popular wood sublimation projects. Custom name signs for homes, inspirational quotes for offices, and seasonal decorations all sell exceptionally well at create fairs and online marketplaces. The natural wood grain enhances text-based designs, creating a warm, inviting aesthetic that complements any décor style.
Custom Keychains
Small wooden blanks transform into eye-catching keychains through sublimation. These compact items require minimal materials while offering high profit margins. Names, logos, and small graphics work perfectly on these portable accessories. Wooden keychains provide a natural alternative to plastic options, making them appealing to eco-conscious consumers.
Personalized Picture Frames
Picture frames benefit tremendously from sublimation techniques. Family names, wedding dates, or baby announcements sublimated onto wooden frames create meaningful keepsakes. The permanence of sublimation ensures these personalized elements won’t fade or peel over time like traditional vinyl applications might.
Wooden Ornaments
Ornaments represent a versatile sublimation project adaptable for various holidays and occasions. Christmas ornaments with family photos, graduation commemoratives, and baby’s first milestones all translate beautifully onto wooden blanks. Their small size makes ornaments perfect for practicing sublimation techniques while using minimal materials.
Home Décor Items
Wooden coasters, serving trays, and wall art pieces provide larger canvas areas for more detailed sublimation designs. These functional items combine practicality with personalization, making them highly marketable. The natural warmth of wood complements home décor trends focused on bringing organic elements indoors.
Kitchen Accessories
Cutting boards, utensil holders, and recipe stands offer practical applications for sublimation. Recipes passed down through generations look striking when permanently sublimated onto wooden kitchen tools. Food-safe sealants applied after sublimation ensure these items remain functional while displaying vibrant designs.
Office Supplies
Desk organizers, business card holders, and custom name plates elevate professional environments through personalization. Corporate logos and branding elements transfer beautifully onto wooden office accessories. These items make excellent corporate gifts or employee recognition items with their professional appearance and customization options.
Conclusion
Sublimation on wood opens up a industry of creative possibilities while offering impressive durability and professional results. With the right equipment polymer-coated surfaces and proper technique you’ll transform ordinary wooden items into stunning personalized products.
We’ve covered everything from essential supplies to troubleshooting tips making this create accessible for beginners and profitable for entrepreneurs. Remember that preparation is key – properly coated wood combined with correct heat press settings ensures vibrant long-lasting transfers.
Whether you’re creating decorative signs ornaments or custom gifts wood sublimation delivers results that traditional printing methods simply can’t match. Armed with this knowledge you’re now ready to start your wood sublimation journey and bring your creative vision to life on beautiful wooden surfaces.
Frequently Asked Questions
What is sublimation on wood?
Sublimation on wood is a heat transfer process that permanently bonds ink to specially treated wooden surfaces. The process converts solid ink directly to gas under heat and pressure, which then bonds with a polymer coating on the wood. Unlike traditional printing methods, sublimated designs become part of the surface rather than sitting on top, resulting in vibrant, durable images.
Do I need special equipment for wood sublimation?
Yes, you need specific equipment for wood sublimation. Essential items include a dedicated sublimation printer with sublimation inks, a heat press capable of reaching 375°F, high-quality sublimation paper, and polymer-coated wood blanks. Standard printers and regular inks won’t work as only sublimation inks can achieve the necessary gaseous transfer for permanent bonding.
Can I sublimate on any type of wood?
No, not all wood accepts sublimation equally. The wood must have a polymer coating to bond with sublimation ink. You can use pre-coated wood blanks or treat raw wood with methods like polycrylic coating, sublimation HTV, or sublimation spray. Engineered woods (plywood, MDF) provide more consistent results, while natural wood offers a rustic look but may affect image precision.
How do I prepare wood for sublimation?
To prepare wood for sublimation, first sand the surface smoothly. Next, apply a polymer coating using one of several methods: polycrylic coating (3-4 thin layers), sublimation spray, laminating sheets, or sublimation HTV. For best results, ensure the coating is white or light-colored, completely dry between layers, and sanded lightly between coats for a smooth finish.
What temperature and time settings should I use?
For wood sublimation, set your heat press to 375-400°F (190-205°C) with medium to firm pressure. Press time typically ranges from 60-90 seconds depending on the wood thickness and coating type. Always follow specific recommendations for your materials and conduct test presses before working on final projects to avoid overheating, which can damage the wood or coating.
Why are my sublimated images on wood faded?
Faded images usually result from insufficient heat, pressure, or improper coating. Ensure your heat press reaches the correct temperature (375-400°F), apply firm pressure, and use adequate pressing time (60-90 seconds). Apply multiple thin coats of polymer sealant rather than one thick coat, and make sure your sublimation ink is fresh and high-quality.
How do I prevent ghosting in wood sublimation?
To prevent ghosting (duplicate images or blurring), secure your transfer paper firmly to the wood with heat-resistant tape, and avoid any movement during pressing. Use a protective sheet between the press and your project. Ensure your design is properly mirrored, and the wood remains completely still throughout the entire heat press process.
What are popular items to make with wood sublimation?
Popular wood sublimation projects include decorative signs, custom keychains, personalized picture frames, wooden ornaments, home décor items like wall art and clocks, kitchen accessories such as cutting boards and coasters, and office supplies like desk nameplates. These items showcase the versatility of wood sublimation and make excellent personalized gifts or sellable products.
How durable are sublimated wood products?
Sublimated wood products are highly durable. Because the ink chemically bonds with the polymer coating, images resist fading, scratching, and water damage better than traditional printing methods. However, for maximum longevity, apply a clear protective sealant after sublimation and advise customers to avoid extended direct sunlight and harsh cleaning chemicals.
Is wood sublimation profitable for small businesses?
Yes, wood sublimation can be very profitable for small businesses. The initial investment in equipment is moderate, while the per-item production cost is relatively low. Wood blanks are affordable, and the ability to create custom, personalized items allows for premium pricing. The efficiency of the process enables quick turnaround times, making it ideal for small-batch production and custom orders.


