Veneer wood surfaces add elegance to any home, but over time they can lose their luster and appear worn or dated. The good news? You don’t need to replace your veneer furniture or cabinets to give them new life. Restaining is a cost-effective way to transform these pieces and match your current décor.
We’ll guide you through the process of restaining veneer wood to achieve professional-looking results. While many believe working with veneer is challenging, our step-by-step approach makes it accessible even for DIY beginners. With the right tools, techniques, and a little patience, you’ll restore the beauty of your veneer wood surfaces and extend their lifespan for years to come.
Understanding Wood Veneer and Restaining Basics
Wood veneer surfaces offer elegant aesthetics but require exact treatment methods when restoring their finish. Restaining these surfaces demands understanding their unique properties and knowing when the time is right for a refresh.
What Is Wood Veneer and How Is It Different from Solid Wood
Wood veneer consists of thin slices of real wood adhered to a substrate like plywood, MDF, or particleboard. Unlike solid wood pieces carved from single lumber sections, veneer provides the beautiful appearance of premium wood species without the substantial cost or weight. Veneer thickness typically ranges from 1/42″ to 1/16″, giving just enough material for light sanding during refinishing processes. The core difference lies in the construction—solid wood furniture features consistent wood composition throughout, while veneer pieces have a layered structure with only the outermost surface containing the decorative wood. This distinction significantly impacts refinishing approaches since veneer doesn’t permit aggressive sanding or heavy treatments that might penetrate through the thin exterior layer.
When to Restain Your Veneer Furniture
Veneer furniture typically shows several signs indicating it’s time for restaining. Fading color from sun exposure creates uneven tones across surfaces, particularly near windows or in bright rooms. Water rings and stains from drinks or plant pots leave noticeable discoloration that won’t disappear with cleaning. Surface scratches accumulating over years of use disrupt the smooth appearance and reveal lighter wood underneath the finish. Outdated color schemes that no longer match your room’s aesthetic present an opportunity for a style update through restaining. The finish might also appear dull and lifeless even though regular cleaning, indicating the protective topcoat has worn away. Addressing these issues promptly prevents further deterioration and extends your furniture’s lifespan, transforming tired-looking pieces into refreshed focal points that complement your space.
Tools and Materials You’ll Need for Restaining Veneer

Restaining veneer wood requires exact tools and materials to ensure a professional finish. We’ve compiled a comprehensive list of everything you’ll need to successfully complete your veneer restoration project.
Essential Supplies Checklist
Proper preparation starts with gathering all necessary supplies before beginning your project:
- Sandpaper in multiple grits: You’ll need 100-grit for initial sanding, 180-grit for intermediate smoothing, and 240-grit for final preparation
- Wood stain compatible with veneer surfaces (oil-based or solvent-based options)
- Clean rags for applying stain and wiping excess
- Tack cloth to remove fine dust particles between sanding stages
- Cleaning solution such as TSP (trisodium phosphate) or white vinegar to prepare the surface
- Protective gloves to keep your hands clean and protected from chemicals
- Safety mask to prevent inhalation of dust and fumes
- Primer (optional) to improve stain adhesion on challenging surfaces
- Finishing coat materials like wax, varnish, or lacquer for protection
Choosing the Right Stain for Veneer
The correct stain selection makes a important difference in your veneer restoration results:
Oil-based stains offer excellent workability with veneer surfaces. These stains provide longer working time for even application and penetrate well into the thin veneer layer without causing damage.
Solvent-based stains function similarly to oil-based options but often contain stronger chemicals. These stains typically dry faster and may produce more intense fumes, making proper ventilation essential.
Testing your chosen stain on an inconspicuous area is critical before full application. Veneer often absorbs stain differently than solid wood, frequently resulting in a darker finish than expected. Apply a small amount to a hidden spot, let it dry completely, and evaluate the color before committing to the entire piece.
Preparing Your Veneer Surface for Restaining

Proper preparation is the cornerstone of a successful veneer restaining project. The thin nature of veneer requires special attention during the preparation phase to ensure beautiful, long-lasting results.
Cleaning and Assessing the Current Finish
Thoroughly clean your veneer surface with an appropriate cleaner or degreaser to remove accumulated dirt, oils, and residue. A clean surface allows for better evaluation of the wood’s condition and ensures proper stain adhesion when you begin the application process. Examine the existing finish carefully to determine whether you can apply new stain directly over it or if complete removal is necessary. Look for signs of uneven wear, deep scratches, or areas where the current finish has failed, as these factors will influence your preparation approach.
Sanding Veneer Wood Properly
Use light pressure when sanding veneer surfaces to prevent damage to the thin wood layer. Veneer typically measures only 1/42″ to 1/16″ thick, making it susceptible to sanding through to the substrate if excessive force is applied. Select fine-grit sandpaper (180-220 grit) for your initial sanding to smooth the surface and open the wood pores for optimal stain absorption. Sand exclusively in the direction of the wood grain to avoid creating cross-grain scratches that will become more visible after staining. Remove all sanding dust with a clean, dry cloth before proceeding to the next steps.
For optimal results, apply a pre-stain wood conditioner to your prepared veneer surface, especially with woods prone to blotchy absorption like birch or maple. This conditioner helps create an even base for stain application and prevents patchy coloration. Apply your chosen stain with a foam brush or clean rag, working with the grain and wiping off excess with a lint-free cloth to achieve uniform color distribution. Complete your restoration by adding a protective clear coat such as polyurethane or lacquer once the stain has fully dried to safeguard your newly refreshed veneer and enhance its durability.
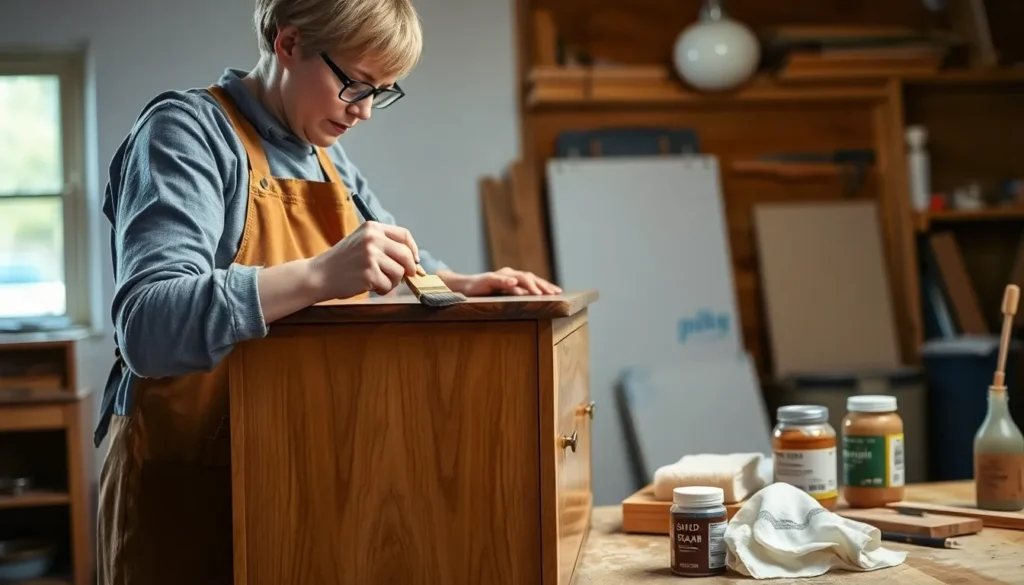
Step-by-Step Veneer Restaining Process

Restaining veneer wood follows a systematic process that yields professional-looking results when executed properly. Our comprehensive guide breaks down each crucial step to transform your tired veneer furniture into stunning pieces.
Cleaning and Preparation
The veneer restaining process begins with thorough cleaning using an appropriate wood cleaner to remove accumulated dirt, oils, and old finishes. Clean surfaces ensure better stain adhesion and reveal the true condition of your veneer. After cleaning, allow the surface to dry completely before proceeding to the next step.
Sanding
Light sanding creates an ideal surface for accepting new stain while preserving the thin veneer layer. Many veneer pieces come pre-sanded, but a gentle once-over with fine-grit sandpaper (220-grit) improves stain absorption. Sand along the grain using minimal pressure to avoid damaging the veneer. Wipe the surface with a tack cloth after sanding to remove all dust particles.
Applying the Stain Correctly
Stain application techniques significantly impact the final appearance of your veneer project. Mix the stain thoroughly before application to ensure color consistency throughout your project. Apply the stain using a clean rag or foam brush in long, smooth strokes that follow the wood grain for even distribution and natural-looking results. Foam brushes work particularly well with gel stains, allowing for controlled application and easier manipulation of the product.
Working in small sections prevents the stain from drying before you’ve had a chance to wipe off any excess. Maintain a wet edge between sections to avoid lap marks that can create uneven coloration. Allow the stain to sit on the surface according to the manufacturer’s recommendations—typically 5-15 minutes—before wiping off excess with a clean, lint-free cloth.
Controlling Stain Absorption on Veneer
Veneer’s absorption rate directly affects the final color intensity and evenness of your project. Testing the stain on an inconspicuous area helps determine the optimal application method and drying time for your exact veneer type. The longer stain remains on the surface before wiping, the darker and richer the resulting color becomes.
For consistent absorption across the entire surface, ensure the veneer is completely smooth and free from imperfections that might cause blotchy results. Apply uniform pressure when wiping away excess stain to maintain color consistency. Areas that appear too light can receive additional stain applications after the first coat has dried completely.
Drying and Additional Coats
Proper drying between coats guarantees optimal results and prevents surface problems. Allow each stain application to dry completely according to the manufacturer’s instructions—typically 24 hours in normal conditions. Insufficient drying time between coats can lead to tacky surfaces and improper curing of the finish.
Multiple thin coats produce better results than a single heavy application. Each subsequent coat deepens the color while maintaining the natural wood grain visibility. Lightly sand between coats with 320-grit sandpaper for the smoothest possible finish.
Finishing
Protecting your newly stained veneer surface with a clear topcoat ensures longevity and enhances the appearance. Apply a protective finish such as polyurethane, varnish, or lacquer using a high-quality brush or spray applicator. These finishes shield your veneer from moisture, UV damage, and daily wear.
For optimal results, apply 2-3 thin coats of finish rather than one thick coat, sanding lightly between applications with 320-grit sandpaper. Allow the final coat to cure completely—typically 72 hours—before returning the furniture to regular use.
Finishing and Protecting Your Newly Stained Veneer

After your stain has completely dried, it’s time to protect your newly refreshed veneer with a durable finish. Applying a quality protective coat enhances the wood’s appearance while providing essential defense against daily wear, moisture, and other potential damage.
Sealing Options for Longevity
Selecting the right sealer for your veneer project makes a important difference in its durability and appearance. Lacquer delivers a glossy, professional finish but requires sanding between applications—apply at least three coats for optimal protection, allowing proper drying time between each layer. Shellac creates a warm, vintage aesthetic with moderate durability and works best when the final coat is applied using an aerosol spray for even coverage. Varnish stands out as the most durable option, offering superior protection against moisture, heat, and UV damage, making it ideal for high-traffic furniture pieces and kitchen cabinets. Each product comes with exact application instructions that should be followed carefully to achieve the best results.
Buffing and Polishing Techniques
The final buffing process transforms your veneer from merely refinished to professionally restored. Once your chosen finish has fully cured (typically 24-48 hours), use a soft cloth or dedicated buffing pad to create a smooth, even sheen across the entire surface. Apply gentle, consistent pressure in circular motions to eliminate any minor imperfections without damaging the thin veneer layer. For enhanced protection and an exquisite shine, apply a small amount of quality furniture wax or polish using circular movements, allowing it to dry according to the manufacturer’s specifications before buffing it to a lustrous finish with a clean, soft cloth. This final polishing step not only elevates the appearance but also provides an additional layer of protection against fingerprints and light scratches.
Troubleshooting Common Veneer Restaining Problems

Even with careful preparation, challenges can arise during the veneer restaining process. Recognizing and addressing these issues promptly ensures your project achieves professional-quality results.
Fixing Blotchiness and Uneven Coloration
Blotchy stain application creates an unprofessional, patchy appearance on veneer surfaces. Testing stain on a hidden area first helps identify potential absorption issues before committing to the entire piece. Applying a pre-stain wood conditioner evens out absorption rates across different sections of the veneer, reducing the likelihood of blotchiness. Maintaining consistent application techniques—using smooth, overlapping strokes and wiping excess stain after a consistent dwell time—further promotes uniform coloration. Sanding between coats with fine-grit sandpaper (220 or higher) removes any raised grain and creates a more receptive surface for additional stain applications.
Dealing with Veneer Damage During Restaining
Veneer’s thin nature makes it particularly vulnerable to damage during the refinishing process. Sanding with light pressure in the direction of the grain prevents tearing or lifting the delicate wood layer. Using only fine-grit sandpaper (220 or higher) for veneer surfaces minimizes the risk of sanding through to the substrate below. Loose veneer edges require immediate repair with wood glue and clamping pressure until completely dry. Small chips or cracks can be filled with wood filler matched to your stain color, while larger damaged sections might need replacement with new veneer that matches the grain pattern of the original. Avoiding excessive moisture during cleaning prevents warping and bubbling of the veneer—always wipe spills immediately and allow surfaces to dry completely between each step of the restaining process.
Conclusion
Restaining veneer wood isn’t just about refreshing its appearance—it’s about extending the life of your furniture while saving money. With the techniques we’ve shared you can confidently transform faded veneer pieces into stunning focal points that complement your home’s aesthetic.
Remember that patience is key throughout this process. Take your time with preparation sanding staining and sealing for professional-quality results. Even beginners can achieve beautiful outcomes by following our step-by-step approach.
By investing a weekend in restaining rather than replacing your veneer furniture you’ll gain satisfaction from both the money saved and the personalized pieces you’ve created. Your newly restored veneer wood will continue to serve you beautifully for years to come.
Frequently Asked Questions
Can veneer wood furniture be restained?
Yes, veneer wood furniture can be restained. Since veneer is a thin layer of real wood adhered to a substrate, it can be refinished much like solid wood. However, the process requires extra care due to the thinness of the veneer layer. Restaining is a cost-effective way to update the appearance of veneer furniture without replacing it.
How do I know if my furniture is veneer or solid wood?
Check the edges and underside of the furniture. Veneer typically has a uniform pattern on the surface but different wood underneath. Look for a thin line along edges where the veneer meets the substrate. Solid wood shows consistent grain patterns throughout, including on edges and undersides. Veneer also tends to be on cheaper or mass-produced furniture.
What tools do I need to restain veneer?
Essential tools include: various grits of sandpaper (220-320 grit), compatible wood stain, clean rags, tack cloth, cleaning solution, protective gear (gloves, mask), paintbrushes or foam applicators, and finishing coat materials (polyurethane, varnish, or lacquer). Having wood filler on hand for repairs and pre-stain conditioner for even results is also recommended.
Should I use oil-based or water-based stain for veneer?
Oil-based stains are generally preferable for veneer. They offer better workability with longer drying times, allowing for adjustments and even application. They also penetrate better into the wood grain. While solvent-based stains dry faster, they require proper ventilation. Always test your chosen stain on an inconspicuous area first.
How do I prepare veneer for restaining?
Thoroughly clean the surface with a mild detergent solution to remove dirt and oils. Allow it to dry completely. Lightly sand the surface with fine-grit sandpaper (220-320 grit), moving with the grain and using minimal pressure to avoid sanding through the veneer. Remove all dust with a tack cloth before applying stain.
Can I sand veneer wood?
Yes, but with caution. Use fine-grit sandpaper (220-320 grit) and apply very light pressure to avoid sanding through the thin veneer layer. Always sand in the direction of the wood grain. The goal is to scuff the surface enough to remove the old finish and allow new stain to adhere, not to remove material.
How do I fix blotchy stain on veneer?
Prevent blotchiness by applying a pre-stain wood conditioner before staining. For existing blotchy areas, lightly sand the surface and reapply stain using consistent, even strokes. Work in small sections and wipe excess stain quickly. For severe cases, you may need to completely remove the stain and start over.
What’s the best way to apply stain to veneer?
Apply stain with a clean cloth or foam brush in the direction of the wood grain. Work in small sections, applying evenly and wiping off excess with a clean cloth after a few minutes. This prevents pooling and ensures even color. For deeper color, apply multiple thin coats rather than one thick coat.
How long should veneer stain dry between coats?
Follow the manufacturer’s instructions, but generally allow 4-24 hours between coats depending on the type of stain and environmental conditions. Oil-based stains typically require longer drying times than water-based options. Ensure the surface is completely dry before applying additional coats or protective finishes.
What protective finish should I use over stained veneer?
After staining, apply a clear protective topcoat like polyurethane, lacquer, or varnish to protect the veneer. Water-based polyurethane offers good durability with less yellowing over time. Oil-based finishes provide a warmer look. Apply 2-3 thin coats, lightly sanding between each for the best results and long-lasting protection.


