Dealing with stubborn polyurethane finishes on wood surfaces can be frustrating, especially when you’re ready for a fresh start. We’ve all been there—staring at that glossy coating that stands between us and our wood restoration dreams. But don’t worry, removing polyurethane doesn’t have to be a headache.
We’ll walk you through several proven methods to strip away that protective layer and reveal the beautiful wood beneath. Whether you’re refinishing an antique dresser or updating your hardwood floors, these techniques will help you tackle the job efficiently and effectively. From chemical strippers to heat guns and sanding approaches, we’ve tested the best answers to make your project successful.
Understanding Polyurethane Finishes on Wood
Polyurethane finishes create a durable protective layer on wood surfaces, sealing them against moisture, scratches, and daily wear. These clear coatings enhance the natural beauty of wood while providing long-lasting protection for furniture, floors, and other wooden items.
Types of Polyurethane Finishes
Oil-based polyurethane offers exceptional durability and a warm amber glow that deepens with age. This traditional finish takes longer to dry (typically 24 hours between coats) but provides superior protection against heat and chemicals. Water-based polyurethane dries faster (2-4 hours between coats) and maintains a clear appearance without yellowing over time, making it ideal for light-colored woods like maple or ash. Newer hybrid formulations combine the benefits of both, featuring improved durability with reduced odor and faster drying times. Semi-gloss finishes strike a balance between subtle sheen and practical maintenance, while high-gloss options create a mirror-like surface that dramatically highlights wood grain patterns.
When to Remove Polyurethane
Visible damage signals it’s time to remove existing polyurethane finish—look for scratches that penetrate through to the wood, white water rings, or widespread cracking that resembles alligator skin. Discoloration issues such as yellowing (common with oil-based finishes) or cloudy patches indicate degradation of the protective layer. Refinishing becomes necessary when previous applications were improperly applied, resulting in visible brush marks, bubbles, or uneven sheen across the surface. Renovation projects often require stripping existing finishes to achieve cohesive results, especially when matching new wood elements with existing pieces. Many homeowners also choose to remove polyurethane simply to update the appearance—perhaps changing from high-gloss to matte finish or applying stain to transform the wood’s color completely.
Essential Tools and Materials for Removing Polyurethane

Removing polyurethane from wood requires exact tools and materials to effectively strip away the finish while protecting the underlying wood surface. We’ve compiled a comprehensive list of everything you’ll need to tackle this project successfully.
Safety Equipment You’ll Need
Safety equipment is non-negotiable when working with polyurethane removers. Chemical-resistant gloves made of nitrile or neoprene provide essential hand protection when applying chemical strippers. A NIOSH-approved respirator prevents inhalation of harmful fumes and particles generated during sanding or chemical application processes. Splash-proof goggles protect your eyes from accidental splashes or airborne particles that can cause serious damage. Proper ventilation is crucial – always work outdoors or in well-ventilated areas to minimize exposure to toxic fumes released during the stripping process.
Chemical Strippers and Solvents
Chemical strippers break down polyurethane finishes for easier removal. Traditional options include acetone or methylene chloride-based products that work effectively but contain hazardous chemicals requiring careful handling. Biosolvents derived from renewable resources offer a non-toxic, low-odor alternative with comparable effectiveness to acetone, making them ideal for indoor projects.
Application techniques follow a standard process: apply the stripper generously, wait 15-30 minutes for it to soften the finish (timing varies by product), then scrape away the loosened polyurethane with a metal or plastic scraper. After scraping, light sanding removes any remaining residue. Mechanical methods like planing with a helical cutter work fastest for thick coatings, while chemical approaches are better suited for detailed surfaces and intricate woodwork.
For cleanup, use mineral spirits after traditional chemical strippers or a damp cloth after using biosolvents or natural mixtures. Natural alternatives like cornstarch, baking soda, vinegar, and water mixtures can be effective but should be avoided on high-tannin woods such as oak or mahogany as they may cause unwanted reactions.
Chemical Methods to Remove Polyurethane

Chemical methods offer effective answers for removing stubborn polyurethane finishes from wood surfaces. These approaches range from powerful commercial products to gentler natural alternatives, giving you options based on your project needs and safety concerns.
Using Commercial Chemical Strippers
Commercial chemical strippers provide the most powerful way to break down polyurethane layers. Methylene chloride-based products work particularly fast, dissolving the finish to create a bubbly texture that’s easy to remove. To use these products effectively, apply the stripper evenly across the wood surface with a paintbrush, wait for the recommended dwell time (usually 15-30 minutes), and watch for the finish to bubble and loosen. Once bubbling occurs, gently scrape away the softened polyurethane using a plastic scraper to avoid damaging the wood underneath.
Safety measures are non-negotiable when working with commercial strippers. Always wear chemical-resistant gloves, use proper ventilation (ideally outdoors or in well-ventilated spaces), and consider wearing a respirator to protect against toxic fumes. The powerful chemicals in these products require careful handling and proper disposal according to local regulations.
Natural Alternatives for Stripping Polyurethane
Natural alternatives provide a less toxic approach to polyurethane removal, especially for smaller projects or when working in spaces with limited ventilation. A homemade cornstarch-based paste creates an effective natural stripper. Mix 1 cup cornstarch, ½ cup cold water, 3/4 cup baking soda, and 1 tablespoon vinegar, then add 4 cups of boiled water to create a thick paste. Apply this mixture to the polyurethane surface, let it sit until the finish softens, then scrape it away.
This natural method works best on light-colored, low-tannin woods such as pine or maple. Dark woods including oak, cherry, and mahogany don’t respond well to this treatment since the baking soda can react with their high tannin content, resulting in unsightly dark stains that prove difficult to remove.
Biosolvents represent another eco-friendly option, derived from renewable resources rather than petroleum. These products dissolve polyurethane effectively without releasing harmful emissions into your home environment. While typically not as fast-acting as traditional chemical strippers, biosolvents offer a good balance between effectiveness and environmental responsibility.
For all chemical methods—commercial or natural—testing in an inconspicuous area first helps determine compatibility with your exact wood type and finish. Combining chemical stripping with light sanding often yields the most thorough polyurethane removal, particularly when working on large surfaces like hardwood floors.
Mechanical Methods for Polyurethane Removal

Mechanical removal techniques offer the fastest approach to strip polyurethane finishes from wood surfaces. These methods involve physically removing the finish layer through tools and abrasives, exposing the bare wood underneath without chemicals.
Sanding Techniques for Different Wood Types
Sanding effectively removes polyurethane while giving you complete control over the process. For pine and other low-tannin woods, start with coarse 80-grit sandpaper to cut through the finish quickly, then progress to finer grits (up to 220-grit) for a smooth surface. Random orbital sanders prevent unsightly swirl marks that can damage the wood’s appearance.
High-tannin woods like oak, mahogany, and cherry require special consideration. Avoid DIY mixtures containing baking soda as these can react with the wood’s natural tannins, causing unwanted staining. Stick to mechanical sanding or commercial chemical strippers specifically formulated for these wood types.
For larger surfaces, a planer equipped with carbide inserts efficiently removes polyurethane while revealing fresh wood beneath. Orbital or belt sanders paired with 80-100 grit abrasive pads work excellently for smaller areas or detail work. Metal or hard plastic scrapers help tackle uneven spots and crevices where sanders can’t reach effectively.
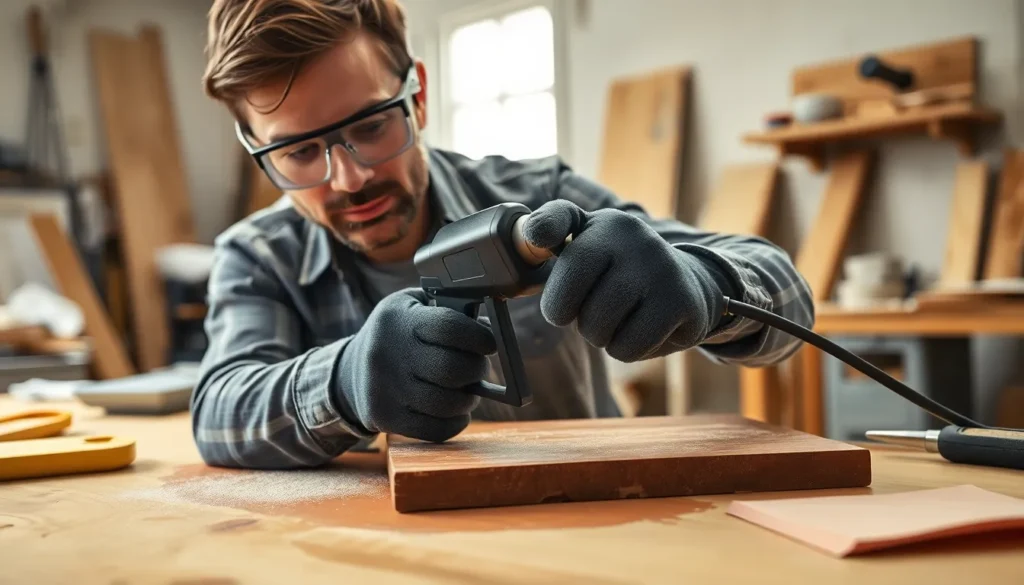
Heat Gun Method for Stubborn Finishes
Heat guns provide an effective solution for particularly stubborn polyurethane finishes that resist sanding alone. Apply controlled heat with a heat gun to soften the polyurethane layer, making it pliable enough to scrape away with a putty knife. Keep the heat gun moving continuously to prevent scorch marks or burns on the wood surface.
Timing matters when using heat methods—remove the softened finish immediately after heating while it remains pliable. Avoid prolonged heating in any single area as this can damage the wood beneath the finish. For spot treatments on small areas, some professionals use a propane torch, though this carries higher risk and requires immediate sanding afterward to remove any charred residue.
Green scrubbing pads can help remove polyurethane residue after either heating or chemical treatment. These slightly abrasive pads effectively clean away softened finish without deeply scratching the wood underneath, creating an ideal transition point between rough removal and fine finishing work.
Step-by-Step Guide to Remove Polyurethane

Removing polyurethane from wood requires a methodical approach to protect the underlying surface while effectively stripping away the finish. We’ve compiled a comprehensive process that guides you through each phase of the removal project, from initial testing to final cleanup.
Preparation and Surface Testing
Testing your wood before starting ensures you choose the appropriate removal method for your exact wood type. First, check the tannin levels of your wood—pine and similar woods have low tannins, while darker woods typically contain higher amounts. This distinction matters because certain removal agents like baking soda can react negatively with high-tannin woods, causing unwanted staining. Before proceeding, remove all hardware and trim pieces using a flat tool such as a chisel to avoid damaging these components. Safety preparation is equally important—gather chemical-resistant gloves, protective goggles, and ensure proper ventilation throughout your working area to minimize exposure to fumes.
Application and Removal Process
The application method varies depending on which polyurethane removal technique you select. For chemical strippers, apply a generous layer to the wood surface and allow it to work according to the manufacturer’s recommended time frame, typically 15-30 minutes. Once the polyurethane softens, use a plastic putty knife to gently scrape away the loosened finish, working with the wood grain to prevent scratching. If you’re using the sanding approach, start with coarse 60-80 grit sandpaper for the initial removal, then progress to medium 120 grit for refining the surface. Always sand in the direction of the wood grain to avoid creating cross-grain scratches that can be difficult to remove later. For those preferring non-chemical methods, create a paste using water, cornstarch, and possibly baking soda (for low-tannin woods only), apply it to the surface, scrub gently with a soft brush, and thoroughly rinse afterward.
Cleaning the Wood After Stripping
Proper cleaning after polyurethane removal prepares the wood for its new finish and prevents future issues. Wipe down the stripped surface with mineral spirits or paint thinner to remove any chemical residue that might interfere with new finishes. Allow the wood to dry completely for at least 48 hours—this drying period is crucial as any trapped moisture can cause problems with subsequent finishes. For optimal results, perform a final light sanding with fine 220 grit sandpaper once the wood is completely dry. This step creates a smooth, receptive surface for stains or new polyurethane applications. Large surface areas like floors benefit from floor sanders or orbital tools for more efficient cleaning and preparation. Throughout the cleaning process, maintain adequate ventilation, particularly when working with solvents like mineral spirits that continue to emit fumes during the drying phase.
Refinishing Your Wood After Polyurethane Removal

Once you’ve successfully stripped the polyurethane finish from your wood surface, it’s time to prepare it for a fresh, new finish. This crucial step determines the quality and longevity of your refinishing project.
Preparing the Bare Wood Surface
Proper preparation of the bare wood surface ensures optimal adhesion of your new finish. Start by cleaning the entire surface with a damp cloth to remove any dust, debris, or chemical residue from the stripping process. Allow the wood to dry completely before moving forward with any additional preparation steps. Sand the surface using progressively finer grits of sandpaper to achieve a smooth, even texture that’s ready for finishing. For areas with gaps, holes, or damage, apply an appropriate wood filler and allow it to dry according to the manufacturer’s instructions before sanding it flush with the surrounding wood.
Choosing a New Finish
Selecting the right finish for your newly stripped wood depends on both the wood type and your desired outcome. Consider these options:
- Polyurethane finishes provide excellent durability and come in both oil-based versions (offering a warm amber glow) and water-based formulations (providing a clearer finish with less yellowing over time).
- Oil-based finishes like tung oil or linseed oil penetrate the wood fibers to enhance the natural grain while offering moderate protection.
- Wax finishes deliver a soft, natural luster that’s easy to maintain but offers less protection than polyurethane or oil options.
Apply your chosen finish in thin, even coats following the wood grain pattern. Multiple thin layers typically yield better results than a single thick application. The drying time between coats varies based on the product type, room temperature, and humidity levels, so always follow the exact manufacturer’s instructions for application and curing times.
Common Mistakes to Avoid When Removing Polyurethane

Neglecting Safety Precautions
Safety equipment isn’t optional when stripping polyurethane. Chemical strippers contain harsh substances that cause skin irritation and produce toxic fumes, while sanding creates fine dust particles that damage your lungs. Always wear chemical-resistant gloves, proper eye protection, and a respirator mask rated for chemical vapors and particulates. Working in a well-ventilated area protects you from inhaling harmful fumes that can cause dizziness, headaches, or more serious health issues.
Using Aggressive Methods on Soft Woods
Soft woods like pine and cedar require a gentler approach than hardwoods. Aggressive sanding or scraping easily gouges these softer surfaces, creating damage that’s difficult to repair. When working with soft woods, opt for less abrasive methods like chemical strippers followed by light sanding with fine-grit sandpaper. Using too much pressure with scrapers or sanders ruins the wood’s natural beauty and creates an uneven surface that’s nearly impossible to refinish properly.
Ignoring Wood Tannin Content
The tannin level in your wood determines which removal methods work best. Natural answers containing vinegar and water often react with high-tannin woods like oak, mahogany, and cherry, causing unsightly dark stains and discoloration. These stains penetrate deep into the wood grain and can’t be removed through sanding. For high-tannin woods, stick with commercial strippers specifically formulated for hardwoods, or use mechanical methods like careful sanding to avoid chemical reactions.
Leaving Residual Polyurethane
Incomplete polyurethane removal prevents new finishes from adhering properly. Even thin, barely visible layers of old finish create adhesion problems, leading to peeling, bubbling, or an uneven appearance in your new finish. Check the entire surface in good lighting after stripping or sanding to identify any remaining polyurethane patches. Running your hand over the wood helps detect smooth spots that indicate residual finish requiring additional attention.
Working in Poor Ventilation
Poor ventilation allows toxic fumes to concentrate to dangerous levels. Chemical strippers release volatile organic compounds that cause respiratory issues, headaches, and dizziness when inhaled. Always open windows, use fans to create cross-ventilation, and take frequent breaks to get fresh air. If working indoors, consider using a box fan positioned in a window to pull fumes outside, or better yet, complete the stripping process outdoors when weather permits.
Conclusion
Stripping polyurethane from wood doesn’t have to be an intimidating task when you’re equipped with the right knowledge and tools. By following our detailed methods—whether using chemical strippers sanding or heat guns—you can successfully reveal the natural beauty of your wood surfaces.
Remember that safety comes first with proper protective gear and ventilation. Pay attention to your exact wood type especially about tannin content to avoid unwanted reactions. Taking your time with preparation and removal will yield the best results.
With your newly stripped wood ready for refinishing you’ll soon enjoy the satisfaction of a beautifully restored piece that showcases the wood’s natural character. The effort is well worth it when you see your furniture or floors transformed with a fresh finish that perfectly suits your vision.
Frequently Asked Questions
What is polyurethane finish and why would I need to remove it?
Polyurethane is a durable protective coating applied to wood surfaces to enhance beauty and protect against moisture and wear. You might need to remove it when the finish becomes damaged, discolored, or when you want to update the appearance of your furniture or floors. Removing old polyurethane allows you to start fresh with a new finish that better suits your current aesthetic preferences.
What safety equipment do I need when removing polyurethane?
Essential safety equipment includes chemical-resistant gloves, a respirator or mask rated for chemical fumes, safety goggles to protect your eyes, and adequate ventilation in your work area. When using heat guns, fire-resistant gloves are recommended. Never skip safety precautions as polyurethane removers contain harmful chemicals that can cause respiratory issues, skin irritation, or eye damage.
What are the most effective methods for removing polyurethane?
The most effective methods include chemical strippers (traditional or bio-based), sanding with appropriate grit sandpaper, heat guns for softening stubborn finishes, and planers or scrapers for larger surfaces. The best method depends on your specific situation, including the wood type, finish thickness, and project size. For intricate details, chemical strippers often work best, while sanding is ideal for flat surfaces.
How do I use chemical strippers to remove polyurethane?
Apply the stripper generously with a paintbrush in the direction of the wood grain. Allow it to work according to the manufacturer’s instructions (typically 15-30 minutes). When the finish bubbles and lifts, gently scrape it away with a plastic scraper. Neutralize the surface afterward as directed on the product label, then clean with mineral spirits or water depending on the stripper type.
Does the type of wood affect how I should remove polyurethane?
Yes, wood type significantly impacts removal methods. High-tannin woods like oak, cherry, and walnut require special care to prevent staining when using chemical strippers. For these woods, use bio-based strippers or specialized products designed for tannin-rich woods. Soft woods like pine can be easily damaged by aggressive sanding, so use lighter pressure and finer grits initially.
How do I know when all the polyurethane is removed?
The wood surface will have a uniform, matte appearance without any shiny spots or residue. Run your hand over the surface—it should feel smooth and natural, not sticky or slick. Wipe the surface with mineral spirits on a white cloth; any yellowish residue indicates remaining polyurethane. Complete removal is crucial for proper adhesion of new finishes.
Can I use a heat gun to remove polyurethane?
Yes, heat guns are effective for stubborn polyurethane finishes. Hold the gun 2-3 inches from the surface, moving constantly to avoid scorching the wood. As the finish softens, scrape it away with a putty knife. Work in small sections and maintain a temperature between 500-650°F. This method works well for thick finishes but requires careful handling to prevent wood damage.
What should I do after removing all the polyurethane?
After complete removal, prepare the bare wood by cleaning thoroughly with appropriate solvents to remove residues. Sand the surface progressively with finer grits (120-220) to achieve smoothness. Fill any holes or imperfections with wood filler, then sand again once dry. Wipe away all dust with a tack cloth before applying your new finish in thin, even coats according to product instructions.
What are common mistakes to avoid when removing polyurethane?
Common mistakes include neglecting safety precautions, using aggressive methods on soft woods, ignoring wood tannin content, leaving residual polyurethane, and working in poor ventilation. Also avoid rushing the process, applying too much pressure when sanding, and skipping surface testing before full application of any removal method. Patience and proper technique yield the best results.
Are there eco-friendly alternatives for removing polyurethane?
Yes, several eco-friendly options exist. Citrus-based and soy-based strippers are less toxic than traditional methylene chloride products while still being effective. Diatomaceous earth mixed with lemon oil can work for light finishes. Steam removal is another option for some applications. However, these gentler methods may require longer working times and multiple applications for complete removal.


