Transforming stained wood with a fresh coat of paint is a budget-friendly way to breathe new life into tired furniture, cabinets, or trim. We’ve seen countless DIYers struggle with this process, ending up with peeling, chipping paint because they skipped crucial preparation steps. Don’t worry—we’ll guide you through the right way to get beautiful, lasting results.
Why You Might Want to Paint Over Stained Wood
Painting over stained wood breathes new life into tired furniture and outdated spaces. Many homeowners choose this route for several compelling reasons that go beyond simple aesthetics.
Refreshing Outdated Aesthetics
Dark stained wood finishes were incredibly popular in previous decades but often make spaces feel smaller and darker. A coat of paint instantly brightens rooms and creates a more contemporary look. Cherry cabinets and oak trim that once defined 1990s homes transform beautifully with modern paint colors like soft whites, grays, or muted blues.
Addressing Damaged Finishes
Stained wood surfaces frequently develop unsightly conditions over time, including:
- Water ring damage from glasses and hot items
- Sun fading in patches near windows
- Scratches and gouges from daily use
- Uneven coloration from previous repair attempts
Paint effectively conceals these imperfections while creating a uniform appearance across the entire surface.
Cost-Effective Alternative to Replacement
New furniture, cabinetry, and trim installation costs thousands of dollars in materials and labor. Painting existing stained wood items typically requires less than $200 in supplies for an entire kitchen cabinet makeover. This budget-friendly approach delivers dramatic results without demolition, disposal fees, or installation headaches.
Creating Design Cohesion
Mismatched wood pieces from different eras or manufacturers often clash in the same space. Paint unifies diverse elements into a cohesive design scheme. Collections of hand-me-down furniture pieces and architectural elements from various renovations blend seamlessly when painted in a coordinating color palette.
Environmental Benefits
Extending the life of existing wood items through painting reduces landfill waste and conserves resources. This sustainable approach maintains the structural integrity of quality wood pieces while updating their appearance. Solid wood furniture pieces from previous generations typically feature superior construction compared to many new items available today.
Materials and Tools You’ll Need

Gathering the right supplies before starting your project ensures a smooth painting process and professional results. Here’s everything you’ll need to successfully paint over stained wood:
Essential Materials
- Stain-blocking primer: Zinsser BIN Shellac-based primer works exceptionally well for preventing stain bleed-through, especially with darker wood stains
- High-quality paint: Choose either latex or enamel paint specifically formulated for wood surfaces
- Sandpaper: 120-220 grit sandpaper or sanding pads for creating proper surface adhesion
- TSP cleaner or Simple Green: These degreasers effectively remove built-up grime and oils from wood surfaces
- Wood filler: Necessary for repairing any cracks, holes, or damaged areas before painting
- Drop cloths: Protect surrounding surfaces from paint splatter and dust
Required Tools
- Paintbrushes and rollers: Select high-quality brushes for detailed work and rollers for larger surfaces
- Painter’s tape: Use for masking off areas you don’t want painted and labeling removed hardware
- Sanding block or electric sander: Makes the sanding process more efficient and consistent
- Clean rags: For wiping down surfaces after cleaning and between sanding steps
- Screwdriver: Helpful for removing hardware like handles, knobs, and hinges
Having these materials and tools on hand before starting will save you time and frustration during your project. Quality supplies, particularly the stain-blocking primer and paint, directly impact your final results and the longevity of your painted wood surfaces.
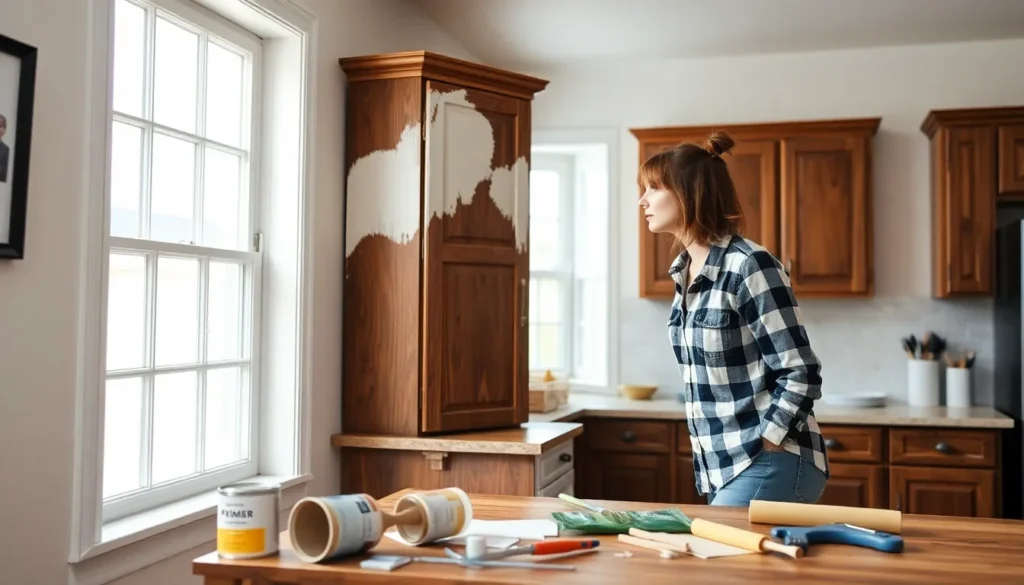
Preparing Your Stained Wood Surface

Proper preparation is the foundation of a successful paint job over stained wood. The process begins with thorough cleaning, continues with effective sanding, and includes special techniques for glossy finishes. These preliminary steps create the ideal surface for paint adhesion and ensure your painted wood maintains its beauty for years to come.
Cleaning the Wood Thoroughly
A clean surface is crucial for paint adhesion on previously stained wood. First, remove all hardware like hinges and knobs, carefully labeling each component for easier reassembly later. Wash all surfaces thoroughly with TSP (trisodium phosphate) or Simple Green to eliminate grease, oils, and accumulated dirt that can prevent paint from properly bonding. After cleaning, rinse the wood completely to remove any cleaner residue and allow the surface to dry fully before moving to the next step. This cleaning process creates a bare surface that’s ready for proper paint application.
Sanding the Stained Surface
Sanding creates texture that helps primer and paint adhere properly to the wood. Start with coarse 50-80 grit sandpaper to remove loose varnish and the top layer of stain. Progress to medium 100-150 grit paper to smooth transitions between bare wood and areas where stain remains. Focus on creating a uniform, slightly rough texture across the entire surface for optimal primer adhesion. Avoid using water-based deglossers on polyurethane-coated surfaces as they’re ineffective at properly preparing these slick finishes. After sanding, wipe away all dust with a tack cloth to ensure a clean surface for priming.
Dealing with Glossy Finishes
Glossy surfaces require special attention because paint struggles to adhere to their slick texture. Mechanical sanding is the most reliable method for preparing glossy stained wood—liquid sandpaper often fails on polyurethane-coated items like stairs or floors. Use 120-150 grit sandpaper to rough up the glossy finish until it takes on a matte appearance. For stubborn areas or intricate details, consider using a deglosser specifically formulated for high-gloss polyurethane finishes. Fill any cracks or holes with wood filler or Bondo after sanding, allowing sufficient drying time before priming. This comprehensive preparation ensures even the glossiest wood finishes become receptive to paint.
Priming Stained Wood for Painting

Priming creates a crucial barrier between your stained wood and new paint. This essential step prevents stain bleed-through and ensures proper paint adhesion for a flawless, long-lasting finish.
Choosing the Right Primer
Stain-blocking primers form the foundation of successful wood painting projects. These specialized primers contain compounds that seal in the wood’s natural tannins and any previous stain colors, preventing them from migrating into your fresh paint. Oil-based primers like Zinsser or Kilz offer exceptional stain-blocking capabilities, particularly for dark or red-toned woods that tend to bleed through. Water-based stain-blocking primers provide an environmentally friendly alternative with lower VOCs and easier cleanup, though they might require additional coats for complete coverage. The color of your primer matters too—white primers work best under light paint colors, while tinted primers provide better coverage for darker paint selections.
Application Techniques for Best Coverage
Applying primer correctly dramatically impacts your final results. Start by stirring (not shaking) your primer thoroughly to ensure consistent application without introducing air bubbles. Using a high-quality synthetic brush allows for smooth application along wood grain, while foam rollers deliver even coverage on larger flat surfaces. Apply thin, even coats rather than one thick layer to prevent drips and ensure proper curing. Multiple thin coats provide superior coverage compared to a single heavy application. Allow each primer coat to dry completely according to the manufacturer’s instructions—typically 2-4 hours—before lightly sanding with fine-grit sandpaper to create a smooth surface for paint adhesion. For dark stained woods, two primer coats often prove necessary to fully block the original color. Test your coverage by wiping the primed surface with a damp cloth—any stain transfer indicates you need another primer coat.
Painting Over Your Stained Wood

After proper preparation and priming, it’s time to apply paint to your stained wood surface. Selecting appropriate materials and using correct techniques ensures a professional, long-lasting finish that transforms your wood piece completely.
Selecting the Right Paint Type
Paint selection directly impacts the durability and appearance of your finished project. Match your paint type to the primer you’ve applied—oil-based paints work best over oil-based primers, while water-based paints adhere better to water-based primers. For stained wood specifically, consider using paint that corresponds to the original stain type: oil-based paint over oil-based stain or water-based paint over water-based stain. Quality matters significantly when painting over stained surfaces, so investing in premium paints creates better coverage and more durable results. Satin and semi-gloss finishes offer practical options for furniture and cabinets as they balance appearance with cleanability.
Proper Painting Techniques
Application techniques dramatically affect your final results when painting over stained wood. Begin by stirring (not shaking) your paint thoroughly to ensure color consistency without introducing air bubbles. Apply paint using smooth, even strokes with a high-quality brush, foam roller, or paint sprayer depending on your surface size and desired finish. Work in sections, maintaining a wet edge to prevent visible lap marks in your finished surface. Brushing with the wood grain rather than against it creates a more natural appearance and helps minimize brush marks. Let each application dry completely according to the manufacturer’s instructions before evaluating coverage or attempting additional coats.
Applying Multiple Coats
Multiple paint layers provide complete coverage and superior durability on stained wood surfaces. Start with a light first coat that might not fully cover the primer—this approach prevents drips and creates a foundation for subsequent applications. Allow this initial coat to dry completely, which typically takes 2-4 hours depending on humidity and temperature conditions. Sand lightly between coats using 220-grit sandpaper to remove any imperfections and create better adhesion for the next layer. Apply your second coat using the same careful techniques as the first, ensuring complete coverage of the surface. Dark-stained woods often require three total coats for perfect opacity and color consistency. Each coat should be applied thinly rather than in one thick layer to prevent peeling or bubbling issues later.
Finishing and Protecting Your Newly Painted Wood

Protecting your freshly painted wood surfaces enhances durability and maintains appearance over time. A proper finishing process extends the life of your paint job and defends against daily wear and tear.
Sealing Options for Longevity
Water-based sealers offer non-toxic protection ideal for indoor projects such as bookshelves, picture frames, and decorative items. These sealers dry quickly, produce minimal odor, and clean up easily with soap and water. Oil-based sealers provide superior durability for high-traffic furniture pieces, outdoor items, and kitchen cabinets. Though they require longer drying times, these sealers create a more robust protective barrier against moisture, scratches, and UV damage. Polyurethane finishes come in both matte and glossy options, giving you flexibility to achieve your desired aesthetic while providing excellent protection for your painted surfaces.
Maintenance Tips
Regular cleaning with mild detergent and a soft cloth prevents dirt buildup that can degrade your paint finish over time. Prompt touch-ups on scratched areas protect the wood underneath from moisture damage and extend the life of your paint job. Avoid abrasive cleaners containing ammonia or bleach as they break down protective coatings and dull painted surfaces. Furniture wax application every 6-12 months adds an extra layer of protection to heavily used pieces such as dining tables and coffee tables. Felt pads placed under objects sitting on painted surfaces prevent scratches and indentations from developing. Rotating decorative items occasionally ensures even exposure to light, preventing uneven fading on horizontal surfaces.
Common Mistakes to Avoid

Painting over stained wood introduces several potential pitfalls that can compromise your results. We’ve identified the most frequent errors to help you achieve a flawless finish.
Skipping the Sanding Step
Failing to sand stained wood creates immediate adhesion problems for your primer and paint. Without proper sanding, the glossy surface of stained wood prevents paint from bonding effectively, leading to peeling and chipping. Even light sanding with 120-220 grit sandpaper creates the necessary texture for paint to grip the surface properly.
Neglecting to Use Primer
Applying paint directly over stain without primer almost guarantees disappointment. Stain compounds tend to bleed through paint, creating unsightly discoloration that ruins your work. Stain-blocking primers specifically formulate a barrier between the stain and your fresh paint, preventing this bleed-through. Oil-based primers work particularly well for this purpose, creating a reliable seal against even the darkest stains.
Rushing Between Coats
Impatience during the painting process causes multiple issues like uneven coverage, drips, and premature peeling. Each layer—primer, first coat, and subsequent coats—requires adequate drying time as specified on the product label. Rushing this process by applying new coats over tacky surfaces compromises the integrity of your entire paint job.
Painting Over Fresh Stain
Attempting to paint over recently applied stain sets your project up for failure. Fresh stain needs to fully cure before accepting primer or paint—usually 24-72 hours depending on the product and environmental conditions. Painting over uncured stain creates adhesion problems and extends drying times significantly.
Using Incompatible Products
Mixing water-based paints with oil-based stains (or primers) without proper preparation causes separation and adhesion failure. Always ensure compatibility between your existing stain, primer, and topcoat. When in doubt, oil-based primers provide the most reliable transition layer between different product types, creating a universal surface for your topcoat.
Conclusion
Transforming stained wood with paint offers a budget-friendly way to revitalize your home while preserving quality pieces. The key to success lies in meticulous preparation careful priming and patient application.
By following our step-by-step approach you’ll avoid common pitfalls like peeling paint and bleed-through that often discourage DIYers. Remember that quality materials and proper technique will always yield professional results.
With your newly painted wood surfaces you’ll enjoy a fresh modern look that stands the test of time. This sustainable approach not only saves money but gives cherished pieces new life. We’re confident that with these techniques you’ll achieve beautiful durable results that you’ll be proud to showcase in your home.
Frequently Asked Questions
Do I need to sand before painting over stained wood?
Yes, sanding is crucial for proper paint adhesion. Use medium-grit sandpaper (120-150) to lightly sand the surface, creating texture for the primer and paint to grip. You don’t need to remove all the stain – just scuff the surface to eliminate the glossy finish. Without this step, your paint may peel or chip prematurely.
Is primer necessary when painting over stained wood?
Absolutely. Primer is essential when painting over stained wood as it creates a barrier that prevents stain bleed-through and ensures proper paint adhesion. Stain-blocking primers are particularly effective, with oil-based primers working best for dark woods. Without primer, tannins in the wood can seep through your paint, causing discoloration and adhesion problems.
How many coats of paint do I need when covering stained wood?
Most projects require 2-3 coats of paint for complete coverage when painting over stained wood. Dark-stained surfaces typically need three coats for perfect opacity and color consistency. Apply thin coats rather than thick ones, and allow proper drying time between applications. Lightly sand between coats for the smoothest finish.
Can I paint over stained wood without removing the finish?
While you don’t need to completely strip the finish, you must prepare the surface properly. This includes cleaning thoroughly with a degreaser, sanding to create texture, and applying a stain-blocking primer. Skipping these steps will likely result in peeling paint. The existing finish needs to be at least scuffed to provide grip for the new paint.
What kind of paint works best over stained wood?
High-quality latex or acrylic paints work best for most stained wood projects. Match your paint type to your primer (water-based paint with water-based primer). For furniture and cabinets, satin and semi-gloss finishes offer the ideal balance of durability and appearance. Oil-based paints provide excellent durability but have longer drying times and stronger odors.
How do I prevent my painted wood from chipping?
To prevent chipping, follow proper preparation steps: clean thoroughly, sand to create texture, apply stain-blocking primer, and use quality paint. Apply thin, even coats and allow complete drying between applications. Once finished, consider adding a protective topcoat sealer for high-use surfaces. For furniture, periodic application of furniture wax provides additional protection against wear.
How much does it cost to paint over stained wood cabinets?
Painting stained wood cabinets typically costs $100-$200 for a DIY kitchen project. This budget covers quality primer ($30-50), paint ($30-60), sandpaper, cleaning supplies, and basic tools. Specialty brushes or sprayers may add to the cost. Compared to the thousands needed for replacement, painting offers significant savings while completely transforming the appearance of your cabinets.
How long should I wait between coats when painting over stain?
Wait at least 2-4 hours between coats of water-based paint and 24 hours for oil-based paint. Primer should dry completely according to the manufacturer’s instructions (usually 24 hours) before applying paint. Rushing this process can lead to adhesion problems and an uneven finish. In humid conditions, extend drying times by several hours.
Can I paint over newly stained wood?
No, you should not paint over freshly stained wood. Allow new stain to fully cure for at least 24-72 hours (follow manufacturer recommendations) before attempting to paint. Uncured stain will prevent proper adhesion of primer and paint, leading to peeling. If you’re in a hurry, consider using products specifically designed for the stain-to-paint transition.
How do I fix bleed-through on painted wood?
To fix stain bleed-through, stop and allow the surface to dry completely. Apply a coat of stain-blocking oil-based primer over the affected areas. For severe cases, shellac-based primers like Zinsser BIN provide superior stain blocking. Once the primer is dry, continue with your paint application. In the future, always use stain-blocking primer before painting over stained wood.


