Dealing with warped wood floors can be a homeowner’s nightmare. Those unsightly bulges and uneven surfaces not only compromise your home’s aesthetic appeal but can also create tripping hazards. We understand how frustrating it is to see your beautiful hardwood floors betraying their promise of timeless elegance.
The good news? You don’t need to rip everything out and start over. With the right techniques and a bit of patience, we can help you restore those warped boards to their former glory. Whether it’s water damage, humidity issues, or improper installation that’s caused the problem, there’s a solution waiting for you to carry out.
Understanding Wood Floor Warping: Causes and Types
Wood floor warping occurs when boards bend, cup, or twist from their original flat position. Different types of warping affect floors in exact ways, with causes ranging from environmental factors to installation errors.
Moisture Damage vs. Structural Issues
Moisture damage represents the primary culprit behind most wood floor warping problems. Excessive humidity causes wood fibers to absorb water and expand, creating pressure between boards that leads to warping. Common moisture sources include flooding, plumbing leaks, spills left unattended, and high ambient humidity. Signs of moisture damage include discoloration, mold growth, and a musty odor accompanying the warped areas.
Structural issues stem from problems with the subfloor or installation methods rather than environmental conditions. Poor installation practices like inadequate acclimation time, improper nailing techniques, or insufficient expansion gaps prevent wood from naturally adjusting to the environment. Foundation settling, uneven subfloors, or joists that have moved over time create pressure points that force boards out of position. Unlike moisture damage, structural warping often appears in patterns following the underlying problem and doesn’t typically show water damage markers.
Identifying the Severity of Warping
The severity of wood floor warping falls into four distinct categories based on visual appearance and physical measurements. Slight warping appears as minimal raising (less than 1/8 inch) with no gaps between boards and poses primarily aesthetic concerns. Moderate warping shows noticeable raised areas (1/8 to 1/4 inch), small gaps between boards, and creates minor tripping hazards requiring attention within a few months. Severe warping exhibits important deformation (over 1/4 inch), obvious gaps between boards, and presents immediate safety risks needing urgent repair. Extreme cases display dramatic deformation (1/2 inch or more), structural damage to surrounding areas, and require complete replacement of affected sections.
Measuring warping involves placing a straight edge across the floor and measuring the maximum gap between the straight edge and the floor surface. Touch tests help identify severity too—slight warping feels barely noticeable underfoot, while extreme cases create obvious unstable walking surfaces. Visual inspection should focus on board edges, checking for consistent elevation changes that indicate cupping or crowning patterns across multiple boards.
Essential Tools and Materials for Fixing Warped Floors

Repairing warped wood floors requires exact equipment to ensure proper restoration. We’ve compiled a comprehensive list of tools, materials, and safety gear needed to tackle this project effectively.
Safety Equipment You’ll Need
Safety should always come first when working on wood floor repairs. Protective eyewear prevents sawdust and wood particles from causing eye injuries during sanding or cutting operations. Work gloves protect your hands from splinters and blisters while handling rough wood materials. A dust mask is essential for keeping harmful wood dust particles out of your lungs, especially during sanding processes. Steel-toed boots offer protection against dropped tools or wood boards that might damage your feet. Knee pads provide comfort and protection during extended periods of kneeling on hard surfaces while working on the floor.
Specialized Tools for Wood Floor Repair
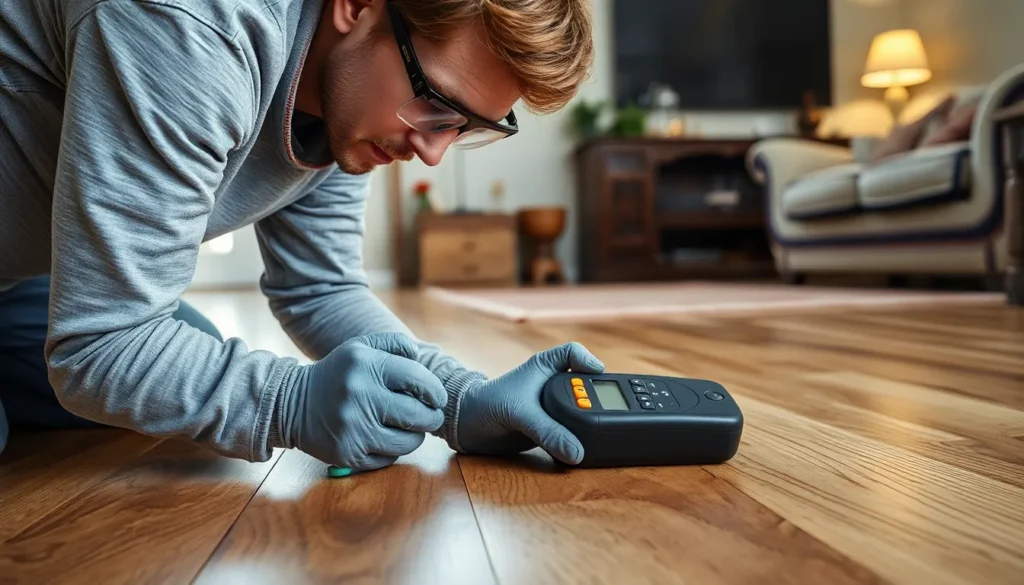
Floor repair requires exact tools designed to handle wood flooring effectively. A moisture meter helps identify areas with excess moisture that may be causing the warping. Dehumidifiers and fans work together to reduce moisture levels in affected areas, addressing the root cause of many warping issues. A floor scraper or pry bar assists in carefully removing damaged boards without affecting surrounding materials. Cutting tools like jigsaws or circular saws enable precise cuts when fitting replacement boards into existing flooring. Drills create pilot holes for screws, preventing the wood from splitting during installation. Sanders smooth the floor surface after repairs, creating an even foundation for refinishing. Staple guns or nail guns secure replacement boards firmly in place. Wood clamps and heavy objects apply consistent pressure to warped areas during the flattening process. Wood filler and wood glue repair minor damage and secure loose sections. Sandpaper in various grits helps achieve smooth transitions between repaired and existing flooring. Tack cloths remove dust before applying stain and polyurethane finishes that protect and beautify your restored wood flooring.
Assessing Your Warped Wood Floor

Determining the severity of warping and identifying moisture sources are crucial first steps in fixing your wood floor. Examine the affected area carefully to understand the extent of damage and appropriate repair methods.
Determining if DIY Repair Is Possible
DIY repairs work effectively when warping is localized and all moisture issues have been resolved. Minor cupping often resolves naturally by balancing indoor humidity levels between 30-50% using dehumidifiers, particularly in basements and crawlspaces where excess moisture affects subfloors. For moderately damaged areas, board replacement might be necessary – remove damaged planks using circular saws or chisels, then install pre-acclimated replacements that match your existing flooring. Refinishing offers another viable option for minor warps; once the floor has thoroughly dried, sanding the affected boards followed by proper resealing can restore their appearance and function.
When to Call a Professional
Professional intervention becomes necessary in several exact situations. Structural damage that affects subfloor integrity or covers large sections of your flooring typically requires expert assessment and specialized equipment. Hidden water sources presenting as persistent moisture may indicate concealed leaks beneath your flooring that need professional detection and repair. Mold risks associated with water damage demand proper sanitization before any floor repairs can begin. The presence of twisted or cracked boards generally indicates prolonged water exposure, requiring thorough subfloor inspection that’s best handled by experienced contractors who can identify and address underlying issues completely.
Simple Fixes for Minor Wood Floor Warping

Minor wood floor warping doesn’t always require professional intervention. Several straightforward DIY techniques can effectively address slight to moderate warping issues without very costly or requiring extensive renovations.
Using Weights and Moisture Control
Moisture adjustment serves as a primary solution for minor warping problems. Maintaining indoor humidity between 30-50% helps prevent further warping and can naturally flatten existing affected areas. Heavy objects placed strategically on warped planks apply gentle pressure over time, encouraging the wood to flatten back to its original position. Books, weights, or storage boxes work well for this purpose – just be sure to distribute the weight evenly across the warped section. Humidity control tools like dehumidifiers or humidifiers provide essential support during this process by creating the optimal environment for wood stabilization.
Spot Repairs for Localized Buckling
Sanding offers an effective fix for minimal warping situations. Using a floor sander (moving with the grain) helps level uneven surfaces without major interventions. Refinishing the affected area after sanding applies a fresh protective layer that enhances both appearance and stability at a fraction of replacement costs. Wood filler repairs gaps or slight buckling effectively – simply apply the filler to affected areas, allow proper drying time, then sand smooth to create a uniform surface. Replacement of individual planks becomes necessary for severe warping cases. We recommend sourcing new planks from inconspicuous areas like closets or under appliances to maintain consistent appearance. Structural inspection remains essential before attempting any buckling repairs, as warping sometimes indicates underlying structural issues requiring professional assessment.
Step-by-Step Guide to Fixing Moderate Warping

Moderate warping requires a methodical approach to restore your wood floors to their original condition. These proven techniques address the underlying causes while repairing visible damage to ensure long-lasting results.
Drying and Dehumidifying the Area
Identifying and fixing the water source marks the critical first step in addressing wood floor warping. Locate any leaks, flooding, or moisture sources and repair them before proceeding with floor restoration. A dehumidifier positioned directly beneath the affected area effectively removes excess moisture from both the air and wood planks. Strategic placement of fans around the room creates air circulation that prevents moisture from settling, significantly accelerating the drying process. This comprehensive drying approach typically takes 1-2 weeks depending on humidity levels and the extent of water damage.
Sanding and Refinishing Techniques
Thorough assessment of the dried floor reveals which boards require sanding or more extensive repairs. Drum sanders or belt sanders equipped with coarse-grit sandpaper (40-60 grit) effectively level moderate warping by removing the raised portions of the affected boards. Gradual progression to medium (80-100) and fine (120-150) grits creates a smooth surface ready for finishing. Application of a matching stain followed by 2-3 coats of polyurethane sealer protects the newly restored wood and creates a uniform appearance across the entire floor. Proper sanding techniques can successfully address warping of up to 1/8 inch without requiring board replacement.
Replacing Damaged Boards
Complete board replacement becomes necessary when warping exceeds 1/4 inch or shows signs of structural damage. Careful removal of affected boards using a circular saw and chisel prevents damage to surrounding flooring. Matching replacement boards with the existing floor’s wood species, grain pattern, and dimensions ensures a seamless repair. Each new board requires proper acclimation to the room’s environment for 48-72 hours before installation to prevent future warping issues.
Preventing Future Warping
Maintaining indoor humidity levels between 30-50% creates an optimal environment for wood floors and prevents recurring warping problems. Hygrometers placed throughout your home monitor moisture levels, while strategically positioned humidifiers or dehumidifiers maintain ideal conditions year-round. Regular inspection of plumbing, roof integrity, and foundation drainage identifies potential moisture sources before they damage your restored floors. Applying a fresh coat of protective sealant every 3-5 years provides additional protection against moisture infiltration.
Replacing Severely Warped Floorboards

Severely warped floorboards require complete replacement when humidity correction or sanding techniques fail to restore their shape and integrity. This process involves carefully removing the damaged sections and installing new matching boards to create a seamless floor surface. We’ve broken down this task into manageable steps to help you tackle this challenging but doable home improvement project.
How to Remove Damaged Boards
Removing damaged boards requires precision and careful technique to avoid harming surrounding flooring. Start by setting your circular saw depth slightly deeper than your flooring thickness, ensuring you’ll cut through the board but not the subfloor below. Make cuts along the grain of the wood, being careful to avoid joists underneath.
For effective removal:
- Cut the damaged boards into smaller, manageable pieces using your circular saw
- Carefully pry out the cut sections with a chisel, working from the center toward the edges
- Lift each piece slowly to prevent damage to adjacent boards that are still in good condition
- Clear away all debris and wood fragments from the exposed area
- Examine the subfloor for any signs of moisture damage or structural issues
After removal, it’s crucial to check the subfloor thoroughly for moisture problems. Dry the area completely before proceeding with the installation of new boards. If moisture issues are present, apply an appropriate moisture barrier to prevent future warping problems.
Installing New Floorboards Correctly
Proper installation ensures your replacement boards blend seamlessly with the existing floor. Select replacement boards that match your current flooring in wood species, thickness, color, and grain pattern for the most natural-looking repair.
Follow these steps for successful installation:
- Measure and cut replacement boards to fit precisely, allowing for ¼-inch expansion gaps along walls
- Test fit each board before permanent installation to ensure proper alignment
- Secure the new boards to the subfloor using appropriate fasteners—either nails or adhesive depending on your floor type
- For traditional installation, use finishing nails or a flooring stapler for hidden fasteners
- Tap boards firmly into place using a block to protect edges from hammer damage
After installation, sand the new boards flush with the surrounding floor to create a smooth transition. Apply matching stain and sealer to the new boards, blending them with the existing floor finish. This final step creates visual continuity across your repaired floor.
To prevent future warping, maintain indoor humidity between 40-60% using dehumidifiers or humidifiers as needed. Regular inspection for leaks or water intrusion helps catch potential problems before they cause warping damage to your newly repaired wood floor.
Preventing Future Wood Floor Warping

After repairing your warped wood flooring, prevention becomes essential to maintain your floor’s integrity. Implementing proactive measures helps protect your investment and avoids the frustration of dealing with warped boards again.
Humidity Control in Your Home
Humidity control serves as the cornerstone of preventing wood floor warping. Using a hygrometer to monitor indoor humidity levels ensures you maintain the optimal range between 30-50%, creating an environment where wood remains stable. Fluctuations outside this range commonly trigger warping, as wood naturally expands and contracts with moisture changes. Dehumidifiers effectively reduce excess moisture during humid months, while humidifiers add necessary moisture during dry seasons, maintaining consistent conditions year-round.
Regular Maintenance Practices
Prompt moisture management stands at the forefront of regular maintenance routines. Addressing water spills immediately and fixing leaks promptly prevents moisture from seeping into floorboards and causing warping. Installing vapor barriers between subfloors and finished hardwood creates an essential protective layer that blocks moisture intrusion from below. Quality finishes applied correctly protect wood from both moisture infiltration and temperature variations, with regular reapplication recommended every few years. Proper ventilation throughout your home, particularly in bathrooms and kitchens, reduces humidity buildup and safeguards your floors from potential moisture damage.
Conclusion
Fixing warped wood floors doesn’t have to be intimidating. From minor cupping to severe buckling we’ve shown that with the right approach most floor issues can be salvaged. Remember that moisture control is your best ally both during repairs and for long-term maintenance.
For minor warping simple humidity adjustments and weight application might do the trick. Moderate damage calls for careful sanding and refinishing while severe cases require board replacement with properly acclimated materials.
Don’t hesitate to call professionals when faced with structural concerns or extensive damage. By maintaining optimal humidity levels between 30-50% and conducting regular inspections you’ll extend the life of your beautiful wood floors and prevent future warping issues.
Frequently Asked Questions
What causes wood floor warping?
Wood floor warping primarily occurs due to moisture exposure. Excessive humidity, flooding, plumbing leaks, or improper installation can cause boards to bend, cup, or twist. When wood absorbs moisture unevenly, different parts of the board expand at different rates, resulting in warping. Structural issues and foundation problems can also contribute to this problem.
How can I tell if my wood floors are warped?
Look for visible signs like raised edges, boards that aren’t flat, or gaps between planks. Run your hand along the surface to feel for unevenness. Measure the severity by placing a straight edge on the floor and checking for gaps. Slight warping shows minimal visual change, while extreme warping exhibits significant deformation and may even create tripping hazards.
Can I fix warped wood floors myself?
Yes, you can fix minor to moderate warping yourself. For slight cupping, adjusting indoor humidity to 30-50% may solve the issue. Moderate warping might require placing heavy objects on affected areas, sanding, or using wood filler for small gaps. However, severe warping, structural damage, hidden water issues, or mold presence typically requires professional intervention.
What tools do I need to fix warped wood floors?
Essential tools include safety equipment (protective eyewear, gloves, dust mask, knee pads), moisture meter, dehumidifier, floor scraper, cutting tools (circular saw, jigsaw), drill, sander, and fasteners. Materials needed include wood filler, wood glue, matching replacement boards, sandpaper of various grits, and finishing products like stain and sealant.
How do I fix moderately warped wood floors?
First, identify and repair moisture sources. Dry the area using dehumidifiers and fans. For moderate warping, sand the affected boards using a drum or belt sander to level the surface. Refinish with matching stain and sealant. If warping persists, you may need to replace the affected boards with new, properly acclimated materials.
When should I call a professional for warped floors?
Call a professional when dealing with severe or extreme warping, structural damage to the subfloor, hidden water sources you can’t identify, suspected mold growth, or when more than 20% of your floor area is affected. Professionals have specialized equipment and expertise to address complex issues safely and effectively without causing further damage.
How do I replace severely warped floorboards?
Carefully remove damaged boards using a circular saw and chisel. Check the subfloor for moisture issues and repair if necessary. Install new, matching boards that have been properly acclimated to your home’s environment. Secure with appropriate fasteners, fill nail holes, sand the entire area, and apply matching finish to achieve a seamless appearance.
How can I prevent wood floor warping in the future?
Maintain indoor humidity between 30-50% using humidifiers or dehumidifiers as needed. Clean spills immediately and address any plumbing leaks promptly. Use area rugs in moisture-prone areas like entryways and kitchens. Apply quality sealants to protect wood from moisture absorption. Ensure proper ventilation throughout your home and consider installing vapor barriers during flooring installation.


