Attaching acrylic to wood opens up endless possibilities for your DIY projects, from custom signage to modern furniture accents. We’ve spent years perfecting these techniques and are excited to share our proven methods with you today.
Whether you’re a crafting enthusiast or a professional woodworker looking to incorporate acrylic elements, choosing the right adhesive and preparation technique makes all the difference. Many beginners struggle with bond failures or unsightly finishes, but with our step-by-step guidance, you’ll achieve professional-quality results every time. Let’s jump into the most effective ways to create lasting bonds between these versatile materials.
Understanding Acrylic and Wood Properties
Acrylic and wood are distinctly different materials with unique properties that affect how they bond together. Before attempting to attach these materials, it’s crucial to understand their individual characteristics and how they interact with various adhesives and mounting techniques.
Different Types of Acrylic Materials
Acrylic comes in several forms, each with exact characteristics that impact attachment methods. Cast acrylic offers superior clarity and durability, making it ideal for display cases and artistic installations. Extruded acrylic is more economical but slightly less durable, perfect for signage and decorative elements. Cell cast acrylic provides exceptional thickness consistency and works well for precision projects requiring exact dimensions. Modified impact acrylic contains additives that enhance its resistance to breakage, making it suitable for outdoor applications or high-traffic areas. Each acrylic type has different surface tension properties that affect how adhesives bond to it, with cast acrylic typically offering the strongest adhesion potential due to its dense molecular structure.
Wood Types That Work Best With Acrylic
Hardwoods like maple, oak, and walnut create the strongest bonds with acrylic due to their dense grain patterns and stable structure. Pine and other softwoods can work but often require additional surface preparation to ensure adhesion strength. Plywood with smooth veneers creates reliable bonds and resists warping that might stress the acrylic attachment points. Medium density fiberboard (MDF) provides an exceptionally smooth surface for acrylic mounting, though it needs proper sealing to prevent moisture absorption. Engineered woods like particleboard aren’t recommended for permanent acrylic attachments as their composition can deteriorate over time, weakening the bond. The porosity and oil content of exotic woods sometimes interfere with adhesives, requiring specialized primers or different attachment methods for successful acrylic mounting.
Essential Tools and Materials for Attaching Acrylic to Wood

Creating a strong bond between acrylic and wood requires exact materials and tools. We’ve assembled this comprehensive list of essentials based on years of experience working with these materials.
Adhesives for Acrylic-to-Wood Bonding
The right adhesive makes all the difference when joining acrylic to wood. Acrylic glue offers instant bonding power and works best when applied in thin, even layers across your surfaces. Polyurethane adhesives like Gorilla Glue provide excellent strength but expand during curing, making them more suitable for opaque acrylic projects where foam visibility isn’t an issue. Epoxy delivers exceptional bonding strength by combining resin and hardener components that create a powerful chemical bond between the two materials. Each adhesive type has different curing times, ranging from seconds with acrylic glue to 24 hours with some epoxies, so plan your project timeline accordingly.
Required Tools for the Job
Several essential tools ensure proper acrylic to wood attachment. Clamps distribute even pressure across the bonding surfaces during curing, preventing gaps and ensuring maximum adhesion strength. Sandpaper (120-220 grit) creates slightly roughened surfaces on both materials, dramatically improving mechanical bonding capabilities. Cleaning supplies including mild detergent and clean cloths remove oils, dust, and residue that would otherwise interfere with adhesion. Application tools such as toothpicks or create sticks help control adhesive placement with precision. Surface preparation equipment might include a blowtorch for flame treating acrylic, which alters the surface tension and enhances glue adhesion. Measuring tools ensure accurate alignment before permanent bonding occurs. Keeping these tools organized and ready before starting your project streamlines the attachment process and contributes significantly to achieving professional-quality results.
Preparing Your Materials Before Attachment

Proper preparation of both wood and acrylic surfaces creates the foundation for a strong, lasting bond. We’ve found that taking time for these preparatory steps significantly reduces the risk of adhesion failures and ensures professional-quality results.
Cleaning and Sanding the Wood Surface
Wood surfaces must be completely clean and properly textured before any adhesive application. First, wipe the wood with a damp cloth and mild detergent to remove all dust, dirt, and oils that could interfere with bonding. Allow the surface to dry thoroughly—even slight moisture can compromise adhesion quality. Once dry, lightly sand the wood with fine-grit sandpaper (180-220 grit) to create a slightly roughened surface that increases the bonding area. This creates microscopic “teeth” for the adhesive to grip, resulting in a significantly stronger attachment between the acrylic and wood.
Preparing the Acrylic Sheet
Acrylic preparation is equally important for achieving optimal adhesion. Clean the acrylic sheet thoroughly using a microfiber cloth with either specialized acrylic cleaner or a solution of mild soap and water. Avoid paper towels, which can scratch the surface. For enhanced bonding, particularly with difficult applications, flame treating the acrylic offers excellent results. This technique involves quickly passing a propane torch flame across the bonding surface until it slightly glosses over—being careful not to melt or distort the material. Flame treatment modifies the surface tension of the acrylic, creating improved chemical bonding sites for adhesives to grip. Let the acrylic cool completely before proceeding with adhesive application.
Methods for Attaching Acrylic to Wood

Attaching acrylic to wood creates versatile design possibilities for both decorative and functional projects. We’ve identified three primary approaches that deliver reliable results across various applications, each with exact advantages depending on your project requirements.
Using Adhesives and Glues
Adhesives provide a clean, seamless connection between acrylic and wood surfaces. Acrylic Weld adhesives work through capillary action, chemically fusing materials for nearly permanent bonds that work exceptionally well for edge-to-surface applications. These specialized formulas, such as Weld-On, require precise application via syringe to create professional results. Two-part epoxy offers another strong bonding option, with products like West Systems creating robust connections, especially when you sand and flame-treat acrylic surfaces beforehand to enhance adhesion. Polyurethane glues like Gorilla Glue expand during curing, making them ideal for opaque acrylic applications, though they may require cleanup of visible foam residue. Adhesive films provide yet another solution, with products like 3M 467MP double-sided tape delivering clean, even adhesion that’s perfect for temporary installations, though the tape edge might remain visible on transparent acrylic.
Mechanical Fastening Techniques
Mechanical fasteners create secure connections without relying solely on adhesives. Chicago screws offer reversible threaded fastening that allows for disassembly without damaging components—perfect for projects that might need future modifications. Slotted framing techniques involve embedding acrylic panels into routed wood channels, creating a clean appearance by avoiding visible adhesive in transparent areas. Various hardware options like brackets, L-clips, and pressure clamps can secure acrylic during adhesive curing and provide additional stability for larger installations. These mechanical methods shine particularly in applications where the bond needs to withstand physical stress or where future disassembly might be necessary.
Combining Methods for Maximum Strength
Proper surface preparation forms the foundation of any successful acrylic-to-wood bond. Clean both materials thoroughly with mild detergent, ensure they’re completely dry, and sand contact areas to create improved adhesion surfaces. A hybrid approach often yields the strongest results—applying epoxy or acrylic weld alongside hidden mechanical fasteners at critical stress points creates redundant attachment mechanisms. Clamping reinforcement plays a crucial role in successful bonding, as securing pieces under uniform pressure for at least 24 hours during curing dramatically improves bond strength. For visible installations with transparent acrylic, consider visibility factors carefully—avoid adhesives in transparent zones, instead using mechanical fasteners or slotted frames. Projects with large joining surfaces benefit from stress distribution techniques, including reinforcement with hidden hardware or applying thicker adhesive layers to prevent failure points under load.
Step-by-Step Guide to Gluing Acrylic to Wood

Attaching acrylic to wood requires careful preparation and technique to ensure a strong, lasting bond. We’ve refined this process through years of experience and found that following these exact steps yields professional results every time.
Preparing the Surfaces
Clean surfaces are essential for creating a strong bond between acrylic and wood. Both materials must be completely free of dust, dirt, oils, and residues that can interfere with adhesion. Wipe both surfaces with a damp cloth and mild detergent, then allow them to dry thoroughly before applying any adhesive. This preparation step is critical—even minor contaminants can significantly weaken the bond and lead to attachment failures.
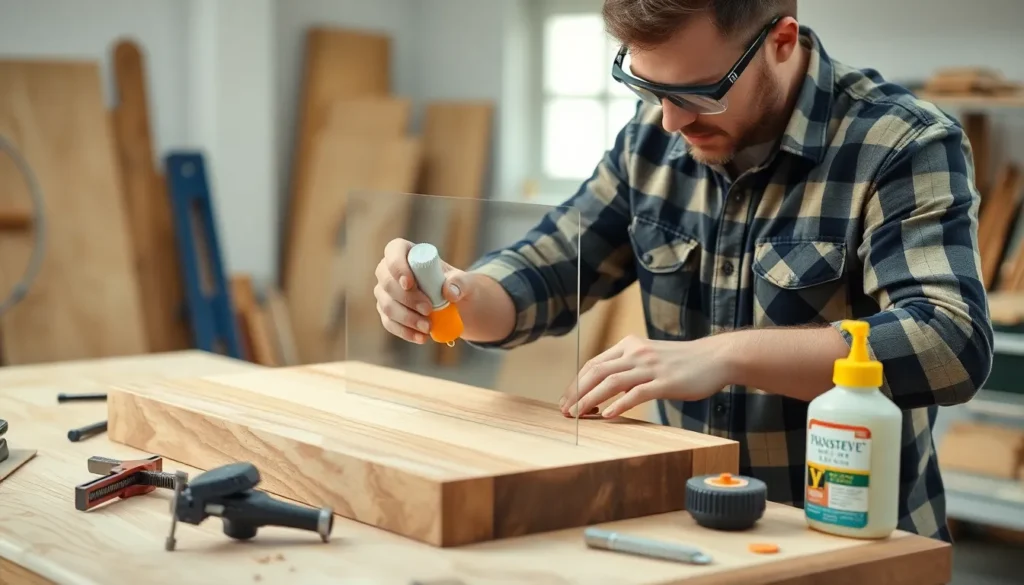
Applying the Adhesive Properly
The right adhesive selection dramatically impacts the quality of your acrylic-to-wood bond. Epoxy, Household Goop, and polyurethane adhesives like Gorilla Glue all provide excellent bonding capabilities for this application. Clear or gel-type epoxies work best with transparent acrylic pieces since they won’t create visible glue lines that detract from your project’s appearance.
Apply adhesive in a thin, even layer directly to one surface using a toothpick or create stick for precise control. This application technique prevents excess glue from squeezing out and creating a messy finish. For larger projects, work in sections to ensure the adhesive doesn’t begin curing before you’ve positioned the pieces—adhesives like epoxy can start setting within minutes.
Clamping and Drying Time Considerations
Proper positioning and clamping significantly affect bond strength between acrylic and wood. Carefully align your pieces and secure them with clamps that match your project’s dimensions. The clamps should apply even pressure across the entire bonding surface to eliminate gaps and ensure complete contact between the materials.
Respect the recommended curing time for your chosen adhesive—rushing this process can result in weak bonds. Different adhesives have varying curing periods ranging from seconds to several minutes for initial set, with full strength developing over hours or days. Baking soda can serve as a nearly invisible filler for any slight gaps that remain after clamping, strengthening the connection between uneven surfaces.
Additional Tips
Flame treating the acrylic surface before applying adhesive can enhance bonding potential. This technique slightly modifies the surface tension of the acrylic, creating better adhesion conditions, though it requires careful handling to avoid damaging the material. For projects requiring maximum durability, consider applying adhesive in multiple thin layers rather than one thick application.
Monitor temperature and humidity during the curing process as these environmental factors can affect how quickly and effectively the adhesive sets. Most adhesives perform optimally in moderate temperatures between 65-75°F with normal humidity levels. Extreme conditions may require adjusted curing times or special adhesive formulations for proper bonding.
Drilling and Screwing Acrylic to Wood

Attaching acrylic to wood using screws creates a secure connection that withstands daily use and environmental changes. This mechanical fastening method requires careful preparation and technique to prevent the acrylic from cracking or becoming damaged during installation.
Proper Drilling Techniques for Acrylic
Drilling acrylic requires exact techniques to prevent cracking and ensure clean holes. We’ve found that applying painter’s tape over the drilling areas acts as a protective barrier against stress fractures. A sharp twist bit designed specifically for plastics with a 60° to 90° point angle creates the cleanest holes when operated at low speeds under 2,500 RPM. Heat buildup poses a important risk to acrylic, so drilling incrementally allows heat to dissipate rather than accumulate and melt the material. Position all holes at least 1/8″ away from any edge to maintain the structural integrity of the acrylic panel and reduce the risk of edge cracks developing over time.
Selecting the Right Screws and Hardware
Machine screws in #6 or #8 sizes paired with washers distribute pressure evenly across the acrylic surface and prevent localized stress. Brass threaded inserts embedded into pre-drilled wood holes create robust attachment points without directly stressing the acrylic panel, making them ideal for permanent installations. For thin acrylic sheets less than 1/4″ thick, self-tapping screws with appropriate pilot holes provide adequate holding power without overtightening risks. Combining mechanical fasteners with clear epoxy or acrylic-exact cement at connection points reinforces the bond and creates a more stable junction between materials. Pre-drilling the wood with holes slightly smaller than the screw diameter ensures the fasteners grip properly without splitting the wood substrate.
Troubleshooting Common Issues

Even with careful preparation, problems can arise when attaching acrylic to wood. We’ve compiled answers for the most frequent challenges based on our years of experience working with these materials.
Fixing Cloudy or Bubbled Adhesive
Cloudy or bubbled adhesive occurs primarily from trapped air or dirt particles in your bonding surfaces. To fix this issue, always work in a clean, dry environment and apply adhesives in thin, even layers. If bubbles have already formed, you can sometimes salvage the project by carefully separating the pieces, cleaning both surfaces thoroughly, and reapplying fresh adhesive. For projects using clear acrylic where aesthetics matter, consider using specialized instant acrylic glue that dries clear rather than polyurethane adhesives which tend to foam during curing and may create visible imperfections.
Preventing Acrylic Cracking
Acrylic cracking typically results from uneven pressure or stress concentrations during the bonding process. Apply even, distributed pressure across the entire acrylic surface when attaching it to wood. Using multiple clamps positioned strategically around the edges and center of your project ensures uniform pressure distribution. Avoid overtightening screws or clamps, as this creates stress points that lead to cracks. When drilling holes for mechanical fasteners, always pre-drill with the appropriate bit size and use painter’s tape on both sides of the acrylic to prevent cracking during the drilling process. Temperature fluctuations can also cause expansion and contraction at different rates between wood and acrylic, so maintain consistent ambient temperature during curing and allow slight flexibility in your attachment method for long-term stability.
Finishing and Protecting Your Acrylic-Wood Project

After successfully attaching acrylic to wood, proper finishing touches ensure your project remains beautiful and durable for years. These final steps transform your work from merely functional to professionally finished.
Edge Treatments and Polishing
Edge treatment transforms raw acrylic edges into smooth, professionally finished surfaces. Start by sanding acrylic edges with progressively finer grit sandpaper (beginning with 220-grit and moving up to 600-grit) to remove any roughness. Apply light pressure in circular motions to avoid scratching the surface. Flame polishing offers another effective method for creating crystal-clear edges on thicker acrylic pieces—carefully pass a small torch along the edge to melt and smooth the surface. Buffing compounds specifically designed for acrylics can be applied with a soft cloth or buffing wheel to achieve a high-gloss finish. Remember to mask off wooden areas before polishing to protect them from scratches or accidental damage.
Protective Coatings for Longevity
Protective coatings significantly extend the lifespan of acrylic-wood projects by shielding both materials from environmental damage. For wood portions painted with acrylic paint, apply a clear sealer such as polyurethane or an acrylic sealer to protect against moisture and wear. High-gloss sealers create a shiny, reflective finish while satin or matte options offer a more subdued appearance. Outdoor projects benefit greatly from UV-resistant coatings that prevent sunlight damage and color fading over time. Apply these protective finishes in thin, even coats using a high-quality brush or spray applicator for best results. Multiple thin layers (typically 2-3 coats) provide better protection than a single thick coat, allowing proper drying between applications. Testing your sealer on a small, inconspicuous area ensures compatibility with both your wood and acrylic before covering the entire project.
Conclusion
Joining acrylic to wood opens up countless creative possibilities for both DIY enthusiasts and professional woodworkers. With the right preparations tools and techniques we’ve outlined you’ll be well-equipped to create stunning combined material projects.
Remember that success lies in proper surface preparation careful adhesive selection and patient application. Whether you choose adhesives mechanical fasteners or our recommended hybrid approach the key is attention to detail.
We’ve refined these methods through years of experience and countless projects. By following these guidelines you’ll avoid common pitfalls and achieve professional-quality results that last. Now it’s time to gather your materials and bring your acrylic and wood creations to life!
Frequently Asked Questions
What is the best adhesive for attaching acrylic to wood?
The best adhesives for attaching acrylic to wood include acrylic glue, polyurethane adhesives, and two-part epoxy. Each has different properties and curing times. Acrylic weld adhesives create strong, seamless connections, while epoxy provides excellent gap-filling capabilities. For maximum bond strength, especially in projects that will experience stress, consider using adhesives in combination with mechanical fasteners.
How do I prepare wood surfaces before attaching acrylic?
Clean the wood surface with a damp cloth to remove dust and debris. Once dry, sand the surface with fine-grit sandpaper (180-220 grit) to create texture for better adhesion. Wipe away sanding dust with a tack cloth. For oily woods, clean with mineral spirits before adhesive application. Proper preparation ensures the strongest possible bond between materials.
How do I prevent acrylic from cracking during installation?
Use painter’s tape on the acrylic before drilling to prevent cracking. Drill with sharp twist bits designed specifically for plastics, starting slowly and at low pressure. When using screws, create slightly oversized holes in the acrylic to allow for expansion, and use washers to distribute pressure evenly. Never overtighten fasteners, and consider using brass threaded inserts for secure attachment points.
Which wood types bond best with acrylic?
Hardwoods like maple and oak create the strongest bonds with acrylic due to their dense, stable structure. Softwoods such as pine can work but may require special preparation. Engineered woods like plywood and MDF also bond well but should be sealed on the edges to prevent moisture absorption. The smoothness and stability of the wood surface significantly impact bond quality.
How long does adhesive take to cure when bonding acrylic to wood?
Curing times vary by adhesive type. Acrylic glues typically set in 5-10 minutes and reach full strength in 24 hours. Polyurethane adhesives set in 30-60 minutes with full curing in 24 hours. Two-part epoxy can take 5-30 minutes to set and 24-48 hours to fully cure. Environmental factors like temperature and humidity affect curing times, so always check manufacturer specifications.
Can I remove bubbles from the adhesive between acrylic and wood?
To fix bubbled adhesive, work in a clean environment and apply adhesives in thin, even layers. If bubbles appear, apply gentle, even pressure with a roller or soft cloth before the adhesive sets. For already cured adhesive with bubbles, you may need to disassemble the pieces, clean thoroughly, and reapply. Preventing bubbles is easier than fixing them afterward.
What mechanical fastening methods work best for acrylic and wood?
Chicago screws, machine screws with washers, and slotted framing techniques work well for attaching acrylic to wood. These methods distribute pressure evenly and reduce the risk of cracking. Brass threaded inserts provide strong attachment points when screwed directly into wood. For maximum strength, combine mechanical fasteners with adhesives, especially for projects that will bear weight.
How do I finish the edges after attaching acrylic to wood?
After attachment, sand wood edges using progressively finer grits ending with 220-320 grit. For acrylic edges, use wet sanding with 400-2000 grit sandpaper followed by acrylic polish or flame polishing for transparency. Seal the wood with multiple thin layers of clear sealer to protect against moisture. For outdoor projects, apply UV-resistant coatings to both materials to prevent yellowing and degradation.
What’s the flame treating method for acrylic preparation?
Flame treating is a technique that modifies acrylic’s surface tension to enhance adhesion. Pass a clean, blue flame quickly across the acrylic surface without lingering in one spot. This oxidizes the surface slightly, creating microscopic texture that improves bonding with adhesives. This method should be used cautiously and only on cast acrylic, as extruded acrylic may warp or ignite under flame.
How do I ensure the strongest possible bond between acrylic and wood?
For maximum strength, use a hybrid approach combining adhesives with mechanical fasteners. Thoroughly prepare both surfaces by cleaning and texturing. Apply adhesive evenly and use proper clamping during the full curing period. Monitor environmental conditions, as extreme temperatures and humidity can affect bond quality. For critical applications, test your bonding method on scrap materials before final assembly.


