Wondering how long it takes for wood to properly dry? You’re not alone. Whether you’re a DIY enthusiast preparing for a woodworking project or a homeowner dealing with moisture issues, understanding the drying timeline is crucial for successful results.
We’ve spent years working with wood in various conditions and can tell you that drying times vary significantly based on several factors. From freshly cut lumber that needs seasoning to water-damaged wood requiring restoration, the process demands patience. Without proper drying, you’ll face warping, cracking, and other issues that can ruin your project or create long-term structural problems.
Understanding Wood Moisture Content
Wood moisture content directly impacts the stability and usability of lumber for various applications. Fresh lumber typically contains 30-100% moisture content by weight, making proper drying essential before use in construction or woodworking projects.
Why Wood Needs to Dry
Wood contains moisture in two forms: free water in cell cavities and bound water within cell walls. Drying removes this excess moisture, preventing common problems like warping, cracking, and dimensional changes. Fresh-cut lumber shrinks approximately 8-10% tangentially and 4-5% radially during proper drying. This moisture reduction also increases wood’s strength by up to 50% depending on species, improves its insulation properties, and makes it less susceptible to decay organisms that thrive in moist environments. Also, dried wood holds paint, stain, and adhesives more effectively, ensuring better finishing results in woodworking projects.
Equilibrium Moisture Content (EMC)
Equilibrium Moisture Content represents the point where wood neither gains nor loses moisture to its surrounding environment. EMC varies by geographic location and seasonal conditions, typically ranging from 7-14% across the United States. Coastal areas generally maintain higher EMCs (12-14%) due to higher humidity levels, while desert regions experience lower EMCs (6-8%). Interior heated spaces usually maintain 6-9% EMC year-round. Woodworkers must account for these regional variations when planning projects, especially for items that might travel between different climate zones. Wood properly dried to the EMC of its intended environment experiences minimal dimensional changes after installation, creating more stable and durable finished products.
Factors Affecting Wood Drying Time

Wood drying times vary dramatically based on several key variables. Understanding these factors helps predict how long your lumber needs to dry before it’s ready for use in projects.
Wood Species
Different wood species dry at significantly different rates due to their unique cellular structures. Softwoods like pine and cedar reach approximately 14% moisture content in just 60-90 days for 1-inch thick boards. Hardwoods take considerably longer to dry properly – maple requires 50-200 days, walnut needs 70-200 days, and red oak can take anywhere from 70 days to a full year. Oak stands out as particularly slow-drying, with 1-inch oak lumber requiring 6-12 months to reach usable moisture levels for woodworking projects.
Thickness and Size
The thickness of lumber directly impacts drying time in a predictable mathematical relationship. A 1-inch pine board typically air-dries in 3-4 months, while a 2-inch thick piece of oak might need over a year to reach the same moisture content. Drying time increases with the square of thickness – doubling the thickness quadruples the required drying duration. Larger boards also take longer to dry than smaller pieces of the same species and thickness due to their greater overall mass and reduced surface-to-volume ratio.
Initial Moisture Content
Green wood contains substantial moisture, ranging from 30% to an astonishing 200% of its dry weight. Higher initial moisture content naturally extends the total drying time needed to reach equilibrium moisture content (EMC), which typically falls between 7-20% depending on your local climate. Fresh-cut lumber with extremely high moisture levels requires significantly more drying time than wood that has already begun the drying process, even when all other factors remain identical.
Environmental Conditions
Environmental factors dramatically influence wood drying speed and quality. Warm, dry climates accelerate the drying process substantially compared to cool, humid environments. Summer drying progresses much faster than winter drying due to higher temperatures and generally lower humidity levels. Relative humidity directly impacts the achievable equilibrium moisture content, while proper airflow ensures uniform drying throughout each piece. Kiln drying creates controlled environmental conditions that can reduce oak drying time to just 22-30 days for 1-inch boards – a dramatic improvement over air-drying times measured in months.
Average Drying Times for Different Wood Types

Wood drying times vary significantly based on species, thickness, and drying method. Understanding these timelines helps woodworkers plan projects effectively and avoid potential issues from working with insufficiently dried lumber.
Softwoods vs. Hardwoods
Softwoods typically dry much faster than hardwoods due to their less dense cellular structure. Pine and cedar, common softwood species, reach acceptable moisture content in approximately 60-90 days when air-dried in warm, low-humidity environments. Their quick drying time makes them excellent choices for projects with tighter timelines or when you’re eager to begin working.
Hardwoods require significantly more patience during the drying process. Red oak can take between 70-200 days to air-dry depending on environmental conditions. White oak presents an even greater challenge, often requiring more than a month in a kiln if starting from green wood. Maple and walnut generally need 50-200 days of air-drying before they’re ready for use. The density of hardwoods contributes to their longer drying times, but this slow process often results in more stable lumber with fewer defects when properly managed.
Green Wood to Workable Wood
Air-drying begins immediately after trees are cut and represents the traditional approach to reducing wood moisture content. This natural process can take several months to over a year depending on species, thickness, and climate conditions. Air-drying gradually brings wood to workable moisture levels without specialized equipment, though it requires important space and time investment.
Kiln-drying dramatically accelerates the process through controlled heat and humidity environments. This method reduces moisture content within days or weeks rather than months, making it the preferred commercial approach. White oak that might take many months to air-dry can be ready in just 1-2 weeks in a kiln if previously air-dried, or about a month if starting from green wood. Kiln operators must carefully manage temperature and humidity parameters to prevent stress-related defects like checking and warping that can occur during rapid moisture removal.
Environmental factors play a crucial role in both drying methods. Temperature, humidity, and air circulation significantly impact how quickly moisture evaporates from wood fibers. Proper stacking with stickers between boards ensures even airflow around all surfaces, promoting consistent drying throughout each piece and minimizing the risk of deformation.
Natural Air Drying Process

Natural air drying exposes wood to ambient conditions, allowing moisture to evaporate gradually over time. This traditional method’s effectiveness depends on several factors including wood species, temperature, humidity, and air circulation. The process typically takes between several months to a year, with exact timeframes varying based on environmental conditions.
Air Drying Setup
Creating an effective air drying setup requires careful planning and proper arrangement of lumber. The foundation of successful air drying starts with selecting a location that offers good air circulation while providing protection from direct precipitation. Stacking lumber on a flat, elevated surface prevents ground moisture from being absorbed into the bottom layers. Concrete pads or wooden pallets serve as excellent foundations for your wood stack, keeping it at least 6-12 inches off the ground. Proper spacing between boards and thoughtful orientation relative to prevailing winds maximize the drying efficiency of your setup.
Recommended Stacking Techniques
Orientation and Layout: Position your wood stack to align with the direction of prevailing winds in your area. This strategic placement enhances airflow through and around the lumber, accelerating moisture removal. The ends of boards facing the wind direction receive maximum air exposure, promoting more even drying throughout the stack.
Stacking Methods: Place stickers (small strips of dry wood) between each layer of lumber to create air gaps of approximately 1 inch. These spacers allow air to circulate freely between boards, preventing direct contact that could trap moisture and lead to mold or decay. Align stickers vertically from bottom to top of the stack to distribute weight evenly and prevent warping.
Covering the Stack: Top your wood pile with a protective covering such as a tarp or metal roofing that extends a few inches beyond the sides without reaching the ground. This arrangement shields the wood from rain and direct sunlight while maintaining crucial air movement around all sides. Avoid completely wrapping the stack, as this creates a moisture-trapping environment that inhibits proper drying.
Following these techniques helps achieve the recommended drying times: 60-90 days for softwoods like pine and cedar, and 70 days to over a year for hardwoods such as oak and maple. The general rule suggests allowing one year of drying time per inch of wood thickness for thorough drying results.
Kiln Drying: Accelerating the Process

Kiln drying dramatically speeds up the wood drying process compared to traditional air drying methods. This controlled approach reduces drying times from months to weeks, typically taking around 6-8 weeks to complete while achieving optimal moisture content levels.
Conventional Kiln Drying
Conventional kiln drying employs a systematic approach using steam, fans, and precise temperature management to control the drying environment. Inside these specialized chambers, lumber experiences carefully regulated conditions that accelerate moisture removal while minimizing defects. Temperature and humidity follow exact schedules customized to different wood species, ensuring efficient drying without compromising wood quality. This method typically brings moisture content down to 6-8%, making the wood immediately usable for construction and woodworking projects. The controlled environment of conventional kilns allows processors to dry lumber year-round regardless of external weather conditions, providing consistent results that aren’t possible with air drying.
Vacuum Kiln Drying
Vacuum kiln drying represents an advanced technology that further enhances the efficiency of the drying process. By removing air from the drying chamber, this method reduces atmospheric pressure, allowing moisture to evaporate from wood at lower temperatures. Lower processing temperatures protect delicate wood species from heat-related damage while still accelerating the drying timeline. The vacuum environment creates ideal conditions for extracting moisture quickly and evenly throughout the lumber stack. Though exact drying times aren’t universally established, vacuum kilns generally operate faster than conventional kilns while maintaining exceptional quality control. This technology proves particularly valuable for processing exotic hardwoods, thick lumber, and specialty woods that require gentle handling during the drying process.
Testing Wood for Dryness

Determining when wood has reached the optimal dryness level is crucial for ensuring project success and preventing future issues. Wood that’s properly dried performs better in finished products while reducing the risk of warping, cracking, or other moisture-related problems.
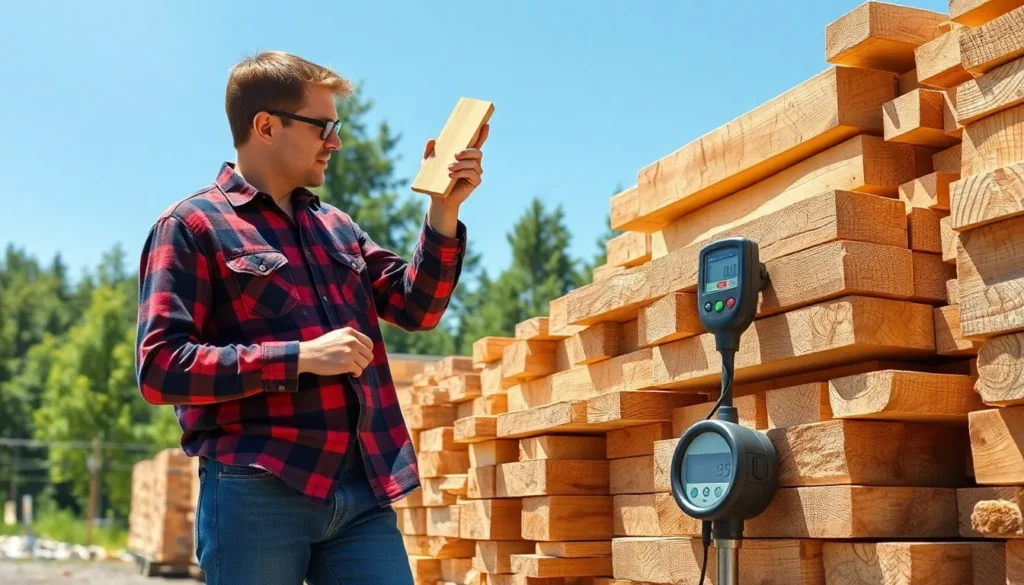
Using Moisture Meters
Moisture meters provide the most accurate method for checking wood dryness by measuring electrical resistance or dielectric properties of the lumber. These handy devices deliver precise readings that indicate the exact moisture content percentage within the wood. For construction and cabinetry projects, moisture content between 6-12% is generally acceptable. Indoor furniture requires slightly drier wood, with optimal moisture levels falling between 6-10%. Firewood burns most efficiently when moisture content drops below 20%. Different meter types exist, from pin-style meters that penetrate the wood to pinless meters that use electromagnetic waves to assess moisture levels without damaging the surface. Professional woodworkers often rely on these tools to ensure their materials meet the exact requirements for their intended applications.
Visual and Physical Signs
Wood reveals several telltale indicators that help determine its dryness without specialized equipment. Small cracks or checks appearing at board ends signal drying stress and indicate moisture loss is occurring. Dry lumber produces a distinctive sharp “clink” sound when two pieces are struck together, contrasting with the duller thud of wet wood. Weight reduction offers another reliable indicator, as properly dried wood feels significantly lighter than freshly cut lumber. Visible shrinkage, manifested as gaps between growth rings or misalignment at joints, confirms substantial moisture loss has occurred. Oak typically develops more pronounced checking than cedar due to its denser cellular structure. Environmental factors like humidity and temperature dramatically influence these visual indicators, with lower humidity and higher temperatures accelerating visible drying signs. Wood stacked with proper spacing between boards (using stickers) typically displays more uniform visual drying characteristics compared to tightly packed lumber.
Preventing Common Drying Problems

Wood drying problems can significantly impact the quality and usability of lumber for woodworking projects. Proper drying techniques help minimize these issues and ensure the wood remains stable and suitable for its intended purpose.
Checking and Splitting
Checking and splitting occur when wood dries too quickly, causing stress that leads to visible cracks along the grain. These defects happen because the outer layers of wood lose moisture faster than the interior, creating tension that forces the wood fibers apart. Environmental factors like excessive heat, low humidity, and strong air circulation can accelerate moisture loss and increase the risk of checking. To prevent these issues, we’ve found that controlling the drying rate by using proper stacking techniques and placing the lumber in a sheltered area away from direct sunlight works effectively. Applying end sealers to freshly cut lumber also helps by slowing moisture loss from the most vulnerable areas of the wood.
Warping and Distortion
Warping happens due to uneven moisture distribution throughout the wood during the drying process. Different types of warping include cupping, bowing, twisting, and crooking—each representing a exact form of dimensional distortion. Proper stacking techniques with evenly spaced stickers between boards creates uniform airflow that minimizes warping potential. Placing weight on top of lumber stacks during the drying process applies consistent pressure that helps maintain the wood’s original shape. Regular rotation of boards in the stack ensures all pieces receive similar exposure to air circulation. Wood species with interlocked grain patterns or irregular growth rings tend to be more susceptible to warping issues, requiring extra attention during the drying process to maintain their structural integrity.
Conclusion
Drying wood properly is a critical yet often overlooked aspect of successful woodworking. We’ve seen that patience truly pays off as rushing this process can lead to warping checking and other defects that compromise your project’s integrity.
Remember that moisture meters are invaluable tools for confirming when your wood has reached the optimal moisture content for your exact application. Whether you choose air drying or kiln drying depends on your timeline resources and the exact requirements of your project.
By understanding the natural properties of different wood species and how they respond to moisture you’ll be better equipped to work with this living material. Properly dried wood will reward you with stable durable and beautiful results that stand the test of time.
Frequently Asked Questions
How long does it take for wood to dry completely?
Drying time varies significantly by wood type, thickness, and method. Softwoods like pine typically dry in 60-90 days when air-dried, while hardwoods like oak can take 6-12 months. A general rule is one year per inch of thickness for thorough air-drying. Kiln drying dramatically reduces these timeframes to days or weeks, depending on the species and initial moisture content.
What is Equilibrium Moisture Content (EMC) and why is it important?
EMC is the point where wood neither gains nor loses moisture relative to its environment. It typically ranges from 7-14% across the U.S., varying by location and season. Wood dried to the EMC of its intended environment will experience minimal dimensional changes, resulting in more stable and durable finished products. Understanding EMC helps woodworkers create projects that resist warping or cracking.
Why do hardwoods take longer to dry than softwoods?
Hardwoods take longer to dry due to their denser cellular structure, which restricts moisture movement. Their higher initial moisture content and thicker cell walls slow the drying process. While pine might reach acceptable moisture levels in 60-90 days, oak can take 70-200 days when air-dried. Though slower to dry, hardwoods often result in more stable lumber with fewer defects.
What are the main methods for drying wood?
The two primary methods are air-drying and kiln-drying. Air-drying is a traditional, low-cost approach that uses natural air circulation and can take months to over a year. Kiln-drying uses controlled environments with heat, humidity regulation, and forced air circulation to accelerate the process to days or weeks. Each method has advantages depending on volume, timeline, and quality requirements.
How can I tell if wood is dry enough to use?
Use a moisture meter for accurate readings—6-12% is acceptable for construction and cabinetry, while 6-10% is ideal for indoor furniture. Look for visual and physical signs like small surface cracks, reduced weight, and a distinctive sound when pieces are struck together. Properly dried wood will feel warm to the touch and show uniform color changes across its surface.
What causes checking and splitting in drying wood?
Checking and splitting occur when wood dries too quickly, creating uneven moisture loss. The outer layers dry and shrink faster than the interior, causing stress that results in cracks along the grain. These defects are more common in thicker pieces and species with dense structure. Prevent them by controlling the drying rate through proper stacking techniques and using end sealers on board ends.
How can I prevent warping during the wood drying process?
Prevent warping by ensuring even moisture distribution throughout the drying process. Stack lumber with stickers (small spacers) between boards to promote uniform airflow. Apply consistent weight across the top of stacked lumber. Regularly rotate boards, especially during early drying stages. Select proper drying locations with stable temperature and humidity. Consider species characteristics, as some woods are naturally more prone to warping.
Does wood thickness affect drying time?
Yes, thickness dramatically impacts drying time. The relationship is exponential—doubling the thickness more than doubles the required drying time. A 1-inch board might dry in 60 days, while a 2-inch board of the same species could take over 200 days. This occurs because moisture must travel farther to reach the surface in thicker pieces, significantly extending the drying process.


