Cedar’s natural beauty and durability make it a popular choice for outdoor projects, but many homeowners wonder: should you stain cedar wood? While cedar contains natural oils that provide some protection against decay and insects, we’ve found that applying a quality stain can significantly extend its lifespan and enhance its appearance.
We’ve helped countless homeowners preserve their cedar investments through proper staining techniques. A good cedar stain not only highlights the wood’s gorgeous grain patterns but also provides crucial UV protection that prevents the silvery-gray weathering that occurs over time. Whether you’re building a deck, fence, or outdoor furniture, understanding how to properly treat cedar can make the difference between a project that lasts decades and one that deteriorates prematurely.
Understanding Cedar Wood’s Natural Properties
Cedar wood’s unique characteristics make it a popular choice for outdoor projects. This aromatic softwood contains natural oils that provide inherent resistance to decay, insects, and moisture damage. These oils give cedar its distinctive reddish-brown hue and pleasant scent while serving as the wood’s built-in preservation system.
The natural resins in cedar wood create a hydrophobic effect, repelling water and reducing the likelihood of rot or fungal growth. Eastern red cedar and Western red cedar varieties contain varying levels of these protective compounds, with Western red cedar typically offering superior decay resistance. Cedar’s cellular structure also contributes to its excellent insulation properties, making it ideal for outdoor structures in various climates.
Over time, untreated cedar weathers to a silvery gray patina when exposed to UV rays. This aging process affects only the surface appearance while the wood’s structural integrity remains intact for many years. Cedar’s natural dimensional stability means it resists warping, twisting, and checking better than many other wood species, even without treatment.
Even though cedar’s natural durability, its protective oils gradually diminish over time due to sun exposure and rainfall. The wood’s surface becomes more porous and vulnerable to damage as these oils leach out. Understanding these properties helps homeowners make informed decisions about whether staining cedar is necessary for their exact project and environmental conditions.
Why You Might Want to Stain Cedar Wood

Staining cedar wood offers many benefits that enhance both its appearance and longevity. Cedar’s natural beauty can be preserved and protected through proper staining techniques, making it an essential consideration for any outdoor project.
Protecting Against UV Damage
UV rays represent one of the biggest threats to cedar wood’s integrity over time. Staining creates a protective barrier that shields the wood from harmful ultraviolet radiation, preventing premature aging and deterioration. In areas with less harsh sun exposure, such as partially shaded locations, stains provide particularly effective protection against UV damage. The application of quality stain prevents the breakdown of cedar’s natural oils and resins that otherwise occur with prolonged sun exposure. This protection is crucial for maintaining cedar’s structural integrity and extending its useful life by many years.
Improving the Natural Beauty
Cedar’s rich, warm tones and distinctive grain patterns make it a prized material for outdoor projects. Semi-transparent stains highlight these natural features while adding depth and dimension to the wood’s appearance. The right stain enhances cedar’s inherent reddish-brown hues without obscuring its character, allowing the beautiful wood grain to remain visible. Various stain colors can complement your home’s exterior and industry design while maintaining cedar’s organic appeal. The enhancement isn’t merely aesthetic—stains also seal the wood, preventing moisture penetration while still allowing it to breathe naturally. This dual benefit of beauty and protection makes staining an ideal treatment for showcasing cedar’s natural elegance while ensuring it remains resistant to environmental damage.
When to Leave Cedar Wood Unstained

Cedar wood doesn’t always require staining, especially if you’re looking for a more natural appearance and less maintenance. There are several scenarios where leaving cedar unstained might be the preferable option, depending on your aesthetic preferences and the environmental conditions where the wood will be used.
Natural Weathering Benefits
Natural weathering transforms cedar wood into a beautiful silver-gray color that many homeowners find appealing. This aged appearance develops gradually over time as the wood is exposed to the elements. Unstained cedar requires virtually no maintenance compared to stained alternatives, eliminating the need for regular reapplication every few years. The weathering process creates a rustic, organic look that complements many architectural styles, particularly in natural settings or coastal environments. For those seeking an environmentally friendly option, allowing cedar to weather naturally avoids the use of chemicals found in many stains and sealants.
Cedar’s Built-in Resistance Properties
Cedar wood contains natural oils and compounds that provide important protection without additional treatments. These inherent properties make cedar naturally resistant to insects, including termites and carpenter ants, which typically avoid the wood due to its aromatic oils. The natural resins in cedar effectively combat rot and fungal growth, making it suitable for outdoor applications even without staining. Cedar’s durability is particularly impressive in shaded or cooler climates where UV exposure is less intense.
The wood performs exceptionally well in environments with moderate moisture levels, as its natural composition helps regulate humidity absorption and release. But, it’s important to note that in areas with high UV exposure or important rainfall, cedar’s natural protective qualities may diminish faster over time. Environmental factors eventually determine whether cedar’s built-in resistance properties will provide sufficient protection for your exact project’s needs and expected lifespan.
Types of Stains for Cedar Wood

Cedar wood accepts three primary stain types: semi-transparent, solid-color, and bleaching stains. Each option provides different levels of protection and aesthetic effects for your cedar projects.
Oil-Based vs. Water-Based Stains
Oil-based stains penetrate deeply into cedar fibers, creating exceptional protection against moisture and UV damage. They resist lap marks when applied in continuous sections, making them forgiving for DIY applications. Natural-bristle brushes work best with oil-based formulations, allowing optimal absorption into the wood grain. These stains require less surface preparation during refinishing, saving time and effort on maintenance.
Water-based stains offer different advantages for cedar applications but come with exact considerations. Metal tools should never be used during application as they can cause chemical reactions that result in unsightly stains. Acrylic latex formulations perform best for solid-color applications on cedar surfaces. Though less commonly used than oil-based options, water-based stains can be customized with watercolors or acrylics to create unique finishes customized to your aesthetic preferences.
Transparent vs. Semi-Transparent Options
Semi-transparent stains represent the ideal choice for most cedar applications, striking the perfect balance between showcasing natural grain and providing UV protection. These formulations contain enough pigment to slow weathering while maintaining cedar’s beautiful texture and character. Reapplication every 3-5 years maintains optimal protection for outdoor cedar projects exposed to the elements.
Transparent stains see limited use on cedar surfaces due to their minimal pigment content. They offer significantly less UV protection than semi-transparent alternatives, making them unsuitable for cedar projects in sun-exposed locations. Solid-color stains function similarly to paint, completely hiding the grain while providing maximum protection. These require primer application and two coats for durability, transforming the appearance while maintaining cedar’s natural resistance properties.
Bleaching stains create an artificial weathered look, producing an attractive gray patina that mimics naturally aged cedar. This option works particularly well on textured cedar surfaces where a rustic, weathered appearance is desired without waiting years for natural aging to occur.
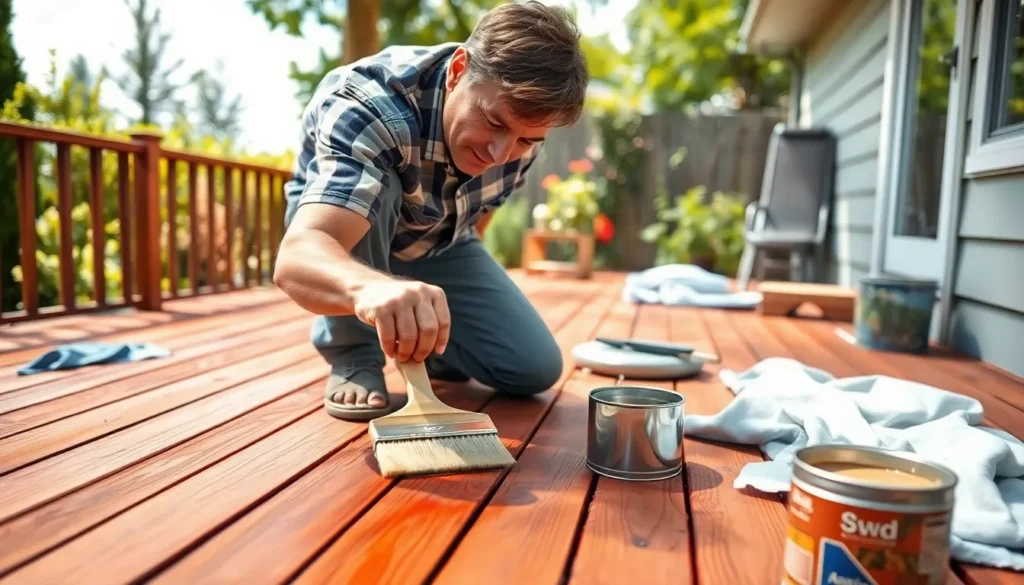
How to Properly Stain Cedar Wood

Staining cedar wood requires exact techniques due to its natural oils and unique properties. Following the proper process ensures long-lasting protection while improving cedar’s natural beauty.
Surface Preparation Steps
Proper preparation creates the foundation for successful cedar staining. Cedar must be completely dry before staining, making late spring or summer ideal timing after winter moisture has fully evaporated. Clean the surface thoroughly using plain water and a stiff non-metallic brush to remove dirt, mildew, and loose wood fibers. Avoid using steel wool or wire brushes during cleaning, as metal particles can react with cedar’s natural tannins and cause unsightly dark stains. For aged cedar or previously finished surfaces, consider light sanding or specialized cedar cleaner to restore the wood’s natural appearance before applying new stain.
Application Techniques
Choosing the right tools and methods significantly impacts your cedar staining results. Semi-transparent or opaque oil-based stains offer the best longevity on cedar surfaces, providing excellent water repellency and UV protection. Transparent stains work for water resistance but provide minimal protection against ultraviolet damage. Apply stain using a thick natural-bristle brush for even coverage and optimal penetration into the wood grain. Sprayers or rollers can speed up the process on large surfaces but should always be followed by back-brushing to prevent blotchy results and ensure consistent absorption.
Work in shaded areas when applying stain to slow the drying process, allowing deeper penetration into the cedar. Maintain a “wet edge” by staining continuous sections without interruption to prevent lap marks where wet and dry areas overlap. Apply a second coat only after the first has dried completely to prevent bubbling or peeling issues. Environmental considerations also matter—water-based stains reduce ecological impact compared to solvent-based alternatives, though they may require more frequent reapplication.
Maintaining Stained Cedar Over Time

Cedar’s natural beauty can be preserved for years with proper maintenance after staining. Regular upkeep ensures that your cedar projects remain protected and visually appealing throughout their lifetime.
Choosing the Right Stain
Semi-transparent oil-based penetrating stains work exceptionally well for cedar maintenance, as they showcase the wood’s natural texture while providing essential protection. These stains penetrate deeply into the wood fibers and don’t require extensive scraping or sanding when it’s time to refinish.
Solid-color stains offer another maintenance-friendly option, functioning similarly to paint but allowing more wood grain to remain visible. For best long-term results, apply two coats over a primer when using solid-color products on your cedar surfaces.
Staining Techniques
Application methods significantly impact how well your cedar maintenance regimen performs over time. Brushing delivers the best penetration and long-term performance, ensuring the stain reaches deep into the wood’s pores. Spraying followed by back-brushing also creates excellent results for maintenance applications.
Preventing lap marks during maintenance requires continuous staining along entire lengths of boards. Working in shaded areas slows drying time, giving you more opportunity to blend sections seamlessly and create a uniform appearance that lasts.
Maintenance Over Time
Refinishing semi-transparent stained cedar simply requires cleaning the surface with a non-metallic brush before applying a fresh coat. Non-metallic brushes prevent metal deposits that can cause unsightly discoloration in the wood over time.
Reapplying stain becomes necessary based on weather exposure levels in your region. Cedar exposed to harsh elements needs more frequent maintenance treatments, while protected areas may require attention less often to maintain optimal color and protection.
Additional Tips
Avoid using metal tools when cleaning or maintaining your stained cedar to prevent unwanted discoloration. Metal particles can react with cedar’s natural tannins, creating dark spots that compromise your project’s appearance.
Artificially weathered cedar requires periodic reapplication of bleaching stains to maintain its consistent weathered look. These specialized maintenance products help preserve the desired aged appearance without sacrificing the wood’s protective qualities.
Conclusion
Staining cedar wood isn’t just a cosmetic choice but a strategic decision that balances protection with aesthetic preferences. Whether you opt for the enhanced durability of a quality stain or embrace cedar’s natural journey to a silvery patina we’ve seen that both paths have merit.
The key is understanding your exact environment and how it will impact your cedar projects. In high-UV or rainy regions staining becomes more necessity than option while drier climates may allow cedar’s natural properties to shine without intervention.
Remember that properly stained cedar can last decades with appropriate maintenance. By choosing the right product and application technique you’ll ensure your outdoor cedar elements remain beautiful and functional for years to come. Your cedar deserves thoughtful care whether that means regular staining or appreciating its natural evolution.
Frequently Asked Questions
Do I need to stain cedar wood for outdoor projects?
While cedar naturally resists decay and insects due to its oils, staining is highly recommended for outdoor projects. A quality stain extends cedar’s lifespan by providing essential UV protection, preventing weathering and fading. Staining also enhances the wood’s appearance by highlighting its beautiful grain pattern. In harsh environments with high sun exposure or significant rainfall, staining becomes even more important to preserve cedar’s natural protective qualities.
How long does untreated cedar last outdoors?
Untreated cedar can last 15-20 years outdoors due to its natural oils and resistance properties. However, its lifespan varies significantly based on climate conditions. In areas with intense UV exposure or heavy rainfall, untreated cedar may deteriorate faster as its protective oils diminish over time. While the wood will develop a silvery-gray patina, its structural integrity will eventually weaken without protection, particularly in harsh environments.
What type of stain is best for cedar wood?
Semi-transparent oil-based stains are generally best for cedar wood. They provide excellent UV protection while still showcasing cedar’s beautiful natural grain and color. Oil-based formulations penetrate deeply into the wood, offering superior moisture resistance and longevity. For maximum protection (at the cost of hiding the grain), solid-color stains work well. Water-based stains are environmentally friendly alternatives but may require more frequent reapplication.
When is the best time to stain cedar?
The ideal time to stain cedar is during dry, moderate weather conditions in late spring or summer. The wood must be completely dry with moisture content below 15%. Avoid staining in direct sunlight, high humidity, or when temperatures are below 50°F or above 90°F. Allow newly installed cedar to weather for 1-3 months before staining to ensure proper adherence, as fresh cedar’s high oil content can repel stain.
How often should I reapply stain to cedar?
Reapplication frequency depends on exposure conditions and stain type. Generally, horizontal surfaces like decks need restaining every 2-3 years, while vertical surfaces like fences may last 3-5 years between applications. Signs that indicate restaining is needed include water no longer beading on the surface, fading color, or graying wood. Semi-transparent oil-based stains typically require less frequent maintenance than water-based or transparent options.
Can I leave my cedar unstained?
Yes, leaving cedar unstained is a viable option, especially if you prefer its natural weathered appearance. Unstained cedar will gradually develop a silver-gray patina that many find attractive. Its natural oils provide inherent resistance to insects and decay. However, without stain protection, cedar will weather more quickly, particularly in areas with high UV exposure or rainfall. If choosing to leave cedar unstained, be prepared for more noticeable color changes and potentially reduced longevity.
What’s the best way to prepare cedar before staining?
Properly prepare cedar by ensuring it’s completely dry (moisture content below 15%). Clean the surface thoroughly using a cedar-specific cleaner or mild detergent solution to remove dirt, mildew, and surface oils. Avoid metal wire brushes which can react with cedar’s tannins and cause discoloration. For weathered cedar, light sanding with 80-100 grit sandpaper helps open the wood grain. Allow 24-48 hours of drying time after cleaning before applying stain.
Are there special considerations for staining different cedar varieties?
Yes, different cedar varieties require slightly different approaches. Western red cedar generally has higher natural oil content than Eastern red cedar, which may require longer weathering before staining. Cedar with higher oil content might need additional preparation to ensure proper stain adhesion. Knotty cedar varieties may require spot-priming of knots to prevent bleed-through. Always test your chosen stain on an inconspicuous area of your specific cedar type before full application.


