Wondering if you can fix those unsightly holes or cracks in your wooden furniture or trim? You’re not alone. Many DIY enthusiasts face this common question: can you use spackle on wood?
We’ve spent years testing various wood repair methods, and we’re here to clear up the confusion. While spackle is primarily designed for drywall repairs, it can indeed be used on wood surfaces in certain situations. But before you grab that container of spackle for your wooden project, there are some important factors to consider that could make or break your repair job.
What Is Spackle and Its Traditional Uses
Spackle is a putty-like substance primarily designed for patching small holes, cracks, and imperfections in drywall and plaster surfaces. The typical spackle compound consists of gypsum powder mixed with binders and additives that create a paste-like consistency when water is added. During application, spackle remains pliable enough to fill gaps completely, then hardens into a solid patch that can be sanded smooth.
Traditional applications for spackle focus almost exclusively on drywall repair situations. Professionals and DIYers routinely use spackle to fix nail holes, small dents, and hairline cracks in walls before painting. Its effectiveness comes from its ability to bond well with porous drywall surfaces, dry relatively quickly, and accept paint without bleeding through or creating noticeable texture differences.
Spackle’s composition gives it exact properties that make it ideal for interior wall repairs. The gypsum base provides good adhesion to porous surfaces while remaining lightweight enough not to sag or shrink significantly. Most commercially available spackles feature additives that prevent cracking, improve workability, and reduce drying time compared to traditional plaster compounds.
Home improvement stores sell several spackle varieties, including lightweight formulas for minor repairs, all-purpose versions for larger projects, and quick-drying options for time-sensitive jobs. Each type offers slightly different working properties, but they’re all fundamentally designed with drywall and plaster surfaces in mind, not specifically formulated for wood repairs.
Can You Use Spackle on Wood? The Short Answer

Yes, you can use spackle on wood, though it’s not typically the ideal option. Spackle will adhere to wooden surfaces and can fill small holes or cracks, but several limitations exist. Its composition, primarily designed for drywall and plaster repairs, doesn’t integrate with wood grain as seamlessly as dedicated wood fillers.
Painted wood projects benefit most from spackle application, as the paint will conceal any texture differences between the spackle and wood. Applying spackle to wood requires a clean, dry surface and works best for smaller repairs rather than structural damage. Spackle dries quickly (usually under an hour) and can be sanded smooth, making it convenient for quick fixes.
The biggest drawback appears when staining is involved – spackle doesn’t absorb wood stains properly, resulting in obvious patched areas. For natural wood finishes or projects requiring staining, wood filler provides superior results by maintaining the wood’s original texture and appearance. Wood filler integrates better with the surrounding wood surface and accepts stains more consistently than spackle repairs.
Benefits of Using Spackle on Wood Projects

Spackle offers several advantages when used correctly on wood surfaces, even though not being specifically formulated for wood repairs. We’ve found that in certain scenarios, it provides practical answers for quick fixes and cosmetic issues on wooden surfaces.
Quick Repair for Small Imperfections
Spackle excels at addressing minor wood damage up to ¾-inch deep. Its pre-mixed, ready-to-use formula makes it perfect for filling nail holes, shallow cracks, and small dents in wooden surfaces without extensive preparation. The lightweight consistency allows for immediate application when you discover imperfections in painted wooden trim, furniture, or decorative pieces. Many DIYers appreciate how spackle dries relatively quickly compared to other wood repair products, enabling faster project completion for non-structural repairs.
Easy Application and Cleanup
Applying spackle to wood requires minimal tools and expertise, making it accessible for beginners and experienced craftspeople alike. The smooth, creamy texture spreads effortlessly across wooden surfaces with just a putty knife or small spatula. Cleanup involves simply wiping away excess material with a damp cloth before it dries. Once dry, spackle can be sanded easily to create a smooth surface that blends with the surrounding wood, particularly on painted projects. The water-based formulation of most spackling compounds also means that tools can be cleaned with soap and water rather than harsh chemical solvents.
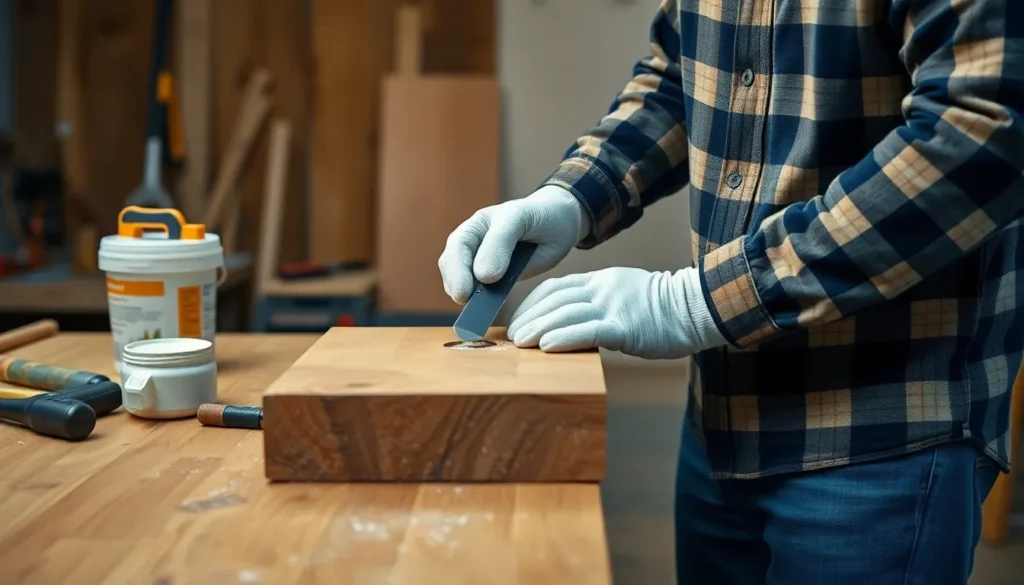
Best Practices for Applying Spackle to Wood

Applying spackle to wood requires careful technique to achieve professional-looking results. Following these best practices ensures your wood repairs blend seamlessly with the surrounding surface while maintaining durability.
Preparing the Wood Surface
Thorough surface preparation is crucial for successful spackle application on wood. Clean the entire wood surface to remove all dust, debris, and grease that could prevent proper adhesion. Sand any imperfections or rough areas using fine-grit sandpaper (120-220 grit) to create a smooth foundation for the spackle. Porous wood sometimes benefits from a primer coat before spackling, though most spackle compounds adhere directly to clean, smooth wood surfaces without additional preparation.
Application Techniques for Best Results
Apply spackle with a putty knife, pressing the compound firmly into nail holes, cracks, or small imperfections in the wood. Slightly overfill each area to compensate for shrinkage that occurs during drying, then immediately scrape away excess material to create a flush surface. Larger gaps require multiple thin layers rather than one thick application—allow each layer to dry completely before adding the next. For delicate wood surfaces, lightweight spackle can be thinned with a light water mist from a spray bottle for smoother application.
Finishing Considerations
Most spackle compounds dry within 1-2 hours, after which gentle sanding with 220-grit sandpaper or a fine sanding sponge creates a smooth, level surface. Apply primer to the spackling before painting to prevent uneven absorption that could reveal repaired areas. Spackle lacks the flexibility needed for load-bearing joints or high-movement areas, making it unsuitable for these applications—use caulk or specialized wood fillers instead. Spackle works perfectly for cosmetic repairs on wood trim, baseboards, and moldings where appearance matters more than structural strength.
| Spackle Benefits for Wood | Spackle Limitations on Wood |
|---|---|
| Faster drying than wood fillers | Not suitable for deep holes (>1/4 inch) |
| Easier sanding for smooth results | Less durable than epoxy-based fillers |
| Cost-effective for minor repairs | Not ideal for structural repairs |
| Paint-ready finish when properly sanded | Won’t work well in high-movement areas |
Limitations of Using Spackle on Wood

Even though its versatility, spackle has several important limitations when used on wood surfaces. Understanding these restrictions helps determine whether spackle is appropriate for your exact wooden repair project or if an alternative would be more effective.
Durability Concerns
Spackle lacks the structural integrity needed for long-lasting wood repairs. Its brittle composition makes it prone to cracking when applied to wooden surfaces that experience stress, movement, or regular use. High-traffic areas like wooden floors, furniture edges, or cabinet doors typically show quick deterioration when repaired with spackle. The material simply can’t withstand the natural expansion and contraction of wood that occurs with temperature and humidity changes.
Adhesion Problems
The adhesion between spackle and wood is significantly weaker than its bond with drywall. This poor adhesion often leads to repairs that flake, chip, or completely separate from the wood surface over time. Unlike materials designed specifically for wood, spackle doesn’t penetrate the wood fibers to create a strong mechanical bond. Environmental factors like moisture further compromise this already tenuous connection, causing premature failure of the repair.
Material Incompatibility
Spackle’s gypsum-based formula doesn’t match wood’s natural properties. This fundamental mismatch creates several issues:
- Texture differences between the repaired area and surrounding wood
- Inability to accept stains in the same manner as natural wood
- Different density and hardness compared to the wooden substrate
- Lack of wood fibers that would help it blend seamlessly
- Inability to replicate wood grain patterns
When to Choose Wood Filler Instead
Wood filler offers superior performance for most wooden surface repairs. Its composition includes actual wood fibers or epoxy resins that integrate better with wooden substrates, creating a more natural and durable result. Wood filler excels in structural repairs, resisting cracks even as wood expands and contracts with environmental changes.
The finish quality achieved with wood filler surpasses spackle, as it sands more smoothly and accepts stains or paints in a manner consistent with natural wood. For larger defects, deep holes, or unfinished wood projects, wood filler provides significantly more reliable results. Professional woodworkers typically choose wood filler for furniture restoration, outdoor wood repairs, and any application where strength or appearance are priorities.
Alternative Wood Repair Products to Consider

Wood repair projects often benefit from using specialized products designed specifically for wooden surfaces rather than spackle. The right material makes a important difference in both the appearance and longevity of your repairs.
Wood Putty vs. Spackle
Wood putty offers distinct advantages for certain wood repair scenarios compared to spackle. This oil-based compound contains actual wood fibers that help it blend seamlessly with the surrounding wood grain. Wood putty remains slightly flexible after drying, making it ideal for areas that experience minor movement or temperature fluctuations. Its color-matching capabilities make it perfect for stained wood surfaces, as it comes in various wood tones that complement natural finishes. Unlike spackle, wood putty doesn’t shrink as it dries, providing a more stable and long-lasting repair for small nail holes and dents.
Spackle, while versatile enough for painted wood applications, lacks the wood-like properties needed for stained surfaces. The gypsum-based formulation creates a stark contrast against natural wood grain, making repairs obvious even after staining. For painted wood projects, spackle can be appropriate since the paint will conceal any texture differences between the repair and surrounding wood.
Epoxy Fillers for Major Repairs
Epoxy wood fillers deliver superior strength and durability for important wood damage that spackle can’t adequately address. These two-part compounds create a rock-hard finish that’s stronger than the original wood in many cases. Epoxy fillers bond exceptionally well with wooden surfaces, creating a permanent repair that resists shrinking, cracking, and moisture damage. Their waterproof properties make them especially valuable for exterior wood repairs or areas exposed to humidity.
Professional woodworkers rely on epoxy fillers for structural repairs such as rotted window sills, damaged furniture legs, or deep gouges in hardwood floors. Once cured, epoxy fillers can be sanded, drilled, and shaped just like actual wood. Some advanced formulations even accept stains similar to natural wood, though results vary by product. For repairs larger than 1/2 inch deep or any damage affecting the structural integrity of wooden elements, epoxy fillers provide the most reliable long-term solution.
Finishing Spackled Wood Surfaces

After applying spackle to wood, proper finishing techniques ensure a professional-looking repair that blends seamlessly with the surrounding surface. The finishing process involves two critical steps: sanding the dried spackle and applying paint to complete the repair.
Sanding Tips for Smooth Results
Sanding transforms rough, uneven spackled areas into smooth surfaces that match the surrounding wood. A multi-grit sanding sponge or sanding block provides better control and creates less mess compared to loose sandpaper sheets. Start with medium-grit sandpaper to remove excess spackle and level the patch, then progress to fine-grit for a smoother finish. Apply varying pressure during the sanding process—use firmer pressure initially to shape the patch, then lighter strokes for final smoothing. Clean your sanding tool regularly to prevent dust buildup that can create scratches on your work surface. This approach maintains the tool’s effectiveness and ensures consistent results across the entire repair area.
Painting Over Spackled Areas
Painting completes the repair process and helps the spackled area blend with the rest of the wood surface. Before applying any paint, ensure the sanded area is completely dust-free for optimal paint adhesion—wipe the surface with a slightly damp cloth and allow it to dry fully. Any paint suitable for wood can be applied to the spackled section, though matching the existing finish is crucial for an invisible repair. Prime the spackled area first if you’re working with raw wood or if the repair is particularly noticeable. Primer creates a uniform base that helps the topcoat adhere properly and prevents the spackle from absorbing paint differently than the surrounding wood. For painted wooden surfaces, this finishing process creates repairs that are virtually undetectable once complete.
Conclusion
Spackle can work on wood for minor cosmetic repairs especially on painted surfaces. It’s quick to apply easy to sand and perfect for those small nail holes or shallow cracks that need a fast fix.
But we’ve found that dedicated wood fillers deliver superior results for most wooden surface repairs. They match wood’s properties better accept stains and offer greater durability.
Always consider your exact project needs when choosing between spackle and alternatives like wood putty or epoxy fillers. For painted trim or furniture with minor damage spackle might be your go-to solution. For natural wood finishes or structural repairs wood-exact products will serve you better in the long run.
Frequently Asked Questions
Can spackle be used on wood?
Yes, spackle can be used on wood for minor repairs, particularly on painted wooden surfaces. It works best for small holes up to ¾-inch deep, shallow cracks, and nail holes. However, it’s not ideal for wood that will be stained, as it doesn’t match wood’s natural texture and won’t accept stain like real wood does.
What is the difference between spackle and wood filler?
Spackle is gypsum-based and designed primarily for drywall, while wood filler contains actual wood fibers or epoxy resins. Wood filler integrates better with wood grain, accepts stains more naturally, and provides greater durability for structural repairs. Spackle is easier to work with for quick cosmetic fixes on painted wood but lacks the strength and natural appearance of wood filler.
How do I apply spackle to wood properly?
Start by cleaning and lightly sanding the wood surface. Apply spackle with a putty knife, slightly overfilling the hole to account for shrinkage. For larger repairs, use multiple thin layers rather than one thick application. Allow it to dry completely (typically 1-2 hours), then sand gently with fine-grit sandpaper until smooth. Always prime before painting for best results.
When should I use wood filler instead of spackle?
Use wood filler instead of spackle when repairing unfinished wood that will be stained, fixing structural or larger damages, repairing areas subject to moisture or temperature fluctuations, working on high-traffic furniture pieces, or addressing outdoor wood repairs. Wood filler provides better durability, flexibility, and a more natural appearance for these applications.
How long does spackle take to dry on wood?
Spackle typically dries within 1-2 hours on wood surfaces, depending on the depth of the repair, humidity levels, and room temperature. Thin layers dry faster than thick applications. Allow the spackle to dry completely before sanding or painting to prevent cracking or uneven finishes. For deeper repairs requiring multiple layers, let each layer dry fully before applying the next.
Can I stain over spackle on wood?
No, spackle doesn’t accept wood stain well. It has a different composition than wood and will appear as a distinct, lighter patch against the stained wood. If you plan to stain your wood project, use a stainable wood filler instead. These products contain actual wood fibers that accept stain similarly to natural wood, creating a more seamless repair.
Is spackle strong enough for furniture repairs?
Spackle is suitable only for minor, cosmetic furniture repairs on painted pieces. It lacks the structural strength needed for load-bearing areas or joints. For furniture that experiences regular use, movement, or stress, choose wood filler or epoxy filler instead. These alternatives provide better durability and flexibility, preventing the cracking and flaking that often occurs with spackle over time.
What’s the best way to sand spackle on wood?
Sand spackle on wood using fine-grit sandpaper (180-220 grit) or a sanding sponge for better control. Sand lightly in the direction of the wood grain, being careful not to remove too much material. Wipe away dust between sanding stages. For the smoothest finish, progress from medium to fine grit, and finish with very fine sandpaper for painted surfaces.


