Working with pressure treated wood often raises concerns about sanding and finishing. We’ve heard countless DIYers ask whether it’s safe to sand this chemically treated lumber when building decks, outdoor furniture, or other exterior projects.
The short answer is yes, you can sand pressure treated wood—but there are important precautions you’ll need to take. While sanding helps achieve a smoother surface for staining or painting, the chemicals used to preserve this wood require special handling. Throughout this guide, we’ll walk you through the proper techniques, essential safety measures, and best practices for sanding pressure treated lumber safely and effectively.
Understanding Pressure Treated Wood
Pressure treated wood differs significantly from regular lumber due to its chemical preservation process. This specialized wood undergoes treatments that help it resist rot, insects, and weathering, making it a popular choice for outdoor construction projects.
What Makes Pressure Treated Wood Different
Pressure treated lumber undergoes a specialized manufacturing process where wood is placed in a depressurized holding tank. The tank removes air from the wood cells before flooding them with chemical preservatives under high pressure. This forced infusion ensures the chemicals penetrate deep into the wood fibers, creating a protective barrier throughout the entire piece of lumber. Unlike regular wood that deteriorates quickly outdoors, pressure treated varieties can last 15-20 years or more in harsh environments. The treatment also gives the wood its characteristic greenish or brownish tint, depending on the chemicals used and the wood species.
Common Chemicals Used in Treatment
Modern pressure treated wood contains several types of preservatives that protect against decay. Alkaline Copper Quaternary (ACQ) is one of the most common treatments, containing copper compounds that deter fungal growth and insect infestation. Copper Azole (CA) offers similar protection with a mixture of copper and azole compounds that’s less corrosive to metal fasteners. Micronized Copper Quaternary (MCQ) uses tiny copper particles for deeper penetration and increased effectiveness. Older pressure treated lumber often contained Chromated Copper Arsenate (CCA), which includes arsenic compounds, but this formulation has been phased out for residential use since 2003 due to health concerns. Borate treatments provide another option specifically designed for interior applications or covered exterior locations where rainfall exposure is minimal.
Can You Sand Pressure Treated Wood?

Yes, you can sand pressure-treated wood, though it requires careful consideration due to potential health risks. The chemicals used to protect the wood from rot and insects can become airborne during sanding, creating hazards that necessitate proper safety measures.
Safety Concerns When Sanding Treated Lumber
Sanding pressure-treated lumber generates dust containing preservation chemicals that pose important health risks. These harmful substances can enter your body through inhalation or skin contact, potentially causing respiratory issues and other health problems. Splinters from treated wood are particularly dangerous, as they can lead to skin irritation, ulcers, and festering wounds that take longer to heal than those from untreated wood. The chemical preservatives in the wood, such as Copper Azole (CA) and Alkaline Copper Quaternary (ACQ), create fine dust particles that remain suspended in the air for extended periods, increasing exposure time and risk.
Recommended Precautions Before Sanding
Protective gear forms the first line of defense when sanding pressure-treated wood. Always wear a NIOSH-approved respirator or dust mask (not just a standard face covering), safety goggles to protect your eyes, and thick gloves to prevent skin contact with treated wood dust. Work in well-ventilated areas, preferably outdoors or in spaces with strong airflow to carry dust away from your breathing zone. Operating fans and opening windows creates cross-ventilation that significantly reduces airborne dust concentration.
Proper dust collection and disposal techniques prevent environmental contamination. Connect your sander to a vacuum system with a HEPA filter to capture dust at the source, and thoroughly clean the work area after sanding. Collect all dust in sealed bags and dispose of it according to local regulations for treated wood waste. It’s worth noting that sanding pressure-treated wood often provides only temporary aesthetic improvements, as the chemicals and moisture content in the wood make achieving a smooth, lasting finish challenging. Also, embedded hardware like screws and nails can damage sandpaper and power sanders, requiring careful inspection of the wood surface before beginning your project.
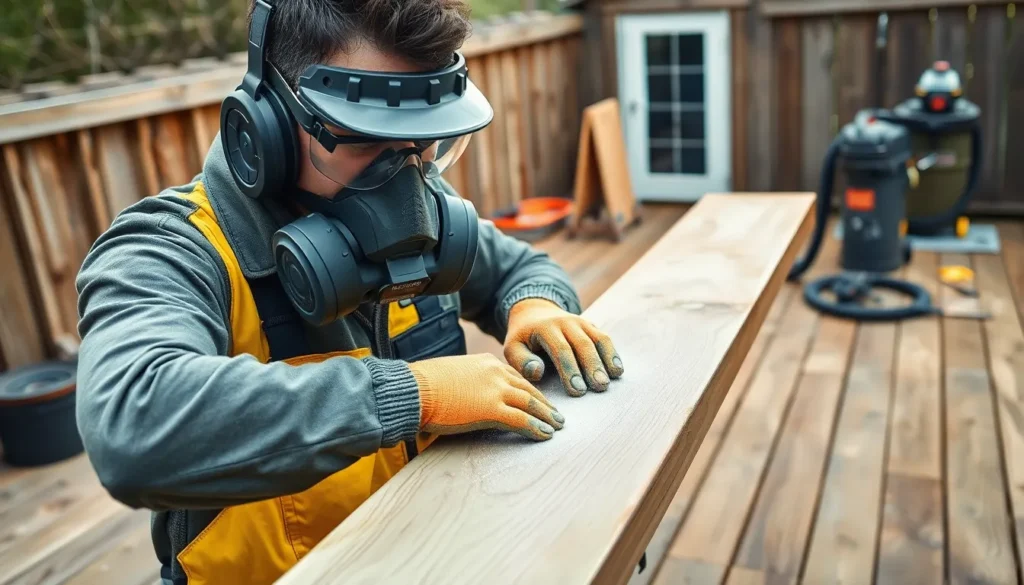
Essential Safety Gear for Sanding Pressure Treated Wood

Sanding pressure-treated wood demands exact safety equipment to protect against chemical exposure. These precautions aren’t optional—they’re essential safeguards against the potentially harmful substances present in treated lumber.
Respiratory Protection Requirements
Respiratory protection stands as the most critical safety measure when sanding pressure-treated wood. A dust mask or respirator prevents inhalation of chemical-laden dust particles that can cause respiratory issues. NIOSH-approved respirators with particulate filters offer superior protection compared to standard dust masks. Work outdoors whenever possible to prevent dangerous accumulation of airborne wood particles in enclosed spaces. Proper ventilation helps disperse harmful dust and reduces exposure risks during longer sanding sessions.
Protective Clothing and Equipment
Comprehensive body protection complements respiratory safety when working with treated lumber. Gloves (preferably chemical-resistant) create a barrier between your skin and potentially harmful preservatives in the wood. Safety goggles shield your eyes from flying dust particles that could cause irritation or injury. Long sleeves and pants minimize skin exposure to chemical-laden dust that might cause irritation or absorption through the skin. Remember to thoroughly wash your hands with mild soap and water after handling treated wood, even when using gloves. Launder work clothes separately from regular laundry to prevent cross-contamination of chemicals to other garments. Always collect and dispose of sawdust and debris according to local regulations to prevent environmental contamination.
Best Sanding Practices for Pressure Treated Wood

Sanding pressure-treated wood requires exact techniques and materials to achieve optimal results while maintaining safety. Following proper practices not only improves the appearance of your treated lumber but also preserves its protective qualities.
Recommended Sandpaper Grits
Selecting the right sandpaper grit for pressure-treated wood is crucial for effective surface preparation. Coarse grits (60-80) excel at removing deep stains, mill glaze, and splinters that commonly appear on pressure-treated surfaces. Medium grits (100-120) work best for smoothing rough areas and creating a more uniform texture across the wood. Fine grits (150-180) prepare the surface for finishing applications like stains or sealants. It’s important to avoid over-sanding pressure-treated lumber as this can expose untreated inner layers, compromising the wood’s chemical protection against rot and insects.
Sanding Techniques for Different Projects
Each pressure-treated wood project benefits from exact sanding approaches customized to its purpose and exposure. For decks, a random-orbit sander provides efficient coverage of large surface areas while minimizing aggressive material removal that could compromise the treatment. Furniture projects made from pressure-treated wood require more delicate handling – hand-sanding with the grain using medium grits creates smoother surfaces while preserving detail work in curved or decorative elements. Structural elements like posts or beams need minimal sanding, focused only on areas with splinters or rough spots to maintain maximum chemical integrity. Throughout any project, collecting dust with a HEPA-filter vacuum prevents harmful particles from spreading and ensures proper disposal according to local regulations.
When to Sand vs. When to Replace Pressure Treated Wood

Determining whether to sand or replace pressure-treated wood depends on its condition, age, and treatment type. Making the right decision protects both your project’s integrity and your health.
Signs Wood Is Safe to Sand
Pressure-treated lumber can be safely sanded when it meets exact conditions. The wood must be fully dry, which typically takes 4-6 months after installation or purchase, as this reduces chemical leaching during the sanding process. Modern pressure-treated lumber (manufactured after 2003) is generally safer to sand because it doesn’t contain arsenic-based preservatives. Light sanding with 80-100 grit sandpaper works best for preparing surfaces with minor imperfections or uneven staining. Remember that even when sanding is appropriate, proper protective equipment remains essential—always use a respirator (minimum N95), goggles, and gloves while working in well-ventilated outdoor areas to minimize exposure to chemical dust.
When Sanding Isn’t Recommended
Several situations warrant avoiding sanding altogether. Older pressure-treated wood (pre-2004) potentially contains arsenic and should never be sanded due to severe health risks. Boards with visible signs of chemical leaching, indicated by greenish residue on the surface, are unsuitable for sanding. Severely warped, split, or rotted pieces require replacement rather than surface treatment, as structural integrity has already been compromised. Mildew-affected wood doesn’t benefit from sanding since fungi often penetrate deep into the material, making surface treatment ineffective. Wood in ground-contact applications or showing signs of fastener corrosion (rusting nails or screws) indicates advanced decay that sanding can’t remedy. Projects in high-moisture environments like marine applications typically demand specialized alternatives such as composite materials or naturally rot-resistant woods rather than attempting to refinish deteriorating pressure-treated lumber.
Finishing Options After Sanding Pressure Treated Wood

After properly sanding pressure-treated wood, applying the right finish protects your investment and enhances its appearance. Selecting compatible products ensures the chemicals in the wood don’t interfere with the finish’s performance and durability.
Stains and Sealers Compatible with Treated Wood
Water-based stains offer excellent compatibility with pressure-treated lumber since they’re less likely to react with wood preservatives. These products penetrate effectively while allowing the wood to breathe, preventing moisture buildup that could lead to premature deterioration. Several manufacturers produce specialized stains formulated specifically for pressure-treated surfaces, offering improved adhesion and durability.
UV-resistant coatings provide crucial protection against the sun’s damaging rays, helping prevent the fading and graying commonly seen in outdoor wood projects. These products contain additives that block ultraviolet light, extending the wood’s color retention by up to 3-4 years compared to untreated surfaces.
For maximum protection, consider water-repellent sealers that create a barrier against moisture infiltration while still allowing the wood to release trapped moisture. Some quality sealers contain fungicides and mildewcides that provide additional protection against common outdoor wood problems.
Application Tips for Best Results
Testing finishes on an inconspicuous area first saves time and materials by confirming compatibility with your exact pressure-treated wood. Apply a small amount and wait 24 hours to check for proper adhesion, color results, and any adverse reactions with the wood preservatives.
Temperature and humidity significantly impact finish application success. Applying products in temperatures between 50-85°F with relative humidity below 80% creates optimal conditions for proper curing and adhesion.
Thin coats work better than thick applications, particularly with pressure-treated wood. Multiple thin layers (typically 2-3) provide more uniform coverage and better adhesion than a single heavy coat, which might peel or bubble due to interactions with wood preservatives.
Adequate drying time between coats ensures each layer properly bonds to the wood. Most manufacturers recommend waiting 4-24 hours between applications, though this varies based on environmental conditions and product specifications.
Regular maintenance extends the life of your finished project. Inspect treated surfaces annually and reapply finish every 2-3 years for vertical surfaces and every 1-2 years for horizontal surfaces that experience more direct weather exposure.
Conclusion
Sanding pressure-treated wood is indeed possible but requires careful consideration of safety precautions and proper techniques. With the right protective gear respiratory masks gloves and safety goggles you can safely transform your outdoor projects while minimizing health risks.
Remember to choose appropriate sandpaper grits use proper sanding techniques and always work in well-ventilated areas. Not all treated wood should be sanded we’ve outlined when to sand and when to replace damaged pieces.
Finishing your freshly sanded project with compatible water-based products will protect your work and enhance its appearance for years to come. By following our guidelines you’ll be able to maintain and beautify your pressure-treated wood projects safely and effectively.
Frequently Asked Questions
Is it safe to sand pressure-treated wood?
Yes, sanding pressure-treated wood is safe when proper precautions are taken. Always wear a NIOSH-approved respirator, safety goggles, and chemical-resistant gloves. Work in a well-ventilated area, preferably outdoors, to minimize dust accumulation. Use a vacuum with a HEPA filter to collect dust and dispose of debris according to local regulations.
How long should pressure-treated wood dry before sanding?
Pressure-treated wood should dry completely before sanding, which typically takes 2-6 months depending on climate conditions. The wood should feel dry to the touch and show no signs of surface moisture. Sanding wet treated lumber can release more chemicals and result in an uneven finish.
What grit sandpaper should I use on pressure-treated wood?
Start with coarse grit (60-80) to remove deep stains and splinters. Progress to medium grit (100-120) for smoothing rough areas. Finish with fine grit (150-180) to prepare the surface for finishing applications. Avoid over-sanding, as this can remove too much of the protective treatment.
Can I use a power sander on pressure-treated wood?
Yes, you can use a power sander like a random-orbit sander for large surfaces such as decks. However, be cautious around edges and details. Hand sanding is recommended for furniture pieces to preserve detail. Always use dust collection systems with HEPA filters regardless of the sanding method.
When should I replace rather than sand pressure-treated wood?
Replace wood rather than sand if it: contains arsenic-based preservatives (pre-2004 CCA treatment), shows signs of chemical leaching (crystallization on surface), has severe structural damage, or excessive rot/decay. Also replace if boards are warped beyond repair or in high-moisture environments where sanding would compromise the wood’s protective qualities.
What finishing products work best on sanded pressure-treated wood?
Water-based stains and sealers specifically formulated for treated wood work best. Look for products labeled for use on pressure-treated lumber with UV-resistant properties. Oil-based products can be used but require longer drying times. Always wait 2-3 months after installation before applying any finish, even after sanding.
How often should I resand and refinish my pressure-treated wood deck?
Resand and refinish every 2-3 years for heavily used or exposed surfaces, or when you notice significant fading, peeling, or rough texture. Inspect annually for signs of wear. Vertical surfaces typically require less frequent maintenance than horizontal surfaces like deck floors, which endure more direct exposure to elements.
Can sanding remove the green tint from pressure-treated wood?
Sanding can reduce but not completely eliminate the greenish tint, which comes from copper-based preservatives that penetrate deeply into the wood. Light sanding affects only the surface, while the internal treatment remains. Over time, natural weathering will gradually fade the color to a silver-gray if left unfinished.


