Wood filler is a DIY enthusiast’s best friend when repairing damaged furniture or woodwork, but many wonder: can wood filler actually be stained? We’ve asked this question ourselves many times while tackling restoration projects.
The good news is that yes, most wood fillers can be stained—but not all fillers accept stain equally. We’ll show you exactly which types work best with stains and how to achieve seamless results that blend perfectly with your original wood. With the right techniques, your repairs will become virtually invisible, even to the trained eye.
What Is Wood Filler and How Does It Work
Wood filler is a paste-like substance designed to repair imperfections in wood surfaces. It’s composed primarily of wood fibers, cellulose, or sawdust mixed with binders like epoxy, latex, or other adhesives. These materials combine to create a malleable putty that hardens when dry, effectively filling gaps, cracks, and holes in wooden surfaces.
The application process involves pressing the filler into damaged areas and allowing it to cure completely. Once dried, wood filler creates a solid, durable patch that restores structural integrity to the damaged section. Most fillers can be sanded smooth after curing, creating a surface that’s level with the surrounding wood.
Wood fillers come in various formulations, each serving different purposes:
- Water-based fillers: Easy to clean up and dry quickly
- Solvent-based fillers: More durable and weather-resistant
- Epoxy-based fillers: Offer exceptional strength for larger repairs
- Latex fillers: Provide flexibility and good adhesion
The working mechanism of wood filler relies on its ability to bond with the existing wood structure while maintaining enough rigidity to support the repaired area. Unlike wood putty, which remains somewhat pliable, properly cured wood filler becomes nearly as hard as the surrounding wood, making it suitable for repairs on load-bearing or frequently used wooden items.
The effectiveness of wood filler depends largely on proper preparation of the damaged area. Cleaning out loose debris, ensuring the surface is dry, and applying the filler in thin layers for deep repairs all contribute to successful results. Many professional woodworkers use wood filler not just for repairs but also for improving the appearance of wood by filling natural imperfections like knots and grain irregularities.
Can Wood Filler Be Stained? The Truth Revealed

Most wood fillers don’t accept stain in the same way natural wood does. While some fillers can absorb stain to varying degrees, achieving a perfect match with surrounding wood often proves challenging. Stainable wood fillers exist specifically to address this issue, but results vary depending on the product and application technique.
Types of Wood Fillers That Accept Stain
Stainable wood fillers are formulated specifically to absorb stains and blend seamlessly with surrounding wood. These specialized products contain components that mimic wood’s natural absorption properties, allowing for better color matching when stained. DAP Premium Wood Filler stands out as an option that can be customized by mixing it with stain before application, creating a more integrated look with the stained wood surface. Some woodworkers enhance compatibility by custom tinting their wood fillers, mixing stain directly into the product before application to achieve closer color matching with the surrounding wood grain.
Types of Wood Fillers That Resist Stain
Standard wood fillers typically resist staining because they fill the wood’s pores, preventing stain from penetrating evenly across the surface. This resistance creates noticeable color differences between filled areas and natural wood, making repairs more visible after staining. Oil-based fillers particularly struggle with stain absorption, often requiring additional finishing techniques to match surrounding wood tones. The composition of these resistant fillers typically includes synthetic materials that don’t have the same porosity as wood, limiting their ability to accept stain in the same manner as natural wood fibers. Achieving an even finish with these products requires careful preparation and potentially specialized techniques to disguise the filled areas.
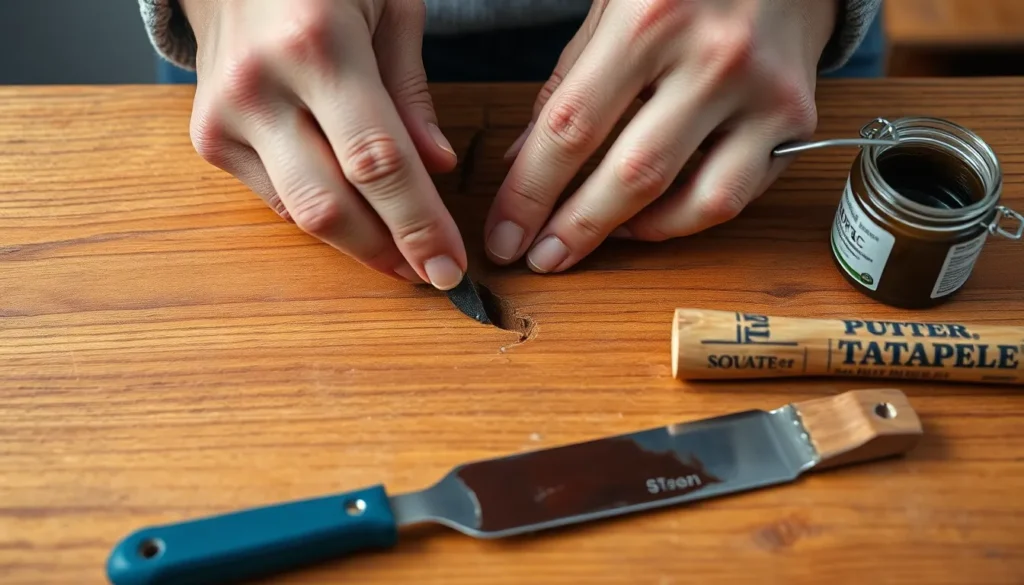
How to Properly Stain Wood Filler

Staining wood filler effectively requires exact techniques to achieve the best color match with surrounding wood. We’ve compiled proven methods that help overcome the common challenge of filler absorbing stain differently than natural wood.
Preparing the Surface for Staining
Surface preparation creates the foundation for successful wood filler staining. Clean the repair area thoroughly, removing all dust, debris, and existing finish from imperfections before applying filler. Testing compatibility by applying stain to a small section of dried filler helps verify absorption rates and potential color differences. Sand the filled area lightly with 120-220 grit sandpaper after the filler has completely dried, creating a smooth transition between the filler and surrounding wood for more even stain penetration.
Best Staining Techniques for Wood Filler
Applying stain to the surrounding wood before filling imperfections significantly reduces color-matching challenges later. Custom-tinting stainable fillers like DAP Premium Wood Filler by mixing them directly with stain before application improves color integration dramatically. Apply the tinted filler slightly overfilled, then smooth with a putty knife for optimal results. Oil-based stains typically provide better penetration for many wood fillers compared to water-based alternatives. After the filler dries (minimum 2 hours), sand it flush with the wood surface, apply a second coat of stain if needed, then seal with clear polyurethane or lacquer to visually blend the filler with natural wood. For critical projects where perfect matching is essential, consider replacing filler with matching wood plugs instead of relying on stained filler.
Common Challenges When Staining Wood Filler

Even though manufacturers’ claims about “stainable” wood fillers, achieving a seamless match with the surrounding wood remains difficult. Research shows that commercial fillers consistently underperform when it comes to stain absorption and color matching.
Color Matching Issues
Stainable wood fillers rarely absorb pigments identically to natural wood, creating visible discrepancies after staining. Most commercial products labeled as “stainable” exhibit inconsistent coloration compared to surrounding wood surfaces. Post-stain application typically leaves filled areas appearing either lighter or darker than the original wood, immediately drawing attention to repairs. Even premium products like Minwax Stainable Wood Filler achieve close matches only under exact conditions, such as when using lighter stain colors. The color discrepancy becomes particularly noticeable on larger repairs or in areas with prominent grain patterns where the filler’s uniform appearance contrasts with wood’s natural variation.
Absorption Differences Between Wood and Filler
Wood fillers lack the porous grain structure of natural wood, resulting in dramatically different stain penetration. Natural wood contains complex cellular structures that absorb stain in a distinctive pattern, whereas fillers consist of compressed materials with limited porosity. This fundamental difference creates uneven stain absorption, leading to patchy or blotchy finishes wherever filler has been applied. Commercial fillers, regardless of their “stainable” designation, simply can’t replicate wood’s natural absorption properties. DAP Premium Wood Filler offers a partial solution by allowing direct mixing with stain before application, improving color consistency somewhat. Many woodworkers find that filled areas need multiple applications of stain to achieve even a close match, and complete uniformity often remains elusive due to these inherent material differences.
Alternative Solutions for Matching Wood Filler to Surrounding Wood

Using Wood Dust and Adhesive Mixtures
Wood dust mixtures create custom fillers that better match the surrounding wood’s natural appearance. Combining fine sawdust from your project with adhesives like Old Brown Glue produces a filler that absorbs stain more similarly to natural wood. This technique works particularly well for species with distinctive grain patterns or colors that commercial fillers struggle to match. The sawdust carries the same natural pigmentation as your workpiece, giving the repair a more authentic look when stained.
Applying Color After Filling
Post-application coloring techniques provide answers when standard staining methods fail to create seamless repairs. Acrylic paints thinned to a wash consistency can be brushed over dried filler in layers until the color matches surrounding wood. Artist oil paints in earthy tones like raw sienna, burnt sienna, and burnt umber blend beautifully to replicate various wood hues. Wood-tone markers or Sharpies offer quick touch-ups for small filled areas, though they may require periodic reapplication and clear coat protection to maintain color consistency.
Pre-Tinted Wood Putty Options
Pre-tinted wood putties eliminate the need for staining altogether in many repair scenarios. Minwax Wood Putty comes in colors formulated to match popular Minwax stain finishes, making it ideal for minor repairs on already-finished surfaces. These non-hardening putties stay slightly pliable, accommodating the natural expansion and contraction of wood while maintaining their color. Their non-hardening properties make them perfect for small nail holes, dents, and surface scratches where structural strength isn’t required.
Custom-Mixed Stainable Fillers
Premium stainable fillers offer customization options for better color integration with surrounding wood. DAP Premium Wood Filler can be mixed directly with oil-based stains before application to achieve more consistent coloration. Famowood Oil-Based Putty blends effectively with gel stains like General Finishes Gel Stain, creating rich, deep tones that complement darker woods. These specialized products bridge the gap between traditional fillers and the need for seamless repairs, though they still require testing on scrap wood to verify color accuracy before application on your project.
Best Wood Fillers for Staining Projects

Finding wood fillers that genuinely accept stain evenly presents a important challenge for woodworkers. Most conventional fillers absorb stain differently than natural wood, creating noticeable color discrepancies in finished projects. Several specialized products, but, offer improved stain compatibility when used with the right techniques.
DAP Premium Wood Filler stands out as a top contender for stainable repairs. This product performs best when pre-tinted by directly mixing with oil-based stains before application. Many experienced woodworkers achieve excellent results by staining their wood first, then customizing the filler’s color to match the dried stain.
Famowood Oil-Based Putty works exceptionally well with oil-based finishes like General Finishes Gel Stain. Adding darker stains such as Java directly into the putty creates a closer color match for dark-toned wood projects. The oil base in this formula contributes to its superior stain absorption compared to water-based alternatives.
For optimal results with any stainable filler, consider these practical approaches:
- Apply stain to the wood before filling gaps, making color matching substantially easier
- Recognize that most “stainable” fillers still require additional tinting for seamless blending
- Enhance color accuracy by adding acrylic paints, artist oils (raw sienna, burnt umber), or stain-compatible pigments like Mixol
- Choose oil-based fillers when staining is essential, as they generally accept stain more consistently
While perfect matches remain challenging, these specialized products combined with strategic application techniques minimize visibility of repairs in stained woodworking projects.
Conclusion
Staining wood filler successfully requires both the right products and proper techniques. While truly seamless results remain challenging even with premium “stainable” fillers we’ve discussed they can still provide satisfactory repairs when applied correctly.
For best results we recommend using specialized products like DAP Premium Wood Filler or creating custom mixtures with wood dust. Pre-tinting your filler before application and proper surface preparation significantly improve your chances of achieving a natural-looking finish.
Remember that wood fillers will never perfectly match natural wood’s grain and absorption properties. For critical visible areas consider alternative approaches like wood plugs or veneer patches instead of relying solely on filler answers.
With the techniques we’ve shared you’ll be better equipped to tackle your wood repair projects and achieve results that blend beautifully with the surrounding wood.
Frequently Asked Questions
Can wood filler be stained to match surrounding wood?
Yes, wood filler can be stained, but results vary by product. Stainable wood fillers are specifically designed to accept stain, though they rarely match natural wood perfectly. For best results, use products like DAP Premium Wood Filler that can be pre-tinted with stain before application. Even with specialized products, expect some color difference between the filler and natural wood.
What is wood filler made of?
Wood filler is a paste-like substance made from wood fibers, cellulose, or sawdust mixed with binders such as epoxy or latex. These components create a material that hardens when dry and can be sanded smooth. Different formulations exist, including water-based, solvent-based, epoxy-based, and latex fillers, each designed for specific repair needs.
How do I apply wood filler for the best results?
For optimal results, clean the damaged area thoroughly and ensure it’s dry. Press the filler firmly into cracks or holes, slightly overfilling the space. Allow it to cure completely according to the manufacturer’s instructions. Once dry, sand the area smooth with progressively finer sandpaper until it’s level with the surrounding wood surface.
Why doesn’t wood filler stain the same as natural wood?
Wood filler lacks the porous grain structure of natural wood, causing it to absorb stain differently. Most fillers contain synthetic binders that resist stain penetration, leading to color discrepancies. Even “stainable” fillers can’t perfectly replicate wood’s natural absorption properties because they don’t have the cellular composition that gives wood its characteristic staining qualities.
What’s the best way to color-match wood filler to surrounding wood?
For the best color match, consider pre-tinting stainable fillers with stain before application. Alternatively, stain the wood before applying filler, or use post-application coloring with thinned acrylic or artist oils. Custom mixtures using fine sawdust from the same wood piece mixed with adhesive also produce good results. Always test on scrap wood first.
Are there alternatives to commercial wood fillers for better stain acceptance?
Yes, a popular alternative is mixing fine sawdust from the wood you’re repairing with wood glue to create a custom filler. This homemade mixture often accepts stain more naturally than commercial fillers. For small repairs, wood putty that comes pre-tinted in various wood tones eliminates the need for staining altogether.
How long should wood filler dry before staining?
Wood filler should dry completely before staining, which typically takes 24 hours, though this varies by product and environmental conditions. Rushing this process can result in poor stain absorption and cracking. Check the manufacturer’s instructions for specific drying times, and when in doubt, allow extra time, especially for deeper repairs.
Can I sand wood filler after it’s been stained?
It’s not recommended to sand wood filler after staining, as this will remove the stain. The proper sequence is to apply filler, let it dry completely, sand it smooth, and then apply stain. If adjustments are needed after staining, light touch-ups with matching stain or tinted finishes can be applied to the filler area.


